---
Order: 11
Area: python
TOCTitle: Deploy with containers
ContentId: e3f4006c-ab3f-4444-909b-fb045afcdf09
PageTitle: Deploy Python web apps to Azure App Service using Docker containers
DateApproved: 01/14/2019
MetaDescription: How to create Docker containers for Python web apps and deploy to Azure App Service
MetaSocialImage: images/tutorial/social.png
---
# Deploy Python using Docker containers
This tutorial walks you through the full process of containerizing an existing Python application using [Docker](https://www.docker.com/), pushing the app image to a Docker registry, then deploying the image to [Azure App Service](https://azure.microsoft.com/services/app-service/containers/), all within Visual Studio Code. The tutorial also demonstrates how to use base container images that include production-ready web servers (uwsgi and nginx), and how to configure those servers for both [Django](https://www.djangoproject.com/) and [Flask](http://flask.pocoo.org/) web apps, which is helpful to know no matter what your deployment target.
If you have any problems, feel free to file an issue for this tutorial in the [VS Code documentation repository](https://github.com/Microsoft/vscode-docs/issues).
## An introduction to containers
Docker is a system that allows you to deploy and run apps using **containers** rather than setting up dedicated environments like virtual machines. A container is a lightweight runtime environment that shares the resources of the host operating system with other containers. Docker is the layer that sits above the operating system to manage resources on behalf of containers.
A container is specifically an instance of a Docker **image**, an executable package that contains everything needed to run your app: app code, configuration files, runtimes, and all of app's dependencies. An image can be used to instantiate any number of identical containers, which is especially useful when scaling out a cloud-based web app. Because container images are much smaller than virtual machine images, instances can be started and stopped much more quickly than virtual machines, enabling your app to be highly responsive to varying loads at a minimal cost. (When used to scale web apps, containers are often managed in **clusters**, which are then managed by an orchestration agent such as [Kubernetes](https://wikipedia.org/wiki/Kubernetes).)
Images, for their part, are built in multiple **layers**. The lowest or **base** layers of an image are typically common elements like the Python runtime; the higher layers the contain more specialized elements like your app code. Because of layering, it takes very little time to rebuild an image when changing only the top layer with your app code. Similarly, when you push an image to a **container registry**, an online repository for images from which you can deploy to cloud services like Azure, only the modified layers need be uploaded and redeployed. As a result, using containers has only a small impact on your develop-test-deploy loop.
You will experience the basics of containers and images in the course of this tutorial. For additional background, including helpful diagrams, refer to the [Docker documentation](https://docs.docker.com/get-started/).
## Prerequisites
To complete this tutorial you need an Azure account, Docker, Visual Studio Code with the necessary extensions, a Python environment, and an app that you'd like to deploy using containers.
### Azure account
If you don't have an Azure account, [sign up now](https://azure.microsoft.com/free/?utm_source=campaign&utm_campaign=vscode-tutorial-docker-extension&mktingSource=vscode-tutorial-docker-extension) for a free 30-day account with $200 in Azure credits to try out any combination of services.
### Visual Studio Code, Docker, and Python runtime
Install the following software:
- [Visual Studio Code](https://code.visualstudio.com/)
- [Docker Community Edition](https://www.docker.com/community-edition). To verify your installation, run the command `docker --version`, which should show output like `Docker version 18.06.1-ce, build e68fc7a`.
- Python and the Python extension as described on [Python Tutorial - Prerequisites](/docs/python/python-tutorial.md).
### Docker and Azure App Service extensions for VS Code
The **Docker extension** helps you manage local Docker images, provides Docker commands, and simplifies deployment of app images to Azure. You can find an overview of the extension on the [vscode-docker GitHub repository](https://github.com/Microsoft/vscode-docker).
> Install the Docker extension
The **Azure App Service extension** helps you create, manage, and deploy Web Apps to Azure App Service on Linux. For details, explore the [App Service extension tutorial](/tutorials/app-service-extension/getting-started.md) or visit the [vscode-azureappservice GitHub repository](https://github.com/Microsoft/vscode-azureappservice).
> Install the Azure App Service extension
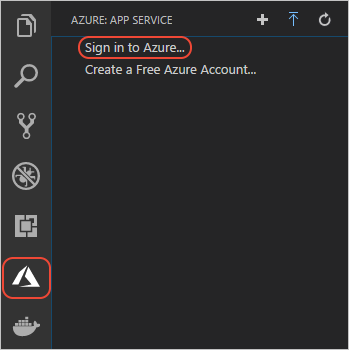
### Sign in to Azure
Once the extensions are installed, sign into your Azure account by navigating to the **Azure: App Service** explorer, select **Sign in to Azure**, and follow the prompts.
After signing in, verify that you see the email account of your Azure around in the Status Bar and your subscription(s) in the **Azure: App Service** explorer:


> **Note**: If you see the error **"Cannot find subscription with name [subscription ID]"**, this may be because you are behind a proxy and unable to reach the Azure API. Configure `HTTP_PROXY` and `HTTPS_PROXY` environment variables with your proxy information in your terminal:
>
> ```sh
> # macOS/Linux
> export HTTPS_PROXY=https://username:password@proxy:8080
> export HTTP_PROXY=http://username:password@proxy:8080
>
> #Windows
> set HTTPS_PROXY=https://username:password@proxy:8080
> set HTTP_PROXY=http://username:password@proxy:8080
> ```
### App code
If you don't already have an app you'd like to work with, use one of the following samples, which already include the Docker-related files described later in this tutorial:
- [python-sample-vscode-django-tutorial](https://github.com/Microsoft/python-sample-vscode-django-tutorial), which is the result of following the [Django Tutorial](/docs/python/tutorial-django.md).
- [python-sample-vscode-flask-tutorial](https://github.com/Microsoft/python-sample-vscode-flask-tutorial), which is the result of following the [Flask Tutorial](/docs/python/tutorial-flask.md).
After verifying that your app runs properly, generate a `requirements.txt` file (using `pip freeze > requirements.txt`, for example) so that those dependencies can be automatically installed in the Docker image. The samples each include a `requirements.txt` file.
## Create a container registry
As mentioned earlier, a container registry is an online repository for container images that allows a cloud service, like Azure App Service, to acquire the image whenever it needs to start a container instance. Because the registry manages images separate from container instances, the same image in a registry can be used to start any number of concurrent instances, as happens when scaling out a web app to handle increased loads.
Because setting up a registry is a one-time affair, you do that step now before creating images that you then push to that registry.
Registry options include the following:
- The [Azure Container Registry (ACR)](https://azure.microsoft.com/services/container-registry/), a private, secure, hosted registry for your images.
- [Docker Hub](https://hub.docker.com/), Docker's own hosted registry that provides a free way to share images.
- A private registry running on your own server, as described on [Docker registry](https://docs.docker.com/registry/) in the Docker documentation.
To create an Azure Container Registry, as shown in this tutorial, do the following:
1. Follow the first part of [Quickstart: Create a container registry using the Azure portal](https://docs.microsoft.com/azure/container-registry/container-registry-get-started-portal) through the "Log in to ACR" section. You don't need to complete the sections "Push image to ACR" and later because you do those steps within VS Code as part of this tutorial.
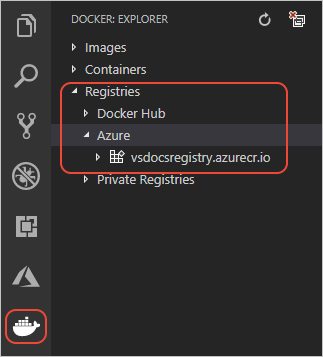
1. Make sure that the registry endpoint you created is visible under **Registries** in the **Docker** explorer of VS Code:
## Create a container image
A container image is a bundle of your app code and its dependencies. To create an image, Docker needs a `Dockerfile` that describes how to structure the app code in the container and how to get that code running. The `Dockerfile`, in other words, is the template for your image. The Docker extension helps you create these files with customization for production servers.
> **Note**: The Python samples linked earlier in this article already contain the necessary Docker files. The instructions here help you create files for an app of your own.
## Create the Docker files
1. In VS Code, open the **Command Palette** (`kb(workbench.action.showCommands)`) and select the **Docker: Add Docker files to workspace** command.
1. When the prompt appears after a few moments, select **Python** as the app type.
1. Specify the port on which your app listens, such as 8000 (as in the Django sample) or 5000 (as in the Flask sample). The port value ends up only in the Docker compose files (see below) and have no impact on your container image.
1. With all this information, the Docker extension creates the following files:
- The `Dockerfile` file describes the contents of your app's layer in the image. Your app layer is added on top of the base image indicated in the `Dockerfile`.. By default, the name of the image is the name of the workspace folder in VS Code.
- A `.dockerignore` file that reduces image size by excluding files and folders that aren't needed in the image, such as `.git` and `.vscode`. For Python, add another line to the file for `__pycache__`.
- `docker-compose.yml` and `docker-compose.debug.yml` files that are used with [Docker compose](https://docs.docker.com/compose/overview/). For the purposes of this tutorial, you can ignore or delete these files.
> **Tip:** VS Code provides great support for Docker files. See the [Working with Docker](/docs/azure/docker.md) article to learn about rich language features like smart suggestions, completions, and error detection.
## Using production servers
For Python, the Docker extension by default specifies the base image `python:alpine` in the `Dockerfile` and includes commands to run only the Flask development server. These defaults obviously don't accommodate Django, for one, and when deploying to the cloud, as with Azure App Service, you should also use production-ready web servers instead of a development server. (If you're used Flask, you're probably accustomed to seeing the development server's warning in this regard!)
For this reason, you need to modify the `Dockerfile` to use a base image with production servers, then provide the necessary configuration for your app. The following sections provide details for both Flask and Django.
### Changes for Flask apps
A good base image for Flask is `tiangolo/uwsgi-nginx-flask:python3.6-alpine3.7`, which is also available for other versions of Python (see the [tiangolo/uwsgi-nginx-flask repository](https://github.com/tiangolo/uwsgi-nginx-flask-docker) on GitHub). This image already contains Flask and the production-ready uwsgi and nginx servers.
By default, the image assumes that (a) your app code is located in an `app` folder, (b) the Flask app object is named `app`, and (c) the app object is located in `main.py`. Because your app may have a different structure, you can indicate the correct folders in the Dockerfile and provide the necessary parameters the uwsgi server in a `uwsgi.ini` file.
The following steps summarize the configuration used in the [python-sample-vscode-flask-tutorial](https://github.com/Microsoft/python-sample-vscode-flask-tutorial) app, which you can adapt for your own code.
1. The `Dockerfile` indicates the location and name of the Flask app object, the location of static files for nginx, and the location of the `uwsgi.ini` file. (The `Dockerfile` in the sample contains further explanatory comments that are omitted here.)
```dockerfile
FROM tiangolo/uwsgi-nginx-flask:python3.6-alpine3.7
ENV LISTEN_PORT=5000
EXPOSE 5000
# Indicate where uwsgi.ini lives
ENV UWSGI_INI uwsgi.ini
# Tell nginx where static files live.
ENV STATIC_URL /hello_app/static
# Set the folder where uwsgi looks for the app
WORKDIR /hello_app
# Copy the app contents to the image
COPY . /hello_app
# If you have additional requirements beyond Flask (which is included in the
# base image), generate a requirements.txt file with pip freeze and uncomment
# the next three lines.
#COPY requirements.txt /
#RUN pip install --no-cache-dir -U pip
#RUN pip install --no-cache-dir -r /requirements.txt
```
1. The `uwsgi.ini` file, which is in the `hello_app` folder of the sample, provides configuration arguments for the uwsgi server. For the sample, the configuration below says that the Flask app object is found in the `hello_app/webapp.py` module, and that it's named (that is, "callable" as) `app`. The other values are additional common uwsgi settings:
```ini
[uwsgi]
module = hello_app.webapp
callable = app
uid = 1000
master = true
threads = 2
processes = 4
```
### Changes for Django apps
A good base image for Django is `tiangolo/uwsgi-nginx:python3.6-alpine3.7`, which is also available for other versions of Python (see the [tiangolo/uwsgi-nginx repository](https://github.com/tiangolo/uwsgi-nginx-docker) on GitHub).
This base image already contains the production-ready uwsgi and nginx servers, but does not include Django. It's also necessary to provide settings to uwsgi so it can find the app's startup code.
The following steps summarize the configuration used in the [python-sample-vscode-django-tutorial](https://github.com/Microsoft/python-sample-vscode-django-tutorial) app that you can adapt for your own code.
1. Make sure you have a `requirements.txt` file in your project that contains Django and its dependencies. You can generate `requirements.txt` using the command `pip freeze > requirements.txt`.
1. In your Django project's `settings.py` file, add the root URL to which you intend to deploy the app to the `ALLOWED_HOSTS` list. For example, the following code assumes deployment to an Azure App Service (azurewebsites.net) named "vsdocs-django-sample-container":
```python
ALLOWED_HOSTS = [
# Example host name only; customize to your specific host
"vsdocs-django-sample-container.azurewebsites.net"
]
```
Without this entry, you'll eventually get all the way through the deployment only to see a "DisallowedHost" message that instructs to you add the domain to `ALLOWED_HOSTS`, which requires that you rebuild, push, and redeploy the image all over again!
1. Create a `uwsgi.ini` file in the Django project folder (alongside `manage.py`) that contains startup arguments for the uwsgi server. In the sample, the Django project is in a folder called `web_project`, which is where the `wsgi.py` and `setting.py` files live.
```ini
[uwsgi]
chdir = .
module = web_project.wsgi:application
env = DJANGO_SETTINGS_MODULE=web_project.settings
uid = 1000
master = true
threads = 2
processes = 4
```
1. Modify the `Dockerfile` to indicate the location of `uwsgi.ini`, set the location of static files for nginx, and make sure the SQLite database file is writable. (The `Dockerfile` in the sample contains further explanatory comments that are omitted here.)
```dockerfile
FROM tiangolo/uwsgi-nginx:python3.6-alpine3.7
ENV LISTEN_PORT=8000
EXPOSE 8000
# Indicate where uwsgi.ini lives
ENV UWSGI_INI uwsgi.ini
# Tell nginx where static files live (as typically collected using Django's
# collectstatic command.
ENV STATIC_URL /app/static_collected
# Copy the app files to a folder and run it from there
WORKDIR /app
ADD . /app
# Make app folder writable for the sake of db.sqlite3, and make that file also writable.
RUN chmod g+w /app
RUN chmod g+w /app/db.sqlite3
# Make sure dependencies are installed
RUN python3 -m pip install -r requirements.txt
```
> **Note**: When building a Docker image on Windows, you typically see the message below, which is why the Dockerfile shown here includes the two `chmod` commands. If need to make other files writable, add the appropriate `chmod` commands to your Dockerfile.
>
> ```output
> SECURITY WARNING: You are building a Docker image from Windows against a non-Windows Docker host. All files and directories added to build context will have '-rwxr-xr-x' permissions. It is recommended to double check and reset permissions for sensitive files and directories.
> ```
## Build and test the image
With the necessary `Dockerfile` in place, you're ready to build the Docker image and run it locally:
1. Make sure that Docker is running on your computer.
1. On the VS Code **Command Palette** (`kb(workbench.action.showCommands)`), select **Docker: Build Image**.
1. When prompted for the Docker file, choose the `Dockerfile` that you created in the previous section. (VS Code remembers your selection so you won't need to enter it again to rebuild.)
1. When prompted for a name to give the image, use a name that follows the conventional form of `/:`, where `` is typically `latest`. Here are some examples:
```sh
# Examples for Azure Container Registry, prefixed with the registry name
vsdocsregistry.azurecr.io/python-sample-vscode-django-tutorial:latest
vsdocsregistry.azurecr.io/python-sample-vscode-flask-tutorial:latest
vsdocsregistry.azurecr.io/myexpressapp:latest
# Examples for Docker hub, prefixed with your username
vsdocs-team/python-sample-vscode-django-tutorial:latest
vsdocs-team/python-sample-vscode-flask-tutorial:latest
vsdocs-team/myexpressapp:latest
```
1. Each step of Docker's build process appears in the VS Code Terminal panel, including any errors that occur running the steps in the `Dockerfile`.
> **Tip**: every time you run the **Docker: Build image** command, the Docker extension opens another Terminal in VS Code in which to run the command. You can close each terminal once the build is complete. Alternately, you can reuse the same terminal to build the image by scrolling up in the command history using the up arrow.
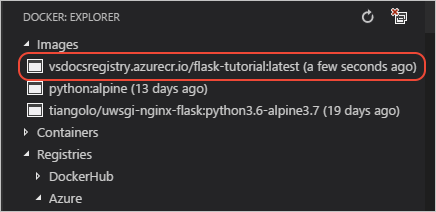
1. When the build is complete, the image appears in the **Docker** explorer under **Images**:
1. Run and test your container locally by using the following command, replacing `` with your specific image, and changing the port numbers as needed. For web apps, you can then open browser to `localhost:` to see the running app.
```bash
# For Flask sample
docker run --rm -it -p 5000:5000
# For Django sample
docker run --rm -it -p 8000:8000
```
### Two useful features of the Docker extension
The Docker extension provides a simple UI to manage and even run your images rather than using the Docker CLI. Just expand the **Image** node in the Docker explorer, right-click any image, and select any of the menu items:

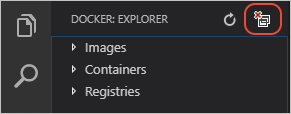
In addition, on the top of the Docker explorer, next to the refresh button, is a button for **System Prune**. This command cleans up any dangling and otherwise unused images on your local computer. It's a good idea to periodically use the command to reclaim space on your file system.
## Push the image to a registry
Once you're confident that your image works, the next step is to push it to your container registry:
1. On the **Command Palette** (`kb(workbench.action.showCommands)`), select **Docker: Push**.
1. Choose the image you just built to push the image to the registry; upload progress appears in the Terminal.
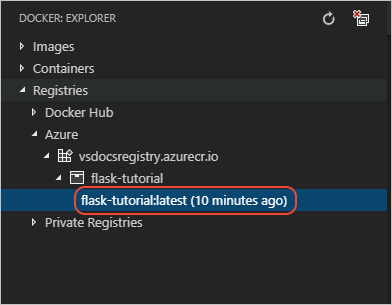
1. Once completed, expand the **Registries** > **Azure** (or **DockerHub**) node in the **Docker** explorer, then expand the registry and image name to see the exact image. (You may need to refresh the **Docker** explorer.)

> **Tip:** The first time you push an image, you see that VS Code uploads all of the different layers that make up the image. Subsequent push operations, however, upload only those layers that have changed. Because it's typically only your app code that's changes, those uploads happen much more quickly, making for a tight edit-build-deploy-test loop. To see this, make a small change to your code, rebuild the image, and then push again to the registry. The whole process typically completes in a matter of seconds.
## Deploy the image to Azure
With an image built and pushed to a registry, you can use the Docker extension in VS Code to easily set up an Azure App Service running the container.
1. In the **Docker** explorer, expand **Registries** > **Azure**, then expand your registry node and the image name until you see the image with the `:latest` tag.
1. Right-click the image and select **Deploy Image to Azure App Service**.

1. Follow the prompts to select an Azure subscription, select or specify a resource group, specify a region, configure an App Service Plan (B1 is the least expensive), and specify a name for the site. The animation below illustrates the process.

A **Resource Group** is a named collection the different resources that make up an app. By assigning all the app's resources to a single group, you can easily manage those resources as a single unit. (For more information, see the [Azure Resource Manager overview](https://docs.microsoft.com/azure/azure-resource-manager/resource-group-overview) in the Azure documentation.)
An **App Service Plan** defines the physical resources (an underlying virtual machine) that hosts the running container. For this tutorial, B1 is the least expensive plan that supports Docker containers. (For more information, see [App Service plan overview](https://docs.microsoft.com/azure/app-service/azure-web-sites-web-hosting-plans-in-depth-overview) in the Azure documentation.)
The name of the App Service must be unique across all of Azure, so you typically use a company or personal name. For production sites, you typically configure the App Service with a separately registered domain name.
1. Creating the app service takes a few minutes, and you see progress in VS Code's Output panel.
1. Once completed, you **must** also add a setting named `WEBSITES_PORT` (notice the plural "WEBSITES") to the App Service to specify the port on which the container is listening, such as 5000 (in the Flask sample) or 8000 (in the Django sample). To do this, switch to the **Azure: App Service** explorer, expand the node for your new App Service (refresh if necessary), then right-click **Application Settings** and select **Add New Setting**. At the prompts enter `WEBSITES_PORT` as the key and the port number for the value.

1. The App Service restarts automatically when you change settings. You can also right-click the App Service and select **Restart** at any time.
1. After the service has restarted, browse the site at `http://.azurewebsites.net`. You can `kbstyle(Ctrl+click)` the URL in the Output panel, or right-click the App Service in the **Azure: App Service** explorer and select **Browse Website**.
## Make changes and redeploy
Because you inevitably make changes to your app, you end up rebuilding and redeploying your container many times. Fortunately, the process is simple:
1. Make changes to your app and test locally.
1. Rebuild the Docker image. If you change only app code, the build should take only a few seconds.
1. Push your image to the registry. If again you change nothing but app code, only that small layer needs to be pushed and the process typically completes in a few seconds.
1. In the **Azure: App Service** explorer, right-click the appropriate App Service and select **Restart**. Restarting an app service automatically pulls the latest container image from the registry.
1. After about 15-20 seconds, visit the App Service URL again to check the updates.
## Viewing logs
From within VS Code, you can view (or "tail") logs from the running site on Azure App Service, which captures any output to the console as from `print` statements and routes them to the VS Code **Output** panel.
1. Find the app in the **Azure: App Service** explorer, right-click the app, and choose **Start Streaming Logs**.
1. Answer **Yes** when prompted to enable logging and restart the app. Once the app is restarted, the VS Code Output panel opens with a connection to the log stream.
1. After a few seconds, you see a message indicating that you are connected to the log-streaming service.
```bash
Connecting to log stream...
2018-09-27T20:14:26 Welcome, you are now connected to log-streaming service.
2018-09-27 20:14:59.269 INFO - Starting container for site
2018-09-27 20:14:59.270 INFO - docker run -d -p 24138:8000 --name vsdocs-django-sample-container_0 -e WEBSITES_PORT=8000 -e WEBSITE_SITE_NAME=vsdocs-django-sample-container -e WEBSITE_AUTH_ENABLED=False -e WEBSITE_ROLE_INSTANCE_ID=0 -e WEBSITE_INSTANCE_ID=02c705ae24eaf5f298e553a9c2724b9fe4485707c2d1c36137cd02931091e561 -e HTTP_LOGGING_ENABLED=1 vsdocsregistry.azurecr.io/python-sample-vscode-django-tutorial:latest
2018-09-27 20:15:06.216 INFO - Container vsdocs-django-sample-container_0 for site vsdocs-django-sample-container initialized successfully.
```
1. Navigate within the app to see additional output for various HTTP requests.
## Next steps
Congratulations on completing this walkthrough of deploying a containerized Python app to Azure App Service!
As noted earlier, you can learn more about the Docker and App Service extensions by visiting their respective repositories on GitHub: [vscode-docker](https://github.com/Microsoft/vscode-docker) and [vscode-azureappservice](https://github.com/Microsoft/vscode-azureappservice). Issues and contributions are also welcome.
To learn more about Azure services that you can use from Python, including data storage along with AI and Machine Learning services, visit [Azure Python Developer Center](https://docs.microsoft.com/python/azure/?view=azure-python).
There are also other Azure extensions for VS Code that you may find helpful. Just search on "Azure" in the Extensions explorer:
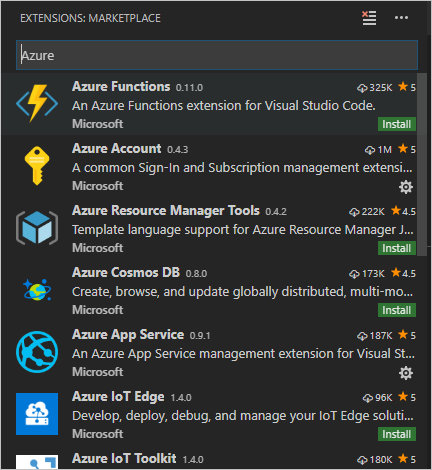
A few favorites include:
- [Cosmos DB](https://marketplace.visualstudio.com/items?itemName=ms-azuretools.vscode-cosmosdb)
- [Azure Functions](https://marketplace.visualstudio.com/items?itemName=ms-azuretools.vscode-azurefunctions)
- [Azure CLI Tools](https://marketplace.visualstudio.com/items?itemName=ms-vscode.azurecli)
- [Azure Resource Manager (ARM) Tools](https://marketplace.visualstudio.com/items?itemName=msazurermtools.azurerm-vscode-tools)
And again, if you've encountered any problems in the course of this tutorial, feel free to file an issue for this tutorial in the [VS Code documentation repository](https://github.com/Microsoft/vscode-docs/issues).