Buckets:


| # 나만의 첫 LangGraph 만들기[[building-your-first-langgraph]] | |
| 이제 LangGraph의 구성 요소를 이해했으니, 실제로 적용해보며 첫 번째 기능적 그래프를 만들어봅시다. 여기서는 알프레드의 이메일 처리 시스템을 구현할 것입니다. 알프레드는 다음과 같은 작업을 수행해야 합니다: | |
| 1. 들어오는 이메일 읽기 | |
| 2. 스팸 또는 정상 메일로 분류하기 | |
| 3. 정상 메일에 대한 임시 답장 작성하기 | |
| 4. 정상 메일일 경우 Mr. Wayne에게 정보 전달(출력만) | |
| 이 예제는 LLM 기반 의사결정을 포함하는 LangGraph 워크플로우를 어떻게 구조화할 수 있는지를 보여줍니다. (여기서는 별도의 툴이 사용되지 않으므로 Agent라고 부르진 않지만, LangGraph 프레임워크 학습에 초점을 둡니다.) | |
| 이 노트북을 따라가며 Google Colab에서 코드를 실행해볼 수 있습니다. | |
| ## 우리가 만들 워크플로우[[our-workflow]] | |
| 아래와 같은 워크플로우를 구현합니다: | |
| ## 환경 설정[[setting-up-our-environment]] | |
| 먼저 필요한 패키지를 설치합니다: | |
| ```python | |
| %pip install langgraph langchain_openai | |
| ``` | |
| 필요한 모듈을 임포트합니다: | |
| ```python | |
| import os | |
| from typing import TypedDict, List, Dict, Any, Optional | |
| from langgraph.graph import StateGraph, START, END | |
| from langchain_openai import ChatOpenAI | |
| from langchain_core.messages import HumanMessage | |
| ``` | |
| ## 1단계: 상태(State) 정의하기[[step-1-define-our-state]] | |
| 이메일 처리 워크플로우에서 알프레드가 추적해야 할 정보를 정의합니다: | |
| ```python | |
| class EmailState(TypedDict): | |
| # 처리 중인 이메일 | |
| email: Dict[str, Any] # 제목, 발신자, 본문 등 포함 | |
| # 이메일 분류(문의, 불만 등) | |
| email_category: Optional[str] | |
| # 스팸으로 분류된 이유 | |
| spam_reason: Optional[str] | |
| # 분석 및 결정 | |
| is_spam: Optional[bool] | |
| # 답장 생성 | |
| email_draft: Optional[str] | |
| # 처리 메타데이터 | |
| messages: List[Dict[str, Any]] # LLM과의 대화 추적 | |
| ``` | |
| > 💡 **팁:** 상태는 중요한 정보를 모두 담되, 불필요하게 비대해지지 않도록 하세요. | |
| ## 2단계: 노드 정의하기[[step-2-define-our-nodes]] | |
| 이제 각 처리 단계를 담당할 함수를 만듭니다: | |
| ```python | |
| # LLM 초기화 | |
| model = ChatOpenAI(temperature=0) | |
| def read_email(state: EmailState): | |
| """알프레드가 들어온 이메일을 읽고 기록합니다.""" | |
| email = state["email"] | |
| print(f"알프레드가 {email['sender']}로부터 온 메일(제목: {email['subject']})을 처리 중입니다.") | |
| return {} | |
| def classify_email(state: EmailState): | |
| """알프레드가 LLM을 사용해 이메일을 스팸/정상으로 분류합니다.""" | |
| email = state["email"] | |
| prompt = f""" | |
| 집사 알프레드로서, 이 이메일을 분석해 스팸인지 정상인지 판단하세요. | |
| 이메일: | |
| From: {email['sender']} | |
| Subject: {email['subject']} | |
| Body: {email['body']} | |
| 먼저 이 이메일이 스팸인지 판단하고, 스팸이라면 그 이유를 설명하세요. | |
| 정상 메일이라면 (문의, 불만, 감사, 요청 등) 카테고리도 분류하세요. | |
| """ | |
| messages = [HumanMessage(content=prompt)] | |
| response = model.invoke(messages) | |
| response_text = response.content.lower() | |
| is_spam = "spam" in response_text and "not spam" not in response_text | |
| spam_reason = None | |
| if is_spam and "reason:" in response_text: | |
| spam_reason = response_text.split("reason:")[1].strip() | |
| email_category = None | |
| if not is_spam: | |
| categories = ["inquiry", "complaint", "thank you", "request", "information"] | |
| for category in categories: | |
| if category in response_text: | |
| email_category = category | |
| break | |
| new_messages = state.get("messages", []) + [ | |
| {"role": "user", "content": prompt}, | |
| {"role": "assistant", "content": response.content} | |
| ] | |
| return { | |
| "is_spam": is_spam, | |
| "spam_reason": spam_reason, | |
| "email_category": email_category, | |
| "messages": new_messages | |
| } | |
| def handle_spam(state: EmailState): | |
| """알프레드가 스팸 메일을 처리합니다.""" | |
| print(f"알프레드는 이 메일을 스팸으로 분류했습니다. 이유: {state['spam_reason']}") | |
| print("이 메일은 스팸 폴더로 이동되었습니다.") | |
| return {} | |
| def draft_response(state: EmailState): | |
| """알프레드가 정상 메일에 임시 답장을 작성합니다.""" | |
| email = state["email"] | |
| category = state["email_category"] or "일반" | |
| prompt = f""" | |
| 집사 알프레드로서, 이 이메일에 정중한 임시 답장을 작성하세요. | |
| 이메일: | |
| From: {email['sender']} | |
| Subject: {email['subject']} | |
| Body: {email['body']} | |
| 이 이메일의 카테고리: {category} | |
| Mr. Hugg가 검토 후 개인화할 수 있도록 간단하고 전문적인 답장을 작성하세요. | |
| """ | |
| messages = [HumanMessage(content=prompt)] | |
| response = model.invoke(messages) | |
| new_messages = state.get("messages", []) + [ | |
| {"role": "user", "content": prompt}, | |
| {"role": "assistant", "content": response.content} | |
| ] | |
| return { | |
| "email_draft": response.content, | |
| "messages": new_messages | |
| } | |
| def notify_mr_hugg(state: EmailState): | |
| """알프레드가 Mr. Hugg에게 메일과 임시 답장을 전달합니다.""" | |
| email = state["email"] | |
| print("\n" + "="*50) | |
| print(f"주인님, {email['sender']}로부터 메일이 도착했습니다.") | |
| print(f"제목: {email['subject']}") | |
| print(f"카테고리: {state['email_category']}") | |
| print("\n검토하실 임시 답장을 준비했습니다:") | |
| print("-"*50) | |
| print(state["email_draft"]) | |
| print("="*50 + "\n") | |
| return {} | |
| ``` | |
| ## 3단계: 분기 로직 정의하기[[step-3-define-our-routing-logic]] | |
| 분류 후 어떤 경로로 갈지 결정하는 함수를 만듭니다: | |
| ```python | |
| def route_email(state: EmailState) -> str: | |
| """스팸 분류 결과에 따라 다음 단계를 결정합니다.""" | |
| if state["is_spam"]: | |
| return "spam" | |
| else: | |
| return "legitimate" | |
| ``` | |
| > 💡 **참고:** 이 라우팅 함수는 LangGraph가 분류 노드 이후 어떤 엣지를 따라갈지 결정할 때 호출됩니다. 반환값은 조건부 엣지 매핑의 키와 일치해야 합니다. | |
| ## 4단계: StateGraph 생성 및 엣지 정의[[step-4-create-the-stategraph-and-define-edges]] | |
| 이제 모든 것을 연결합니다: | |
| ```python | |
| # 그래프 생성 | |
| email_graph = StateGraph(EmailState) | |
| # 노드 추가 | |
| email_graph.add_node("read_email", read_email) | |
| email_graph.add_node("classify_email", classify_email) | |
| email_graph.add_node("handle_spam", handle_spam) | |
| email_graph.add_node("draft_response", draft_response) | |
| email_graph.add_node("notify_mr_hugg", notify_mr_hugg) | |
| # 엣지 시작 | |
| email_graph.add_edge(START, "read_email") | |
| # 흐름 정의 | |
| email_graph.add_edge("read_email", "classify_email") | |
| # 분기 추가 | |
| email_graph.add_conditional_edges( | |
| "classify_email", | |
| route_email, | |
| { | |
| "spam": "handle_spam", | |
| "legitimate": "draft_response" | |
| } | |
| ) | |
| # 마지막 엣지 | |
| email_graph.add_edge("handle_spam", END) | |
| email_graph.add_edge("draft_response", "notify_mr_hugg") | |
| email_graph.add_edge("notify_mr_hugg", END) | |
| # 그래프 컴파일 | |
| compiled_graph = email_graph.compile() | |
| ``` | |
| LangGraph에서 제공하는 특수한 `END` 노드를 사용합니다. 이는 워크플로우가 완료되는 지점을 나타냅니다. | |
| ## 5단계: 어플리케이션 실행하기[[step-5-run-the-application]] | |
| 정상 메일과 스팸 메일로 그래프를 테스트해봅니다: | |
| ```python | |
| # 정상 메일 예시 | |
| legitimate_email = { | |
| "sender": "john.smith@example.com", | |
| "subject": "서비스 문의", | |
| "body": "안녕하세요 Mr. Hugg, 동료의 추천으로 연락드립니다. 귀하의 컨설팅 서비스에 대해 더 알고 싶습니다. 다음 주에 통화 가능할까요? 감사합니다, John Smith" | |
| } | |
| # 스팸 메일 예시 | |
| spam_email = { | |
| "sender": "winner@lottery-intl.com", | |
| "subject": "당신은 $5,000,000에 당첨되었습니다!!!", | |
| "body": "축하합니다! 국제 복권에 당첨되셨습니다! 상금을 받으시려면 은행 정보와 수수료 $100을 보내주세요." | |
| } | |
| # 정상 메일 처리 | |
| print("\n정상 메일 처리 중...") | |
| legitimate_result = compiled_graph.invoke({ | |
| "email": legitimate_email, | |
| "is_spam": None, | |
| "spam_reason": None, | |
| "email_category": None, | |
| "email_draft": None, | |
| "messages": [] | |
| }) | |
| # 스팸 메일 처리 | |
| print("\n스팸 메일 처리 중...") | |
| spam_result = compiled_graph.invoke({ | |
| "email": spam_email, | |
| "is_spam": None, | |
| "spam_reason": None, | |
| "email_category": None, | |
| "email_draft": None, | |
| "messages": [] | |
| }) | |
| ``` | |
| ## 6단계: Langfuse로 메일 분류 에이전트 관찰하기 📡[[step-6-inspecting-our-mail-sorting-agent-with-langfuse]] | |
| 알프레드는 메일 분류 에이전트를 다듬으면서 디버깅에 지쳐갑니다. 에이전트는 본질적으로 예측 불가능하고 추적이 어렵기 때문입니다. 하지만 궁극의 스팸 감지 에이전트를 만들어 프로덕션에 배포하려면, 향후 모니터링과 분석을 위한 강력한 추적 기능이 필요합니다. | |
| 이를 위해 알프레드는 [Langfuse](https://langfuse.com/)와 같은 관찰 도구를 사용할 수 있습니다. | |
| 먼저 Langfuse를 설치합니다: | |
| ```python | |
| %pip install -q langfuse | |
| ``` | |
| LangChain도 설치합니다(Langfuse 사용 시 필요): | |
| ```python | |
| %pip install langchain | |
| ``` | |
| Langfuse API 키와 호스트 주소를 환경 변수로 추가합니다. [Langfuse Cloud](https://cloud.langfuse.com) 가입 또는 [셀프 호스팅](https://langfuse.com/self-hosting)으로 키를 발급받을 수 있습니다. | |
| ```python | |
| import os | |
| # 프로젝트 설정 페이지에서 키를 확인하세요: https://cloud.langfuse.com | |
| os.environ["LANGFUSE_PUBLIC_KEY"] = "pk-lf-..." | |
| os.environ["LANGFUSE_SECRET_KEY"] = "sk-lf-..." | |
| os.environ["LANGFUSE_HOST"] = "https://cloud.langfuse.com" # 🇪🇺 EU 리전 | |
| # os.environ["LANGFUSE_HOST"] = "https://us.cloud.langfuse.com" # 🇺🇸 US 리전 | |
| ``` | |
| [Langfuse `callback_handler`](https://langfuse.com/docs/integrations/langchain/tracing#add-langfuse-to-your-langchain-application)를 설정하고, 그래프 호출 시 `config={"callbacks": [langfuse_handler]}`로 인스트루먼트합니다. | |
| ```python | |
| from langfuse.langchain import CallbackHandler | |
| # LangGraph/Langchain용 Langfuse CallbackHandler 초기화(추적용) | |
| langfuse_handler = CallbackHandler() | |
| # 정상 메일 처리 | |
| legitimate_result = compiled_graph.invoke( | |
| input={"email": legitimate_email, "is_spam": None, "spam_reason": None, "email_category": None, "draft_response": None, "messages": []}, | |
| config={"callbacks": [langfuse_handler]} | |
| ) | |
| ``` | |
| 이제 알프레드는 LangGraph의 실행 내역을 Langfuse에 기록하여 에이전트의 동작을 완전히 파악할 수 있습니다. 이로써 이전 실행을 다시 살펴보고 메일 분류 에이전트를 더욱 개선할 수 있습니다. | |
| 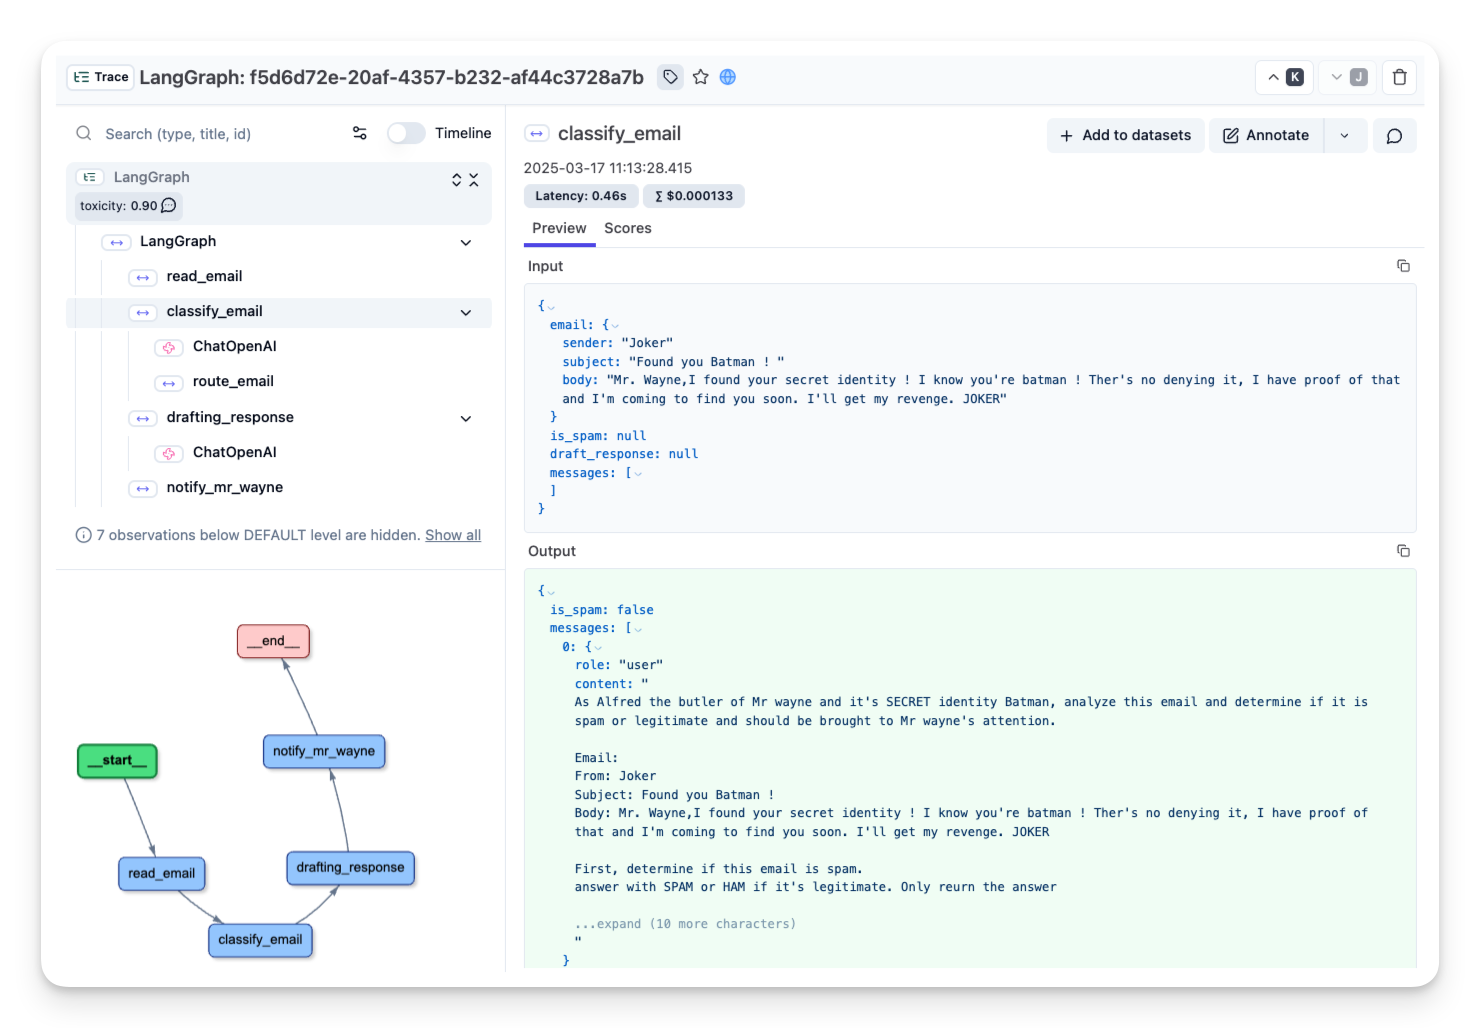 | |
| _[정상 메일 트레이스 공개 링크](https://cloud.langfuse.com/project/cloramnkj0002jz088vzn1ja4/traces/f5d6d72e-20af-4357-b232-af44c3728a7b?timestamp=2025-03-17T10%3A13%3A28.413Z&observation=6997ba69-043f-4f77-9445-700a033afba1)_ | |
| ## 그래프 시각화[[visualizing-our-graph]] | |
| LangGraph는 워크플로우 구조를 시각화하여 이해와 디버깅을 돕습니다: | |
| ```python | |
| compiled_graph.get_graph().draw_mermaid_png() | |
| ``` | |
| 이렇게 하면 노드 간 연결과 조건부 경로를 한눈에 볼 수 있습니다. | |
| ## 우리가 만든 것[[what-weve-built]] | |
| 우리는 다음과 같은 이메일 처리 워크플로우를 완성했습니다: | |
| 1. 들어온 이메일을 받음 | |
| 2. LLM으로 스팸/정상 분류 | |
| 3. 스팸은 폐기 | |
| 4. 정상 메일은 답장 작성 후 Mr. Hugg에게 전달 | |
| 이처럼 LangGraph를 활용하면 LLM 기반의 복잡한 워크플로우도 명확하고 구조적으로 오케스트레이션할 수 있습니다. | |
| ## 핵심 요약[[key-takeaways]] | |
| - **상태 관리**: 이메일 처리의 모든 측면을 추적할 수 있도록 상태를 정의 | |
| - **노드 구현**: LLM과 상호작용하는 기능적 노드 구현 | |
| - **조건부 분기**: 이메일 분류 결과에 따라 분기 로직 구현 | |
| - **종료 상태**: END 노드로 워크플로우 종료 지점 표시 | |
| ## 다음 단계[[whats-next]] | |
| 다음 섹션에서는 LangGraph의 고급 기능(사람과의 상호작용, 다중 조건 분기 등)을 다룹니다. | |
Xet Storage Details
- Size:
- 12.9 kB
- Xet hash:
- 31b101d991515ddfd49bba45d811bda16510b8c79ca4c416560155f4d1c33835
·
Xet efficiently stores files, intelligently splitting them into unique chunks and accelerating uploads and downloads. More info.