
File size: 5,923 Bytes
1e92f2d |
1 2 3 4 5 6 7 8 9 10 11 12 13 14 15 16 17 18 19 20 21 22 23 24 25 26 27 28 29 30 31 32 33 34 35 36 37 38 39 40 41 42 43 44 45 46 47 48 49 50 51 52 53 54 55 56 57 58 59 60 61 62 63 64 65 66 67 68 69 70 71 72 73 74 75 76 77 78 79 80 81 82 83 84 85 86 87 88 89 90 91 92 93 94 95 96 97 98 99 100 101 102 103 104 105 106 107 108 109 110 111 112 113 114 115 116 117 118 119 120 121 122 123 124 125 126 127 128 129 130 131 132 133 134 135 136 137 138 139 140 141 142 143 144 145 146 |
# A statically generated landing page using Next.js and Plasmic
This example showcases Next.js's [Static Generation](https://nextjs.org/docs/basic-features/pages) feature using [Plasmic](https://www.plasmic.app/) as the visual page builder.
You'll get:
- Statically generated pages from your visual designs
- Development server on [preview mode](https://nextjs.org/docs/advanced-features/preview-mode) watches for changes from Plasmic Studio
## Demo
### [https://nextjs-plasmic-example.vercel.app/](https://nextjs-plasmic-example.vercel.app/)
## Deploy your own
Once you have access to the [environment variables you need](#step-3-set-up-environment-variables), deploy the example using [Vercel](https://vercel.com?utm_source=github&utm_medium=readme&utm_campaign=next-example).
[](https://vercel.com/new/clone?repository-url=https%3A%2F%2Fgithub.com%2Fvercel%2Fnext.js%2Ftree%2Fcanary%2Fexamples%2Fcms-plasmic&env=NEXT_PUBLIC_PLASMIC_PROJECT_ID,NEXT_PUBLIC_PLASMIC_PROJECT_API_TOKEN,PLASMIC_PREVIEW_SECRET&envDescription=Required%20to%20connect%20the%20app%20with%20Plasmic&envLink=https%3A%2F%2Fgithub.com%2Fvercel%2Fnext.js%2Ftree%2Fcanary%2Fexamples%2Fcms-plasmic)
### Related examples
- [AgilityCMS](/examples/cms-agilitycms)
- [Builder.io](/examples/cms-builder-io)
- [ButterCMS](/examples/cms-buttercms)
- [Contentful](/examples/cms-contentful)
- [Cosmic](/examples/cms-cosmic)
- [DatoCMS](/examples/cms-datocms)
- [DotCMS](/examples/cms-dotcms)
- [Drupal](/examples/cms-drupal)
- [Enterspeed](/examples/cms-enterspeed)
- [Ghost](/examples/cms-ghost)
- [GraphCMS](/examples/cms-graphcms)
- [Kontent.ai](/examples/cms-kontent-ai)
- [MakeSwift](/examples/cms-makeswift)
- [Payload](/examples/cms-payload)
- [Plasmic](/examples/cms-plasmic)
- [Prepr](/examples/cms-prepr)
- [Prismic](/examples/cms-prismic)
- [Sanity](/examples/cms-sanity)
- [Sitecore XM Cloud](/examples/cms-sitecore-xmcloud)
- [Sitefinity](/examples/cms-sitefinity)
- [Storyblok](/examples/cms-storyblok)
- [TakeShape](/examples/cms-takeshape)
- [Tina](/examples/cms-tina)
- [Umbraco](/examples/cms-umbraco)
- [Umbraco heartcore](/examples/cms-umbraco-heartcore)
- [Webiny](/examples/cms-webiny)
- [WordPress](/examples/cms-wordpress)
- [Blog Starter](/examples/blog-starter)
## How to use
Execute [`create-next-app`](https://github.com/vercel/next.js/tree/canary/packages/create-next-app) with [npm](https://docs.npmjs.com/cli/init), [Yarn](https://yarnpkg.com/lang/en/docs/cli/create/), or [pnpm](https://pnpm.io) to bootstrap the example:
```bash
npx create-next-app --example cms-plasmic cms-plasmic-app
```
```bash
yarn create next-app --example cms-plasmic cms-plasmic-app
```
```bash
pnpm create next-app --example cms-plasmic cms-plasmic-app
```
## Configuration
### Step 1. Create an account and a project on Plasmic
First, [create an account on Plasmic](https://studio.plasmic.app/).
After creating an account, create a new project.
### Step 2. Gather your project ID and API token
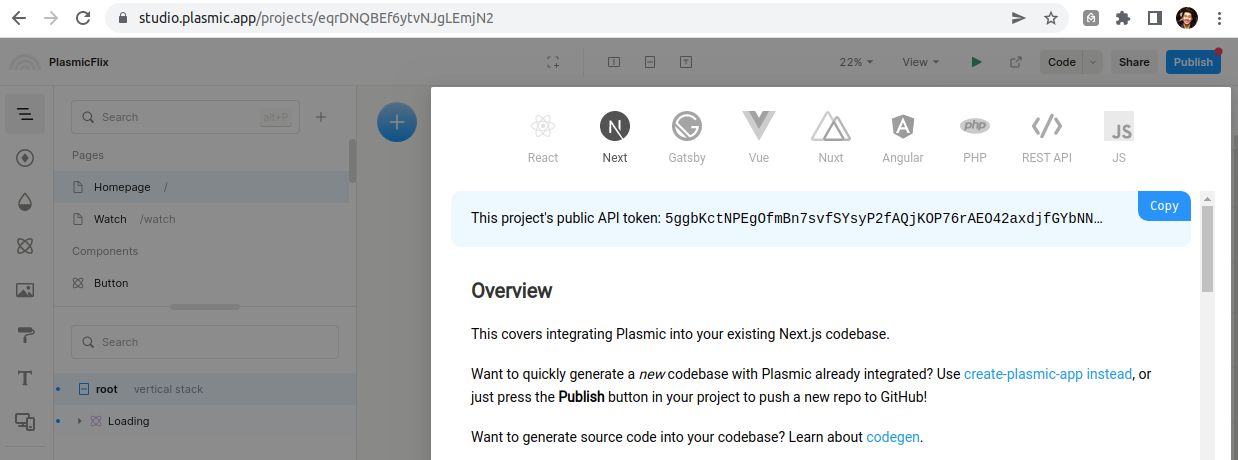
Once you've opened your Plasmic project, you can find the project ID in the URL: `https://studio.plasmic.app/projects/PROJECTID`.
The API token can be found by clicking the Code button in the top bar.
### Step 3. Set up environment variables
Copy the `.env.local.example` file in this directory to `.env.local` (which will be ignored by Git):
```bash
cp .env.local.example .env.local
```
Then set each variable on `.env.local`:
- `NEXT_PUBLIC_PLASMIC_PROJECT_ID` should be the `projectId` value in step 2.
- `NEXT_PUBLIC_PLASMIC_PROJECT_API_TOKEN` should be the API token gathered in previous step.
- `PLASMIC_PREVIEW_SECRET` can be any random string (but avoid spaces), like `MY_SECRET` - this is used for [Preview Mode](https://nextjs.org/docs/advanced-features/preview-mode).
### Step 4. Run Next.js in development mode
```bash
npm install
npm run dev
# or
yarn install
yarn dev
```
Your blog should be up and running on [http://localhost:3000](http://localhost:3000)! If it doesn't work, post on [GitHub discussions](https://github.com/vercel/next.js/discussions).
### Step 5. Try preview mode
By default, the code is set up to only build published Plasmic projects.
If you want to see changes as you make them in the Plasmic Studio, enter preview mode by opening the following URL:
```
http://localhost:3000/api/preview?secret=PLASMIC_PREVIEW_SECRET&slug=PATH
```
Be sure to replace the secret with the chosen secret in Step 3 and pick a path to preview (e.g. `http://localhost:3000/api/preview?secret=123456&slug=/`)
Now you can make edits in the Studio and see them reflected in the development server live.
You can exit preview mode at any time by going to the following URL:
```
http://localhost:3000/api/exit-preview
```
### Step 6. Deploy on Vercel
You can deploy this app to the cloud with [Vercel](https://vercel.com?utm_source=github&utm_medium=readme&utm_campaign=next-example) ([Documentation](https://nextjs.org/docs/deployment)).
To deploy your local project to Vercel, push it to GitHub/GitLab/Bitbucket and [import to Vercel](https://vercel.com/new?utm_source=github&utm_medium=readme&utm_campaign=next-example).
**Important**: When you import your project on Vercel, make sure to click on **Environment Variables** and set them to match your `.env.local` file.
## Next steps:
With Plasmic, you can enable non-developers on your team to publish pages and content into your website or app.
To learn more about Plasmic, take a look at the following resources:
- [Plasmic Website](https://www.plasmic.app/)
- [Plasmic Documentation](https://docs.plasmic.app/learn/)
- [Plasmic Slack Community](https://www.plasmic.app/slack)
You can check out [the Plasmic GitHub repository](https://github.com/plasmicapp/plasmic) - your feedback and contributions are welcome!
|