
File size: 31,417 Bytes
47c146e |
1 2 3 4 5 6 7 8 9 10 11 12 13 14 15 16 17 18 19 20 21 22 23 24 25 26 27 28 29 30 31 32 33 34 35 36 37 38 39 40 41 42 43 44 45 46 47 48 49 50 51 52 53 54 55 56 57 58 59 60 61 62 63 64 65 66 67 68 69 70 71 72 73 74 75 76 77 78 79 80 81 82 83 84 85 86 87 88 89 90 91 92 93 94 95 96 97 98 99 100 101 102 103 104 105 106 107 108 109 110 111 112 113 114 115 116 117 118 119 120 121 122 123 124 125 126 127 128 129 130 131 132 133 134 135 136 137 138 139 140 141 142 143 144 145 146 147 148 149 150 151 152 153 154 155 156 157 158 159 160 161 162 163 164 165 166 167 168 169 170 171 172 173 174 175 176 177 178 179 180 181 182 183 184 185 186 187 188 189 190 191 192 193 194 195 196 197 198 199 200 201 202 203 204 205 206 207 208 209 210 211 212 213 214 215 216 217 218 219 220 221 222 223 224 225 226 227 228 229 230 231 232 233 234 235 236 237 238 239 240 241 242 243 244 245 246 247 248 249 250 251 252 253 254 255 256 257 258 259 260 261 262 263 264 265 266 267 268 269 270 271 272 273 274 275 276 277 278 279 280 281 282 283 284 285 286 287 288 289 290 291 292 293 294 295 296 297 298 299 300 301 302 303 304 305 306 307 308 309 310 311 312 313 314 315 316 317 318 319 320 321 322 323 324 325 326 327 328 329 330 331 332 333 334 335 336 337 338 339 340 341 342 343 344 345 346 347 348 349 350 351 352 353 354 355 356 357 358 359 360 361 362 363 364 365 366 367 368 369 370 371 372 373 374 375 376 377 378 379 380 381 382 383 384 385 386 387 388 389 390 391 392 393 394 395 396 397 398 399 400 401 402 403 404 405 406 407 408 409 410 411 412 413 414 415 416 417 418 419 420 421 422 423 424 425 426 427 428 429 430 431 432 433 434 435 436 437 438 439 440 441 442 443 444 445 446 447 448 449 450 451 452 453 454 455 456 457 458 459 460 461 462 463 464 465 466 467 468 469 470 471 472 473 474 475 476 477 478 479 480 481 482 483 484 485 486 487 488 489 490 491 492 493 494 495 496 497 498 499 500 501 502 503 504 505 506 507 508 509 510 511 512 513 514 515 516 517 518 519 520 521 522 523 524 525 526 527 528 529 530 531 532 533 534 535 536 537 538 539 540 541 542 543 544 545 546 547 548 549 550 551 552 553 554 555 556 557 558 559 560 561 562 563 564 565 566 567 568 569 570 571 572 573 574 575 576 577 578 579 580 581 582 583 584 585 586 587 588 589 590 591 592 593 594 595 596 597 598 599 600 601 602 603 604 605 606 607 608 609 610 611 612 613 614 615 616 617 618 619 620 621 622 623 624 625 626 627 628 629 630 631 632 633 634 635 636 637 638 639 640 641 642 643 644 645 646 647 648 649 |
<!--Copyright 2025 The HuggingFace Team. All rights reserved.
Licensed under the Apache License, Version 2.0 (the "License"); you may not use this file except in compliance with
the License. You may obtain a copy of the License at
http://www.apache.org/licenses/LICENSE-2.0
Unless required by applicable law or agreed to in writing, software distributed under the License is distributed on
an "AS IS" BASIS, WITHOUT WARRANTIES OR CONDITIONS OF ANY KIND, either express or implied. See the License for the
specific language governing permissions and limitations under the License.
-->
# End-to-End Developer Guide: Building with Modular Diffusers
<Tip warning={true}>
🧪 **Experimental Feature**: Modular Diffusers is an experimental feature we are actively developing. The API may be subject to breaking changes.
</Tip>
In this tutorial we will walk through the process of adding a new pipeline to the modular framework using differential diffusion as our example. We'll cover the complete workflow from implementation to deployment: implementing the new pipeline, ensuring compatibility with existing tools, sharing the code on Hugging Face Hub, and deploying it as a UI node.
We'll also demonstrate the 4-step framework process we use for implementing new basic pipelines in the modular system.
1. **Start with an existing pipeline as a base**
- Identify which existing pipeline is most similar to the one you want to implement
- Determine what part of the pipeline needs modification
2. **Build a working pipeline structure first**
- Assemble the complete pipeline structure
- Use existing blocks wherever possible
- For new blocks, create placeholders (e.g. you can copy from similar blocks and change the name) without implementing custom logic just yet
3. **Set up an example**
- Create a simple inference script with expected inputs/outputs
4. **Implement your custom logic and test incrementally**
- Add the custom logics the blocks you want to change
- Test incrementally, and inspect pipeline states and debug as needed
Let's see how this works with the Differential Diffusion example.
## Differential Diffusion Pipeline
### Start with an existing pipeline
Differential diffusion (https://differential-diffusion.github.io/) is an image-to-image workflow, so it makes sense for us to start with the preset of pipeline blocks used to build img2img pipeline (`IMAGE2IMAGE_BLOCKS`) and see how we can build this new pipeline with them.
```py
>>> from diffusers.modular_pipelines.stable_diffusion_xl import IMAGE2IMAGE_BLOCKS
>>> IMAGE2IMAGE_BLOCKS = InsertableDict([
... ("text_encoder", StableDiffusionXLTextEncoderStep),
... ("image_encoder", StableDiffusionXLVaeEncoderStep),
... ("input", StableDiffusionXLInputStep),
... ("set_timesteps", StableDiffusionXLImg2ImgSetTimestepsStep),
... ("prepare_latents", StableDiffusionXLImg2ImgPrepareLatentsStep),
... ("prepare_add_cond", StableDiffusionXLImg2ImgPrepareAdditionalConditioningStep),
... ("denoise", StableDiffusionXLDenoiseStep),
... ("decode", StableDiffusionXLDecodeStep)
... ])
```
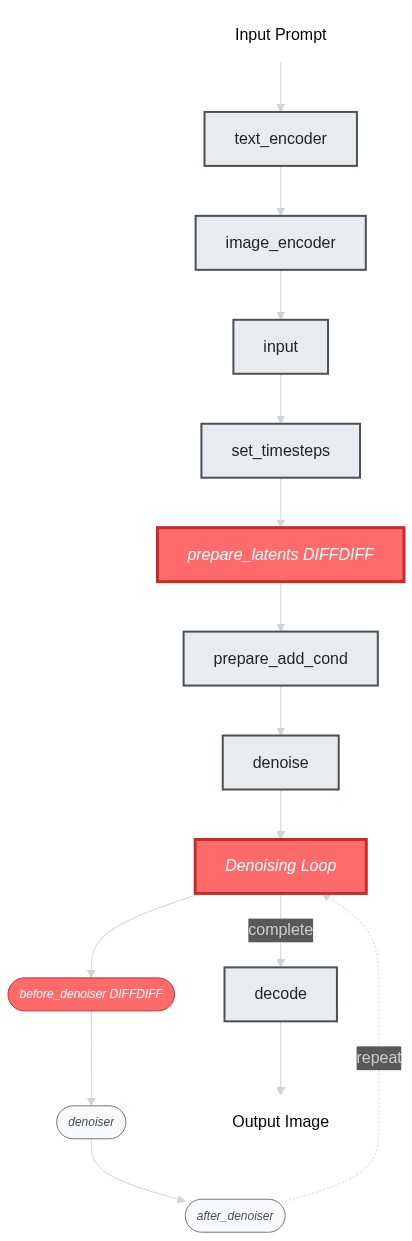
Note that "denoise" (`StableDiffusionXLDenoiseStep`) is a `LoopSequentialPipelineBlocks` that contains 3 loop blocks (more on LoopSequentialPipelineBlocks [here](https://huggingface.co/docs/diffusers/modular_diffusers/write_own_pipeline_block#loopsequentialpipelineblocks))
```py
>>> denoise_blocks = IMAGE2IMAGE_BLOCKS["denoise"]()
>>> print(denoise_blocks)
```
```out
StableDiffusionXLDenoiseStep(
Class: StableDiffusionXLDenoiseLoopWrapper
Description: Denoise step that iteratively denoise the latents.
Its loop logic is defined in `StableDiffusionXLDenoiseLoopWrapper.__call__` method
At each iteration, it runs blocks defined in `sub_blocks` sequencially:
- `StableDiffusionXLLoopBeforeDenoiser`
- `StableDiffusionXLLoopDenoiser`
- `StableDiffusionXLLoopAfterDenoiser`
This block supports both text2img and img2img tasks.
Components:
scheduler (`EulerDiscreteScheduler`)
guider (`ClassifierFreeGuidance`)
unet (`UNet2DConditionModel`)
Sub-Blocks:
[0] before_denoiser (StableDiffusionXLLoopBeforeDenoiser)
Description: step within the denoising loop that prepare the latent input for the denoiser. This block should be used to compose the `sub_blocks` attribute of a `LoopSequentialPipelineBlocks` object (e.g. `StableDiffusionXLDenoiseLoopWrapper`)
[1] denoiser (StableDiffusionXLLoopDenoiser)
Description: Step within the denoising loop that denoise the latents with guidance. This block should be used to compose the `sub_blocks` attribute of a `LoopSequentialPipelineBlocks` object (e.g. `StableDiffusionXLDenoiseLoopWrapper`)
[2] after_denoiser (StableDiffusionXLLoopAfterDenoiser)
Description: step within the denoising loop that update the latents. This block should be used to compose the `sub_blocks` attribute of a `LoopSequentialPipelineBlocks` object (e.g. `StableDiffusionXLDenoiseLoopWrapper`)
)
```
Let's compare standard image-to-image and differential diffusion! The key difference in algorithm is that standard image-to-image diffusion applies uniform noise across all pixels based on a single `strength` parameter, but differential diffusion uses a change map where each pixel value determines when that region starts denoising. Regions with lower values get "frozen" earlier by replacing them with noised original latents, preserving more of the original image.
Therefore, the key differences when it comes to pipeline implementation would be:
1. The `prepare_latents` step (which prepares the change map and pre-computes noised latents for all timesteps)
2. The `denoise` step (which selectively applies denoising based on the change map)
3. Since differential diffusion doesn't use the `strength` parameter, we'll use the text-to-image `set_timesteps` step instead of the image-to-image version
To implement differntial diffusion, we can reuse most blocks from image-to-image and text-to-image workflows, only modifying the `prepare_latents` step and the first part of the `denoise` step (i.e. `before_denoiser (StableDiffusionXLLoopBeforeDenoiser)`).
Here's a flowchart showing the pipeline structure and the changes we need to make:
### Build a Working Pipeline Structure
ok now we've identified the blocks to modify, let's build the pipeline skeleton first - at this stage, our goal is to get the pipeline struture working end-to-end (even though it's just doing the img2img behavior). I would simply create placeholder blocks by copying from existing ones:
```py
>>> # Copy existing blocks as placeholders
>>> class SDXLDiffDiffPrepareLatentsStep(PipelineBlock):
... """Copied from StableDiffusionXLImg2ImgPrepareLatentsStep - will modify later"""
... # ... same implementation as StableDiffusionXLImg2ImgPrepareLatentsStep
...
>>> class SDXLDiffDiffLoopBeforeDenoiser(PipelineBlock):
... """Copied from StableDiffusionXLLoopBeforeDenoiser - will modify later"""
... # ... same implementation as StableDiffusionXLLoopBeforeDenoiser
```
`SDXLDiffDiffLoopBeforeDenoiser` is the be part of the denoise loop we need to change. Let's use it to assemble a `SDXLDiffDiffDenoiseStep`.
```py
>>> class SDXLDiffDiffDenoiseStep(StableDiffusionXLDenoiseLoopWrapper):
... block_classes = [SDXLDiffDiffLoopBeforeDenoiser, StableDiffusionXLLoopDenoiser, StableDiffusionXLLoopAfterDenoiser]
... block_names = ["before_denoiser", "denoiser", "after_denoiser"]
```
Now we can put together our differential diffusion pipeline.
```py
>>> DIFFDIFF_BLOCKS = IMAGE2IMAGE_BLOCKS.copy()
>>> DIFFDIFF_BLOCKS["set_timesteps"] = TEXT2IMAGE_BLOCKS["set_timesteps"]
>>> DIFFDIFF_BLOCKS["prepare_latents"] = SDXLDiffDiffPrepareLatentsStep
>>> DIFFDIFF_BLOCKS["denoise"] = SDXLDiffDiffDenoiseStep
>>>
>>> dd_blocks = SequentialPipelineBlocks.from_blocks_dict(DIFFDIFF_BLOCKS)
>>> print(dd_blocks)
>>> # At this point, the pipeline works exactly like img2img since our blocks are just copies
```
### Set up an example
ok, so now our blocks should be able to compile without an error, we can move on to the next step. Let's setup a simple example so we can run the pipeline as we build it. diff-diff use same model checkpoints as SDXL so we can fetch the models from a regular SDXL repo.
```py
>>> dd_pipeline = dd_blocks.init_pipeline("YiYiXu/modular-demo-auto", collection="diffdiff")
>>> dd_pipeline.load_default_componenets(torch_dtype=torch.float16)
>>> dd_pipeline.to("cuda")
```
We will use this example script:
```py
>>> image = load_image("https://huggingface.co/datasets/OzzyGT/testing-resources/resolve/main/differential/20240329211129_4024911930.png?download=true")
>>> mask = load_image("https://huggingface.co/datasets/OzzyGT/testing-resources/resolve/main/differential/gradient_mask.png?download=true")
>>>
>>> prompt = "a green pear"
>>> negative_prompt = "blurry"
>>>
>>> image = dd_pipeline(
... prompt=prompt,
... negative_prompt=negative_prompt,
... num_inference_steps=25,
... diffdiff_map=mask,
... image=image,
... output="images"
... )[0]
>>>
>>> image.save("diffdiff_out.png")
```
If you run the script right now, you will get a complaint about unexpected input `diffdiff_map`.
and you would get the same result as the original img2img pipeline.
### implement your custom logic and test incrementally
Let's modify the pipeline so that we can get expected result with this example script.
We'll start with the `prepare_latents` step. The main changes are:
- Requires a new user input `diffdiff_map`
- Requires new component `mask_processor` to process the `diffdiff_map`
- Requires new intermediate inputs:
- Need `timestep` instead of `latent_timestep` to precompute all the latents
- Need `num_inference_steps` to create the `diffdiff_masks`
- create a new output `diffdiff_masks` and `original_latents`
<Tip>
💡 use `print(dd_pipeline.doc)` to check compiled inputs and outputs of the built piepline.
e.g. after we added `diffdiff_map` as an input in this step, we can run `print(dd_pipeline.doc)` to verify that it shows up in the docstring as a user input.
</Tip>
Once we make sure all the variables we need are available in the block state, we can implement the diff-diff logic inside `__call__`. We created 2 new variables: the change map `diffdiff_mask` and the pre-computed noised latents for all timesteps `original_latents`.
<Tip>
💡 Implement incrementally! Run the example script as you go, and insert `print(state)` and `print(block_state)` everywhere inside the `__call__` method to inspect the intermediate results. This helps you understand what's going on and what each line you just added does.
</Tip>
Here are the key changes we made to implement differential diffusion:
**1. Modified `prepare_latents` step:**
```diff
class SDXLDiffDiffPrepareLatentsStep(PipelineBlock):
@property
def expected_components(self) -> List[ComponentSpec]:
return [
ComponentSpec("vae", AutoencoderKL),
ComponentSpec("scheduler", EulerDiscreteScheduler),
+ ComponentSpec("mask_processor", VaeImageProcessor, config=FrozenDict({"do_normalize": False, "do_convert_grayscale": True}))
]
@property
def inputs(self) -> List[Tuple[str, Any]]:
return [
+ InputParam("diffdiff_map", required=True),
]
@property
def intermediate_inputs(self) -> List[InputParam]:
return [
InputParam("generator"),
- InputParam("latent_timestep", required=True, type_hint=torch.Tensor),
+ InputParam("timesteps", type_hint=torch.Tensor),
+ InputParam("num_inference_steps", type_hint=int),
]
@property
def intermediate_outputs(self) -> List[OutputParam]:
return [
+ OutputParam("original_latents", type_hint=torch.Tensor),
+ OutputParam("diffdiff_masks", type_hint=torch.Tensor),
]
def __call__(self, components, state: PipelineState):
# ... existing logic ...
+ # Process change map and create masks
+ diffdiff_map = components.mask_processor.preprocess(block_state.diffdiff_map, height=latent_height, width=latent_width)
+ thresholds = torch.arange(block_state.num_inference_steps, dtype=diffdiff_map.dtype) / block_state.num_inference_steps
+ block_state.diffdiff_masks = diffdiff_map > (thresholds + (block_state.denoising_start or 0))
+ block_state.original_latents = block_state.latents
```
**2. Modified `before_denoiser` step:**
```diff
class SDXLDiffDiffLoopBeforeDenoiser(PipelineBlock):
@property
def description(self) -> str:
return (
"Step within the denoising loop for differential diffusion that prepare the latent input for the denoiser"
)
+ @property
+ def inputs(self) -> List[Tuple[str, Any]]:
+ return [
+ InputParam("denoising_start"),
+ ]
@property
def intermediate_inputs(self) -> List[str]:
return [
InputParam("latents", required=True, type_hint=torch.Tensor),
+ InputParam("original_latents", type_hint=torch.Tensor),
+ InputParam("diffdiff_masks", type_hint=torch.Tensor),
]
def __call__(self, components, block_state, i, t):
+ # Apply differential diffusion logic
+ if i == 0 and block_state.denoising_start is None:
+ block_state.latents = block_state.original_latents[:1]
+ else:
+ block_state.mask = block_state.diffdiff_masks[i].unsqueeze(0).unsqueeze(1)
+ block_state.latents = block_state.original_latents[i] * block_state.mask + block_state.latents * (1 - block_state.mask)
# ... rest of existing logic ...
```
That's all there is to it! We've just created a simple sequential pipeline by mix-and-match some existing and new pipeline blocks.
Now we use the process we've prepred in step2 to build the pipeline and inspect it.
```py
>> dd_pipeline
SequentialPipelineBlocks(
Class: ModularPipelineBlocks
Description:
Components:
text_encoder (`CLIPTextModel`)
text_encoder_2 (`CLIPTextModelWithProjection`)
tokenizer (`CLIPTokenizer`)
tokenizer_2 (`CLIPTokenizer`)
guider (`ClassifierFreeGuidance`)
vae (`AutoencoderKL`)
image_processor (`VaeImageProcessor`)
scheduler (`EulerDiscreteScheduler`)
mask_processor (`VaeImageProcessor`)
unet (`UNet2DConditionModel`)
Configs:
force_zeros_for_empty_prompt (default: True)
requires_aesthetics_score (default: False)
Blocks:
[0] text_encoder (StableDiffusionXLTextEncoderStep)
Description: Text Encoder step that generate text_embeddings to guide the image generation
[1] image_encoder (StableDiffusionXLVaeEncoderStep)
Description: Vae Encoder step that encode the input image into a latent representation
[2] input (StableDiffusionXLInputStep)
Description: Input processing step that:
1. Determines `batch_size` and `dtype` based on `prompt_embeds`
2. Adjusts input tensor shapes based on `batch_size` (number of prompts) and `num_images_per_prompt`
All input tensors are expected to have either batch_size=1 or match the batch_size
of prompt_embeds. The tensors will be duplicated across the batch dimension to
have a final batch_size of batch_size * num_images_per_prompt.
[3] set_timesteps (StableDiffusionXLSetTimestepsStep)
Description: Step that sets the scheduler's timesteps for inference
[4] prepare_latents (SDXLDiffDiffPrepareLatentsStep)
Description: Step that prepares the latents for the differential diffusion generation process
[5] prepare_add_cond (StableDiffusionXLImg2ImgPrepareAdditionalConditioningStep)
Description: Step that prepares the additional conditioning for the image-to-image/inpainting generation process
[6] denoise (SDXLDiffDiffDenoiseStep)
Description: Pipeline block that iteratively denoise the latents over `timesteps`. The specific steps with each iteration can be customized with `sub_blocks` attributes
[7] decode (StableDiffusionXLDecodeStep)
Description: Step that decodes the denoised latents into images
)
```
Run the example now, you should see an apple with its right half transformed into a green pear.

## Adding IP-adapter
We provide an auto IP-adapter block that you can plug-and-play into your modular workflow. It's an `AutoPipelineBlocks`, so it will only run when the user passes an IP adapter image. In this tutorial, we'll focus on how to package it into your differential diffusion workflow. To learn more about `AutoPipelineBlocks`, see [here](./auto_pipeline_blocks.md)
We talked about how to add IP-adapter into your workflow in the [Modular Pipeline Guide](./modular_pipeline.md). Let's just go ahead to create the IP-adapter block.
```py
>>> from diffusers.modular_pipelines.stable_diffusion_xl.encoders import StableDiffusionXLAutoIPAdapterStep
>>> ip_adapter_block = StableDiffusionXLAutoIPAdapterStep()
```
We can directly add the ip-adapter block instance to the `diffdiff_blocks` that we created before. The `sub_blocks` attribute is a `InsertableDict`, so we're able to insert the it at specific position (index `0` here).
```py
>>> dd_blocks.sub_blocks.insert("ip_adapter", ip_adapter_block, 0)
```
Take a look at the new diff-diff pipeline with ip-adapter!
```py
>>> print(dd_blocks)
```
The pipeline now lists ip-adapter as its first block, and tells you that it will run only if `ip_adapter_image` is provided. It also includes the two new components from ip-adpater: `image_encoder` and `feature_extractor`
```out
SequentialPipelineBlocks(
Class: ModularPipelineBlocks
====================================================================================================
This pipeline contains blocks that are selected at runtime based on inputs.
Trigger Inputs: {'ip_adapter_image'}
Use `get_execution_blocks()` with input names to see selected blocks (e.g. `get_execution_blocks('ip_adapter_image')`).
====================================================================================================
Description:
Components:
image_encoder (`CLIPVisionModelWithProjection`)
feature_extractor (`CLIPImageProcessor`)
unet (`UNet2DConditionModel`)
guider (`ClassifierFreeGuidance`)
text_encoder (`CLIPTextModel`)
text_encoder_2 (`CLIPTextModelWithProjection`)
tokenizer (`CLIPTokenizer`)
tokenizer_2 (`CLIPTokenizer`)
vae (`AutoencoderKL`)
image_processor (`VaeImageProcessor`)
scheduler (`EulerDiscreteScheduler`)
mask_processor (`VaeImageProcessor`)
Configs:
force_zeros_for_empty_prompt (default: True)
requires_aesthetics_score (default: False)
Blocks:
[0] ip_adapter (StableDiffusionXLAutoIPAdapterStep)
Description: Run IP Adapter step if `ip_adapter_image` is provided.
[1] text_encoder (StableDiffusionXLTextEncoderStep)
Description: Text Encoder step that generate text_embeddings to guide the image generation
[2] image_encoder (StableDiffusionXLVaeEncoderStep)
Description: Vae Encoder step that encode the input image into a latent representation
[3] input (StableDiffusionXLInputStep)
Description: Input processing step that:
1. Determines `batch_size` and `dtype` based on `prompt_embeds`
2. Adjusts input tensor shapes based on `batch_size` (number of prompts) and `num_images_per_prompt`
All input tensors are expected to have either batch_size=1 or match the batch_size
of prompt_embeds. The tensors will be duplicated across the batch dimension to
have a final batch_size of batch_size * num_images_per_prompt.
[4] set_timesteps (StableDiffusionXLSetTimestepsStep)
Description: Step that sets the scheduler's timesteps for inference
[5] prepare_latents (SDXLDiffDiffPrepareLatentsStep)
Description: Step that prepares the latents for the differential diffusion generation process
[6] prepare_add_cond (StableDiffusionXLImg2ImgPrepareAdditionalConditioningStep)
Description: Step that prepares the additional conditioning for the image-to-image/inpainting generation process
[7] denoise (SDXLDiffDiffDenoiseStep)
Description: Pipeline block that iteratively denoise the latents over `timesteps`. The specific steps with each iteration can be customized with `sub_blocks` attributes
[8] decode (StableDiffusionXLDecodeStep)
Description: Step that decodes the denoised latents into images
)
```
Let's test it out. We used an orange image to condition the generation via ip-addapter and we can see a slight orange color and texture in the final output.
```py
>>> ip_adapter_block = StableDiffusionXLAutoIPAdapterStep()
>>> dd_blocks.sub_blocks.insert("ip_adapter", ip_adapter_block, 0)
>>>
>>> dd_pipeline = dd_blocks.init_pipeline("YiYiXu/modular-demo-auto", collection="diffdiff")
>>> dd_pipeline.load_default_components(torch_dtype=torch.float16)
>>> dd_pipeline.loader.load_ip_adapter("h94/IP-Adapter", subfolder="sdxl_models", weight_name="ip-adapter_sdxl.bin")
>>> dd_pipeline.loader.set_ip_adapter_scale(0.6)
>>> dd_pipeline = dd_pipeline.to(device)
>>>
>>> ip_adapter_image = load_image("https://huggingface.co/datasets/YiYiXu/testing-images/resolve/main/diffdiff_orange.jpeg")
>>> image = load_image("https://huggingface.co/datasets/OzzyGT/testing-resources/resolve/main/differential/20240329211129_4024911930.png?download=true")
>>> mask = load_image("https://huggingface.co/datasets/OzzyGT/testing-resources/resolve/main/differential/gradient_mask.png?download=true")
>>>
>>> prompt = "a green pear"
>>> negative_prompt = "blurry"
>>> generator = torch.Generator(device=device).manual_seed(42)
>>>
>>> image = dd_pipeline(
... prompt=prompt,
... negative_prompt=negative_prompt,
... num_inference_steps=25,
... generator=generator,
... ip_adapter_image=ip_adapter_image,
... diffdiff_map=mask,
... image=image,
... output="images"
... )[0]
```
## Working with ControlNets
What about controlnet? Can differential diffusion work with controlnet? The key differences between a regular pipeline and a ControlNet pipeline are:
1. A ControlNet input step that prepares the control condition
2. Inside the denoising loop, a modified denoiser step where the control image is first processed through ControlNet, then control information is injected into the UNet
From looking at the code workflow: differential diffusion only modifies the "before denoiser" step, while ControlNet operates within the "denoiser" itself. Since they intervene at different points in the pipeline, they should work together without conflicts.
Intuitively, these two techniques are orthogonal and should combine naturally: differential diffusion controls how much the inference process can deviate from the original in each region, while ControlNet controls in what direction that change occurs.
With this understanding, let's assemble the diffdiff-controlnet loop by combining the diffdiff before-denoiser step and controlnet denoiser step.
```py
>>> class SDXLDiffDiffControlNetDenoiseStep(StableDiffusionXLDenoiseLoopWrapper):
... block_classes = [SDXLDiffDiffLoopBeforeDenoiser, StableDiffusionXLControlNetLoopDenoiser, StableDiffusionXLDenoiseLoopAfterDenoiser]
... block_names = ["before_denoiser", "denoiser", "after_denoiser"]
>>>
>>> controlnet_denoise_block = SDXLDiffDiffControlNetDenoiseStep()
>>> # print(controlnet_denoise)
```
We provide a auto controlnet input block that you can directly put into your workflow to proceess the `control_image`: similar to auto ip-adapter block, this step will only run if `control_image` input is passed from user. It work with both controlnet and controlnet union.
```py
>>> from diffusers.modular_pipelines.stable_diffusion_xl.modular_blocks import StableDiffusionXLAutoControlNetInputStep
>>> control_input_block = StableDiffusionXLAutoControlNetInputStep()
>>> print(control_input_block)
```
```out
StableDiffusionXLAutoControlNetInputStep(
Class: AutoPipelineBlocks
====================================================================================================
This pipeline contains blocks that are selected at runtime based on inputs.
Trigger Inputs: ['control_image', 'control_mode']
====================================================================================================
Description: Controlnet Input step that prepare the controlnet input.
This is an auto pipeline block that works for both controlnet and controlnet_union.
(it should be called right before the denoise step) - `StableDiffusionXLControlNetUnionInputStep` is called to prepare the controlnet input when `control_mode` and `control_image` are provided.
- `StableDiffusionXLControlNetInputStep` is called to prepare the controlnet input when `control_image` is provided. - if neither `control_mode` nor `control_image` is provided, step will be skipped.
Components:
controlnet (`ControlNetUnionModel`)
control_image_processor (`VaeImageProcessor`)
Sub-Blocks:
• controlnet_union [trigger: control_mode] (StableDiffusionXLControlNetUnionInputStep)
Description: step that prepares inputs for the ControlNetUnion model
• controlnet [trigger: control_image] (StableDiffusionXLControlNetInputStep)
Description: step that prepare inputs for controlnet
)
```
Let's assemble the blocks and run an example using controlnet + differential diffusion. We used a tomato as `control_image`, so you can see that in the output, the right half that transformed into a pear had a tomato-like shape.
```py
>>> dd_blocks.sub_blocks.insert("controlnet_input", control_input_block, 7)
>>> dd_blocks.sub_blocks["denoise"] = controlnet_denoise_block
>>>
>>> dd_pipeline = dd_blocks.init_pipeline("YiYiXu/modular-demo-auto", collection="diffdiff")
>>> dd_pipeline.load_default_components(torch_dtype=torch.float16)
>>> dd_pipeline = dd_pipeline.to(device)
>>>
>>> control_image = load_image("https://huggingface.co/datasets/YiYiXu/testing-images/resolve/main/diffdiff_tomato_canny.jpeg")
>>> image = load_image("https://huggingface.co/datasets/OzzyGT/testing-resources/resolve/main/differential/20240329211129_4024911930.png?download=true")
>>> mask = load_image("https://huggingface.co/datasets/OzzyGT/testing-resources/resolve/main/differential/gradient_mask.png?download=true")
>>>
>>> prompt = "a green pear"
>>> negative_prompt = "blurry"
>>> generator = torch.Generator(device=device).manual_seed(42)
>>>
>>> image = dd_pipeline(
... prompt=prompt,
... negative_prompt=negative_prompt,
... num_inference_steps=25,
... generator=generator,
... control_image=control_image,
... controlnet_conditioning_scale=0.5,
... diffdiff_map=mask,
... image=image,
... output="images"
... )[0]
```
Optionally, We can combine `SDXLDiffDiffControlNetDenoiseStep` and `SDXLDiffDiffDenoiseStep` into a `AutoPipelineBlocks` so that same workflow can work with or without controlnet.
```py
>>> class SDXLDiffDiffAutoDenoiseStep(AutoPipelineBlocks):
... block_classes = [SDXLDiffDiffControlNetDenoiseStep, SDXLDiffDiffDenoiseStep]
... block_names = ["controlnet_denoise", "denoise"]
... block_trigger_inputs = ["controlnet_cond", None]
```
`SDXLDiffDiffAutoDenoiseStep` will run the ControlNet denoise step if `control_image` input is provided, otherwise it will run the regular denoise step.
<Tip>
Note that it's perfectly fine not to use `AutoPipelineBlocks`. In fact, we recommend only using `AutoPipelineBlocks` to package your workflow at the end once you've verified all your pipelines work as expected.
</Tip>
Now you can create the differential diffusion preset that works with ip-adapter & controlnet.
```py
>>> DIFFDIFF_AUTO_BLOCKS = IMAGE2IMAGE_BLOCKS.copy()
>>> DIFFDIFF_AUTO_BLOCKS["prepare_latents"] = SDXLDiffDiffPrepareLatentsStep
>>> DIFFDIFF_AUTO_BLOCKS["set_timesteps"] = TEXT2IMAGE_BLOCKS["set_timesteps"]
>>> DIFFDIFF_AUTO_BLOCKS["denoise"] = SDXLDiffDiffAutoDenoiseStep
>>> DIFFDIFF_AUTO_BLOCKS.insert("ip_adapter", StableDiffusionXLAutoIPAdapterStep, 0)
>>> DIFFDIFF_AUTO_BLOCKS.insert("controlnet_input",StableDiffusionXLControlNetAutoInput, 7)
>>>
>>> print(DIFFDIFF_AUTO_BLOCKS)
```
to use
```py
>>> dd_auto_blocks = SequentialPipelineBlocks.from_blocks_dict(DIFFDIFF_AUTO_BLOCKS)
>>> dd_pipeline = dd_auto_blocks.init_pipeline(...)
```
## Creating a Modular Repo
You can easily share your differential diffusion workflow on the Hub by creating a modular repo. This is one created using the code we just wrote together: https://huggingface.co/YiYiXu/modular-diffdiff
To create a Modular Repo and share on hub, you just need to run `save_pretrained()` along with the `push_to_hub=True` flag. Note that if your pipeline contains custom block, you need to manually upload the code to the hub. But we are working on a command line tool to help you upload it very easily.
```py
dd_pipeline.save_pretrained("YiYiXu/test_modular_doc", push_to_hub=True)
```
With a modular repo, it is very easy for the community to use the workflow you just created! Here is an example to use the differential-diffusion pipeline we just created and shared.
```py
>>> from diffusers.modular_pipelines import ModularPipeline, ComponentsManager
>>> import torch
>>> from diffusers.utils import load_image
>>>
>>> repo_id = "YiYiXu/modular-diffdiff-0704"
>>>
>>> components = ComponentsManager()
>>>
>>> diffdiff_pipeline = ModularPipeline.from_pretrained(repo_id, trust_remote_code=True, components_manager=components, collection="diffdiff")
>>> diffdiff_pipeline.load_default_components(torch_dtype=torch.float16)
>>> components.enable_auto_cpu_offload()
```
see more usage example on model card.
## deploy a mellon node
[YIYI TODO: for now, here is an example of mellon node https://huggingface.co/YiYiXu/diff-diff-mellon]
|