
Click on this link to visit Github Repo
## 09. PyTorch Model Deployment Welcome to Milestone Project 3: PyTorch Model Deployment! We've come a long way with our FoodVision Mini project. But so far our PyTorch models have only been accessible to us. How about we bring FoodVision Mini to life and make it publically accessible? In other words, **we're going to deploy our FoodVision Mini model to the internet as a usable app!** *Trying out the [deployed version of FoodVision Mini](https://huggingface.co/spaces/mrdbourke/foodvision_mini) (what we're going to build) on my lunch. The model got it right too 🍣!*
### What is machine learning model deployment?
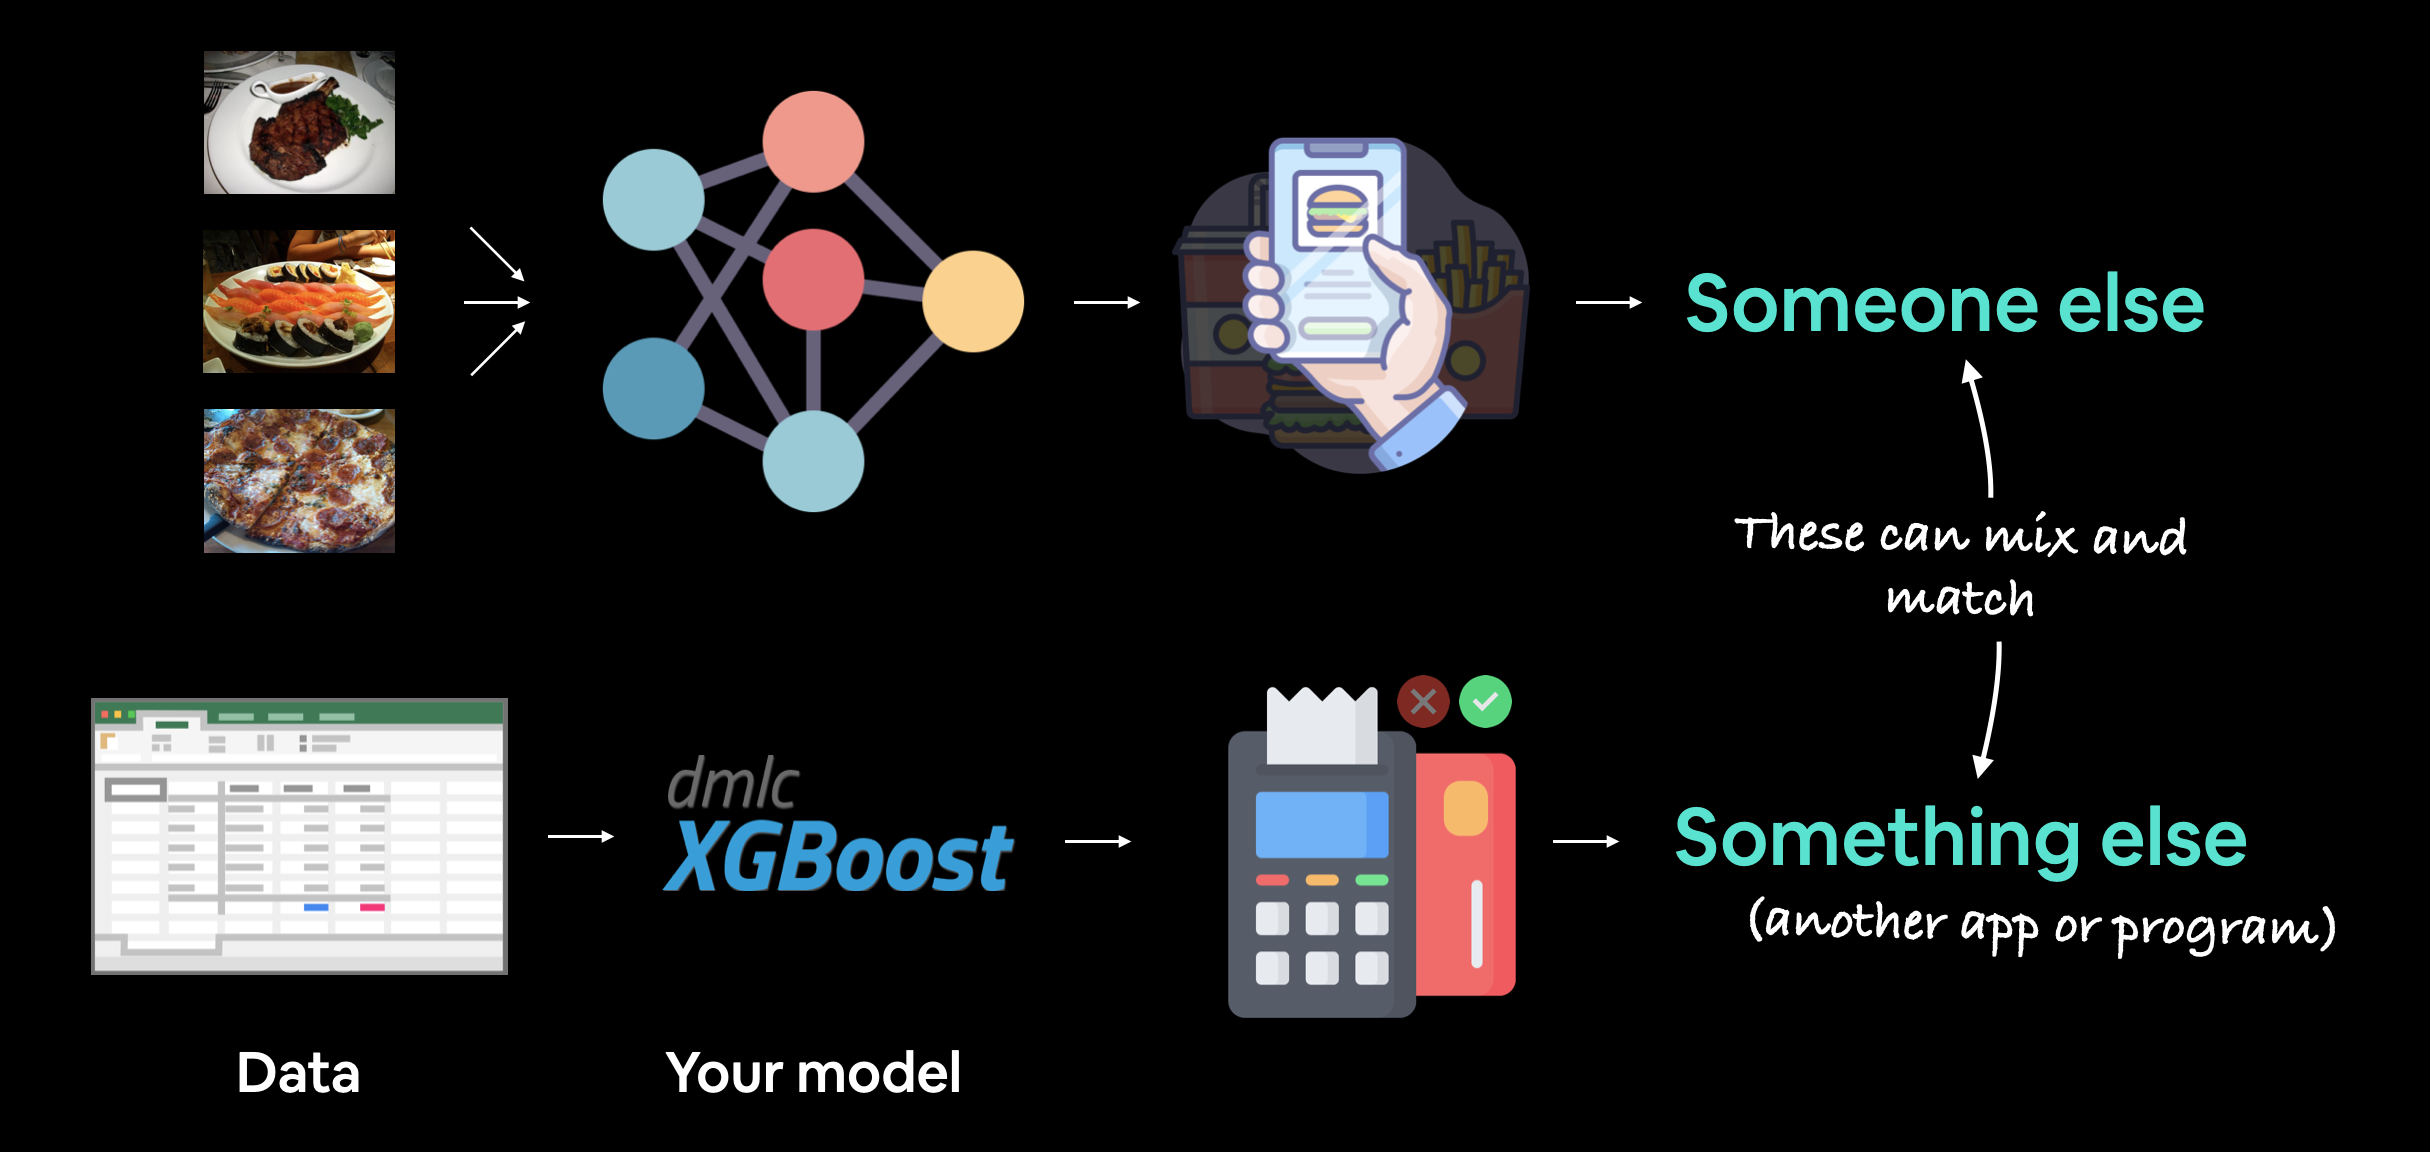
**Machine learning model deployment** is the process of making your machine learning model accessible to someone or something else.
Someone else being a person who can interact with your model in some way.
For example, someone taking a photo on their smartphone of food and then having our FoodVision Mini model classify it into pizza, steak or sushi.
Something else might be another program, app or even another model that interacts with your machine learning model(s).
For example, a banking database might rely on a machine learning model making predictions as to whether a transaction is fraudulent or not before transferring funds.
Or an operating system may lower its resource consumption based on a machine learning model making predictions on how much power someone generally uses at specific times of day.
These use cases can be mixed and matched as well.
For example, a Tesla car's computer vision system will interact with the car's route planning program (something else) and then the route planning program will get inputs and feedback from the driver (someone else).
*Trying out the [deployed version of FoodVision Mini](https://huggingface.co/spaces/mrdbourke/foodvision_mini) (what we're going to build) on my lunch. The model got it right too 🍣!*
### What is machine learning model deployment?
**Machine learning model deployment** is the process of making your machine learning model accessible to someone or something else.
Someone else being a person who can interact with your model in some way.
For example, someone taking a photo on their smartphone of food and then having our FoodVision Mini model classify it into pizza, steak or sushi.
Something else might be another program, app or even another model that interacts with your machine learning model(s).
For example, a banking database might rely on a machine learning model making predictions as to whether a transaction is fraudulent or not before transferring funds.
Or an operating system may lower its resource consumption based on a machine learning model making predictions on how much power someone generally uses at specific times of day.
These use cases can be mixed and matched as well.
For example, a Tesla car's computer vision system will interact with the car's route planning program (something else) and then the route planning program will get inputs and feedback from the driver (someone else).
 *Machine learning model deployment involves making your model available to someone or something else. For example, someone might use your model as part of a food recognition app (such as FoodVision Mini or [Nutrify](https://nutrify.app)). And something else might be another model or program using your model such as a banking system using a machine learning model to detect if a transaction is fraud or not.*
### Why deploy a machine learning model?
One of the most important philosophical questions in machine learning is:
*Machine learning model deployment involves making your model available to someone or something else. For example, someone might use your model as part of a food recognition app (such as FoodVision Mini or [Nutrify](https://nutrify.app)). And something else might be another model or program using your model such as a banking system using a machine learning model to detect if a transaction is fraud or not.*
### Why deploy a machine learning model?
One of the most important philosophical questions in machine learning is:
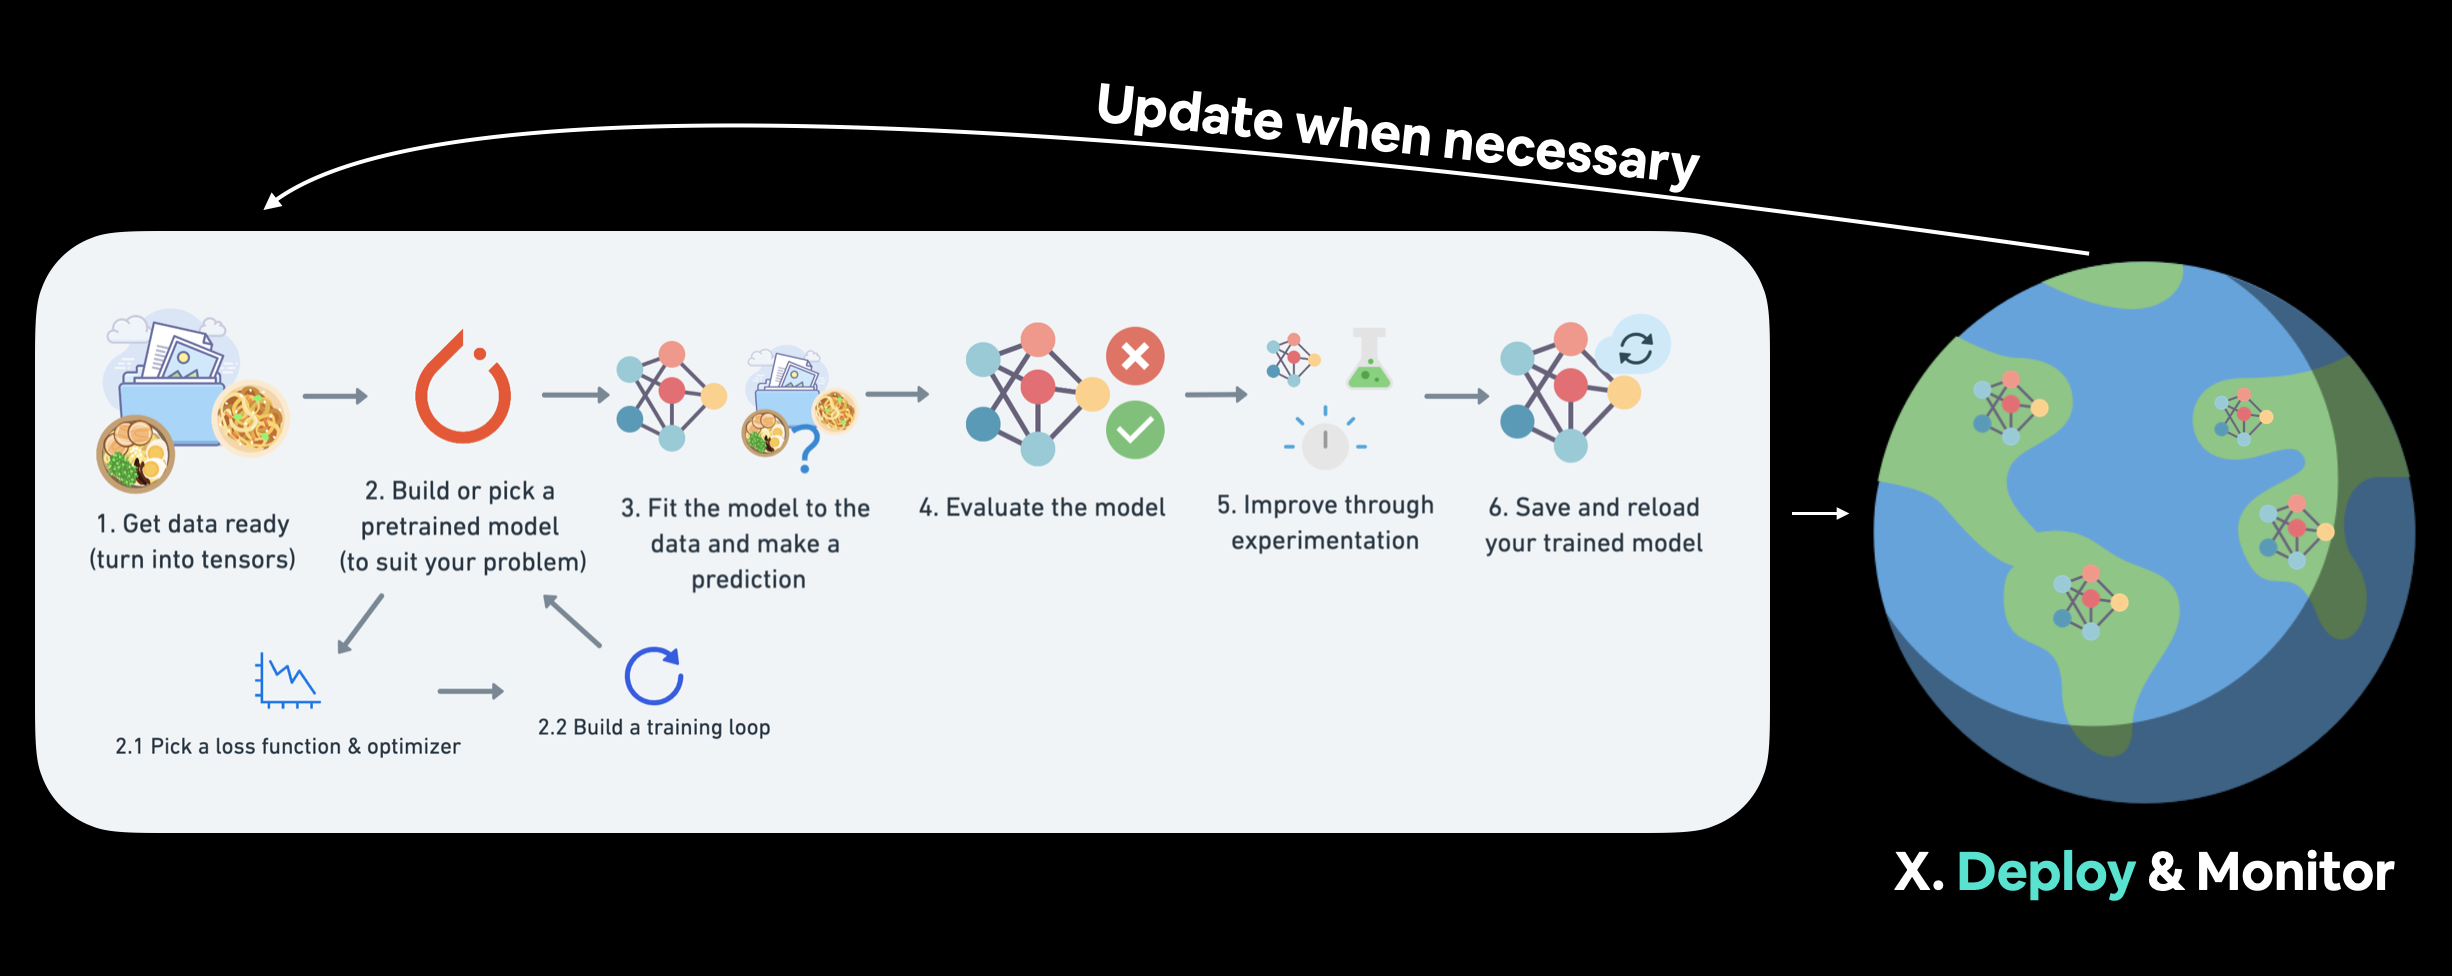 *We covered a PyTorch workflow back in [01. PyTorch Workflow](https://www.learnpytorch.io/01_pytorch_workflow/). But once you've got a good model, deployment is a good next step. Monitoring involves seeing how your model goes on the most important data split: data from the real world. For more resources on deployment and monitoring see [PyTorch Extra Resources](https://www.learnpytorch.io/pytorch_extra_resources/#resources-for-machine-learning-and-deep-learning-engineering).*
### Different types of machine learning model deployment
Whole books could be written on the different types of machine learning model deployment (and many good ones are listed in [PyTorch Extra Resources](https://www.learnpytorch.io/pytorch_extra_resources/#resources-for-machine-learning-and-deep-learning-engineering)).
And the field is still developing in terms of best practices.
But I like to start with the question:
> "What is the most ideal scenario for my machine learning model to be used?"
And then work backwards from there.
Of course, you may not know this ahead of time. But you're smart enough to imagine such things.
In the case of FoodVision Mini, our ideal scenario might be:
* Someone takes a photo on a mobile device (through an app or web broswer).
* The prediction comes back fast.
Easy.
So we've got two main criteria:
1. The model should work on a mobile device (this means there will be some compute constraints).
2. The model should make predictions *fast* (because a slow app is a boring app).
And of course, depending on your use case, your requirements may vary.
You may notice the above two points break down into another two questions:
1. **Where's it going to go?** - As in, where is it going to be stored?
2. **How's it going to function?** - As in, does it return predictions immediately? Or do they come later?
*We covered a PyTorch workflow back in [01. PyTorch Workflow](https://www.learnpytorch.io/01_pytorch_workflow/). But once you've got a good model, deployment is a good next step. Monitoring involves seeing how your model goes on the most important data split: data from the real world. For more resources on deployment and monitoring see [PyTorch Extra Resources](https://www.learnpytorch.io/pytorch_extra_resources/#resources-for-machine-learning-and-deep-learning-engineering).*
### Different types of machine learning model deployment
Whole books could be written on the different types of machine learning model deployment (and many good ones are listed in [PyTorch Extra Resources](https://www.learnpytorch.io/pytorch_extra_resources/#resources-for-machine-learning-and-deep-learning-engineering)).
And the field is still developing in terms of best practices.
But I like to start with the question:
> "What is the most ideal scenario for my machine learning model to be used?"
And then work backwards from there.
Of course, you may not know this ahead of time. But you're smart enough to imagine such things.
In the case of FoodVision Mini, our ideal scenario might be:
* Someone takes a photo on a mobile device (through an app or web broswer).
* The prediction comes back fast.
Easy.
So we've got two main criteria:
1. The model should work on a mobile device (this means there will be some compute constraints).
2. The model should make predictions *fast* (because a slow app is a boring app).
And of course, depending on your use case, your requirements may vary.
You may notice the above two points break down into another two questions:
1. **Where's it going to go?** - As in, where is it going to be stored?
2. **How's it going to function?** - As in, does it return predictions immediately? Or do they come later?
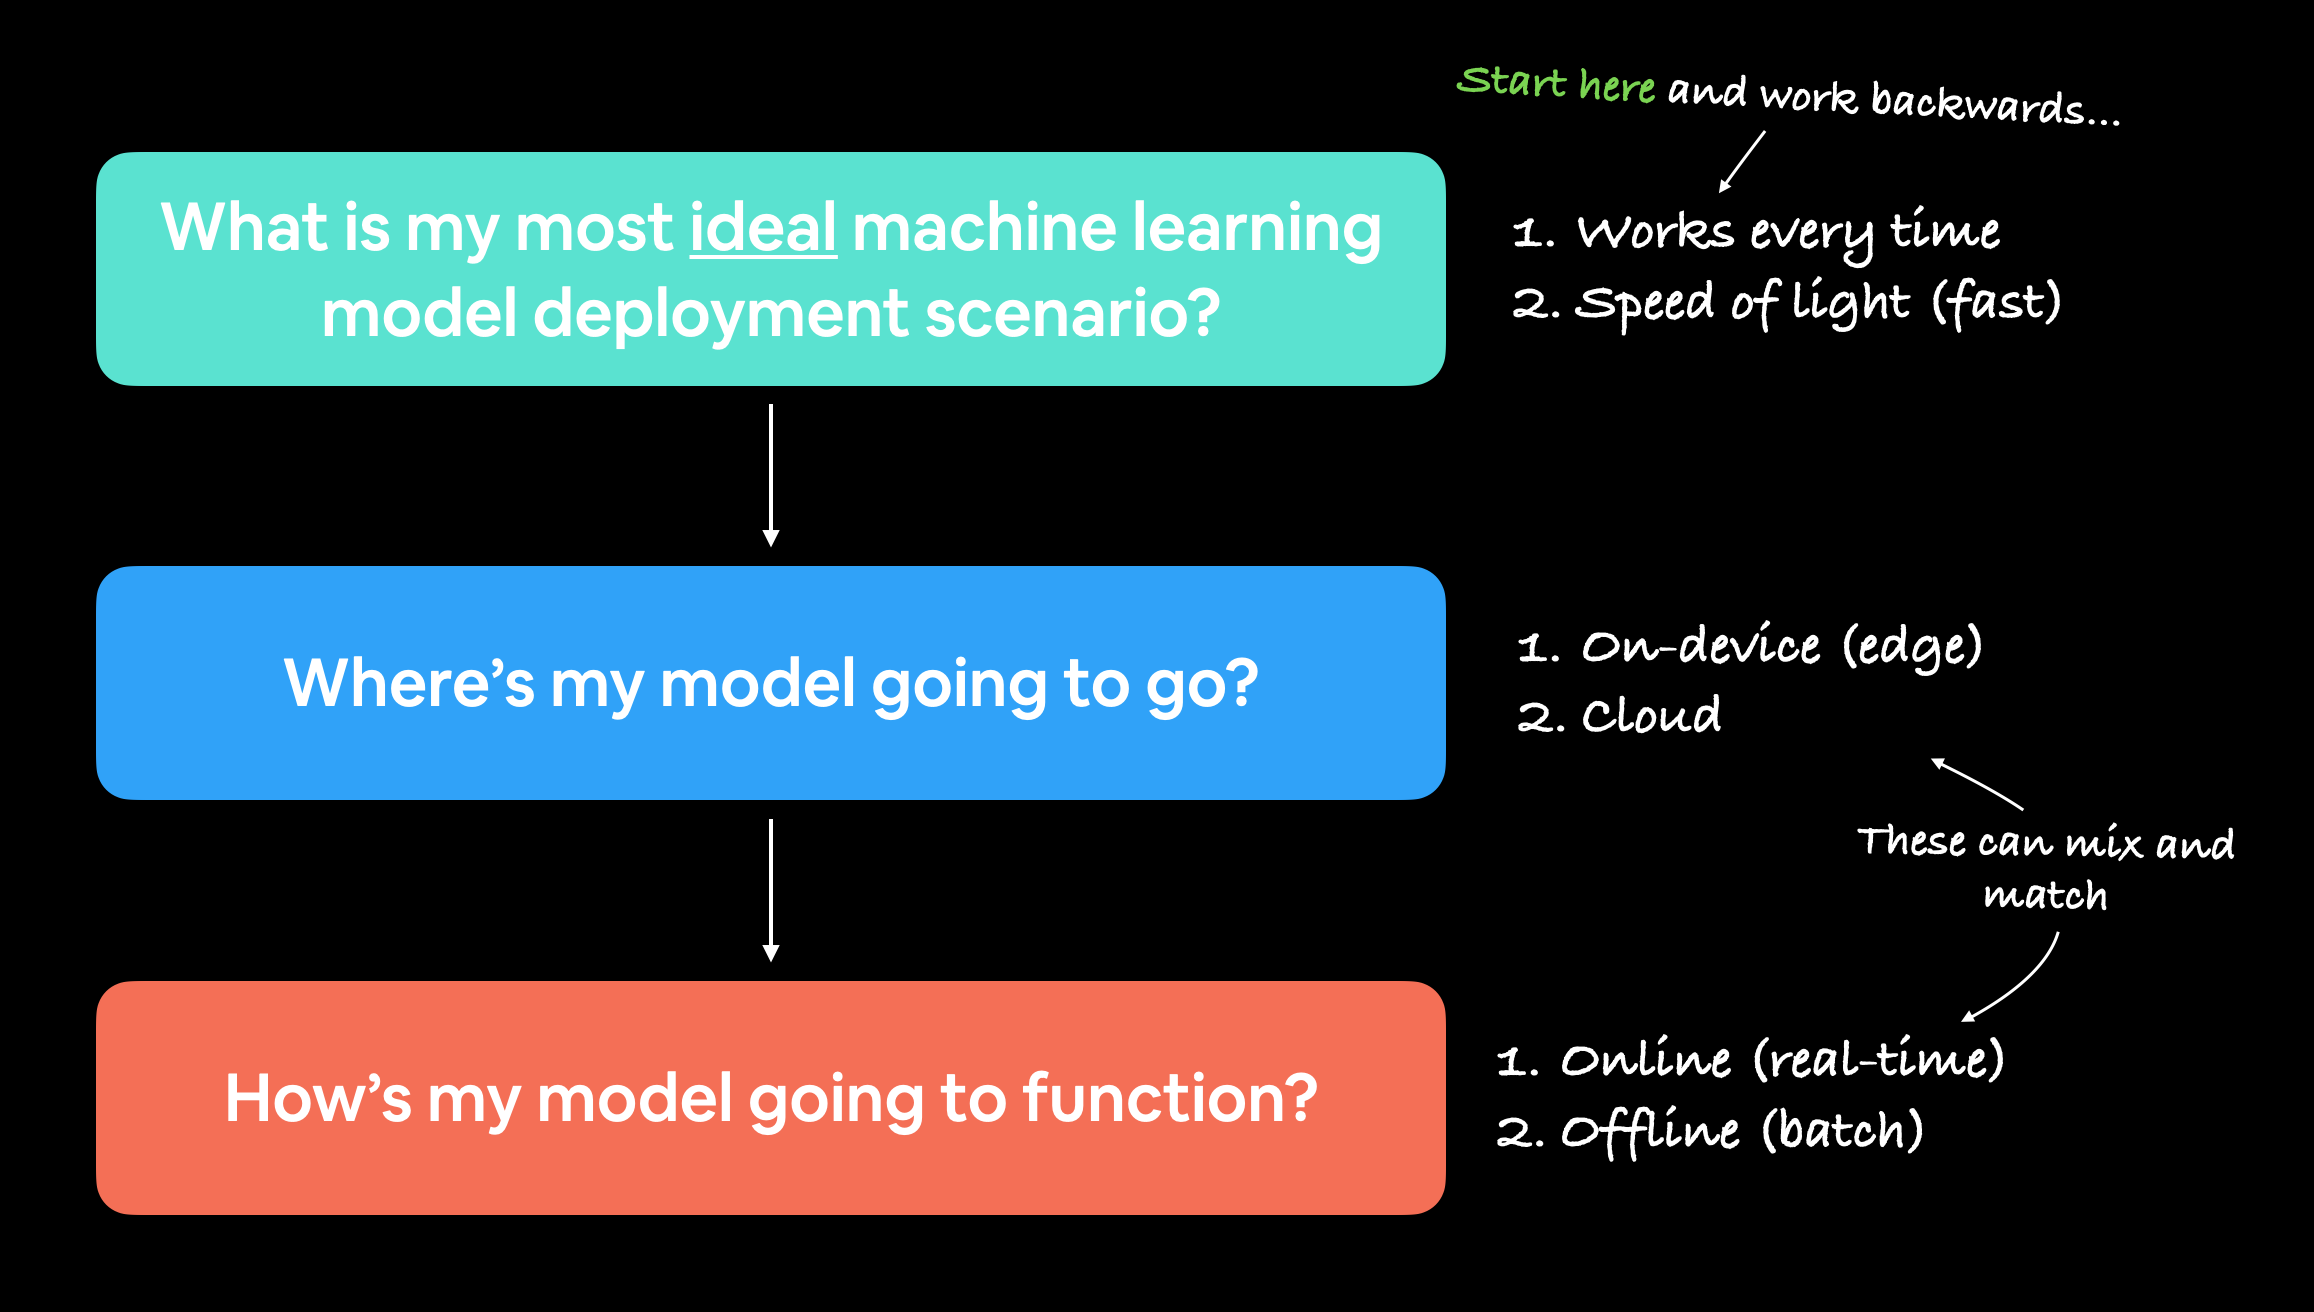 *When starting to deploy machine learning models, it's helpful to start by asking what's the most ideal use case and then work backwards from there, asking where the model's going to go and then how it's going to function.*
#### Where's it going to go?
When you deploy your machine learning model, where does it live?
The main debate here is usually on-device (also called edge/in the browser) or on the cloud (a computer/server that isn't the *actual* device someone/something calls the model from).
Both have their pros and cons.
| **Deployment location** | **Pros** | **Cons** |
| :----- | :----- | :----- |
| **On-device (edge/in the browser)** | Can be very fast (since no data leaves the device) | Limited compute power (larger models take longer to run) |
| | Privacy preserving (again no data has to leave the device) | Limited storage space (smaller model size required) |
| | No internet connection required (sometimes) | Device-specific skills often required |
| | | |
| **On cloud** | Near unlimited compute power (can scale up when needed) | Costs can get out of hand (if proper scaling limits aren't enforced) |
| | Can deploy one model and use everywhere (via API) | Predictions can be slower due to data having to leave device and predictions having to come back (network latency) |
| | Links into existing cloud ecosystem | Data has to leave device (this may cause privacy concerns) |
There are more details to these but I've left resources in the [extra-curriculum](https://www.learnpytorch.io/09_pytorch_model_deployment/#extra-curriculum) to learn more.
Let's give an example.
If we're deploying FoodVision Mini as an app, we want it to perform well and fast.
So which model would we prefer?
1. A model on-device that performs at 95% accuracy with an inference time (latency) of one second per prediction.
2. A model on the cloud that performs at 98% accuracy with an inference time of 10 seconds per per prediction (bigger, better model but takes longer to compute).
I've made these numbers up but they showcase a potential difference between on-device and on the cloud.
Option 1 could potentially be a smaller less performant model that runs fast because its able to fit on a mobile device.
Option 2 could potentially a larger more performant model that requires more compute and storage but it takes a bit longer to run because we have to send data off the device and get it back (so even though the actual prediction might be fast, the network time and data transfer has to factored in).
For FoodVision Mini, we'd likely prefer option 1, because the small hit in performance is far outweighed by the faster inference speed.
*When starting to deploy machine learning models, it's helpful to start by asking what's the most ideal use case and then work backwards from there, asking where the model's going to go and then how it's going to function.*
#### Where's it going to go?
When you deploy your machine learning model, where does it live?
The main debate here is usually on-device (also called edge/in the browser) or on the cloud (a computer/server that isn't the *actual* device someone/something calls the model from).
Both have their pros and cons.
| **Deployment location** | **Pros** | **Cons** |
| :----- | :----- | :----- |
| **On-device (edge/in the browser)** | Can be very fast (since no data leaves the device) | Limited compute power (larger models take longer to run) |
| | Privacy preserving (again no data has to leave the device) | Limited storage space (smaller model size required) |
| | No internet connection required (sometimes) | Device-specific skills often required |
| | | |
| **On cloud** | Near unlimited compute power (can scale up when needed) | Costs can get out of hand (if proper scaling limits aren't enforced) |
| | Can deploy one model and use everywhere (via API) | Predictions can be slower due to data having to leave device and predictions having to come back (network latency) |
| | Links into existing cloud ecosystem | Data has to leave device (this may cause privacy concerns) |
There are more details to these but I've left resources in the [extra-curriculum](https://www.learnpytorch.io/09_pytorch_model_deployment/#extra-curriculum) to learn more.
Let's give an example.
If we're deploying FoodVision Mini as an app, we want it to perform well and fast.
So which model would we prefer?
1. A model on-device that performs at 95% accuracy with an inference time (latency) of one second per prediction.
2. A model on the cloud that performs at 98% accuracy with an inference time of 10 seconds per per prediction (bigger, better model but takes longer to compute).
I've made these numbers up but they showcase a potential difference between on-device and on the cloud.
Option 1 could potentially be a smaller less performant model that runs fast because its able to fit on a mobile device.
Option 2 could potentially a larger more performant model that requires more compute and storage but it takes a bit longer to run because we have to send data off the device and get it back (so even though the actual prediction might be fast, the network time and data transfer has to factored in).
For FoodVision Mini, we'd likely prefer option 1, because the small hit in performance is far outweighed by the faster inference speed.
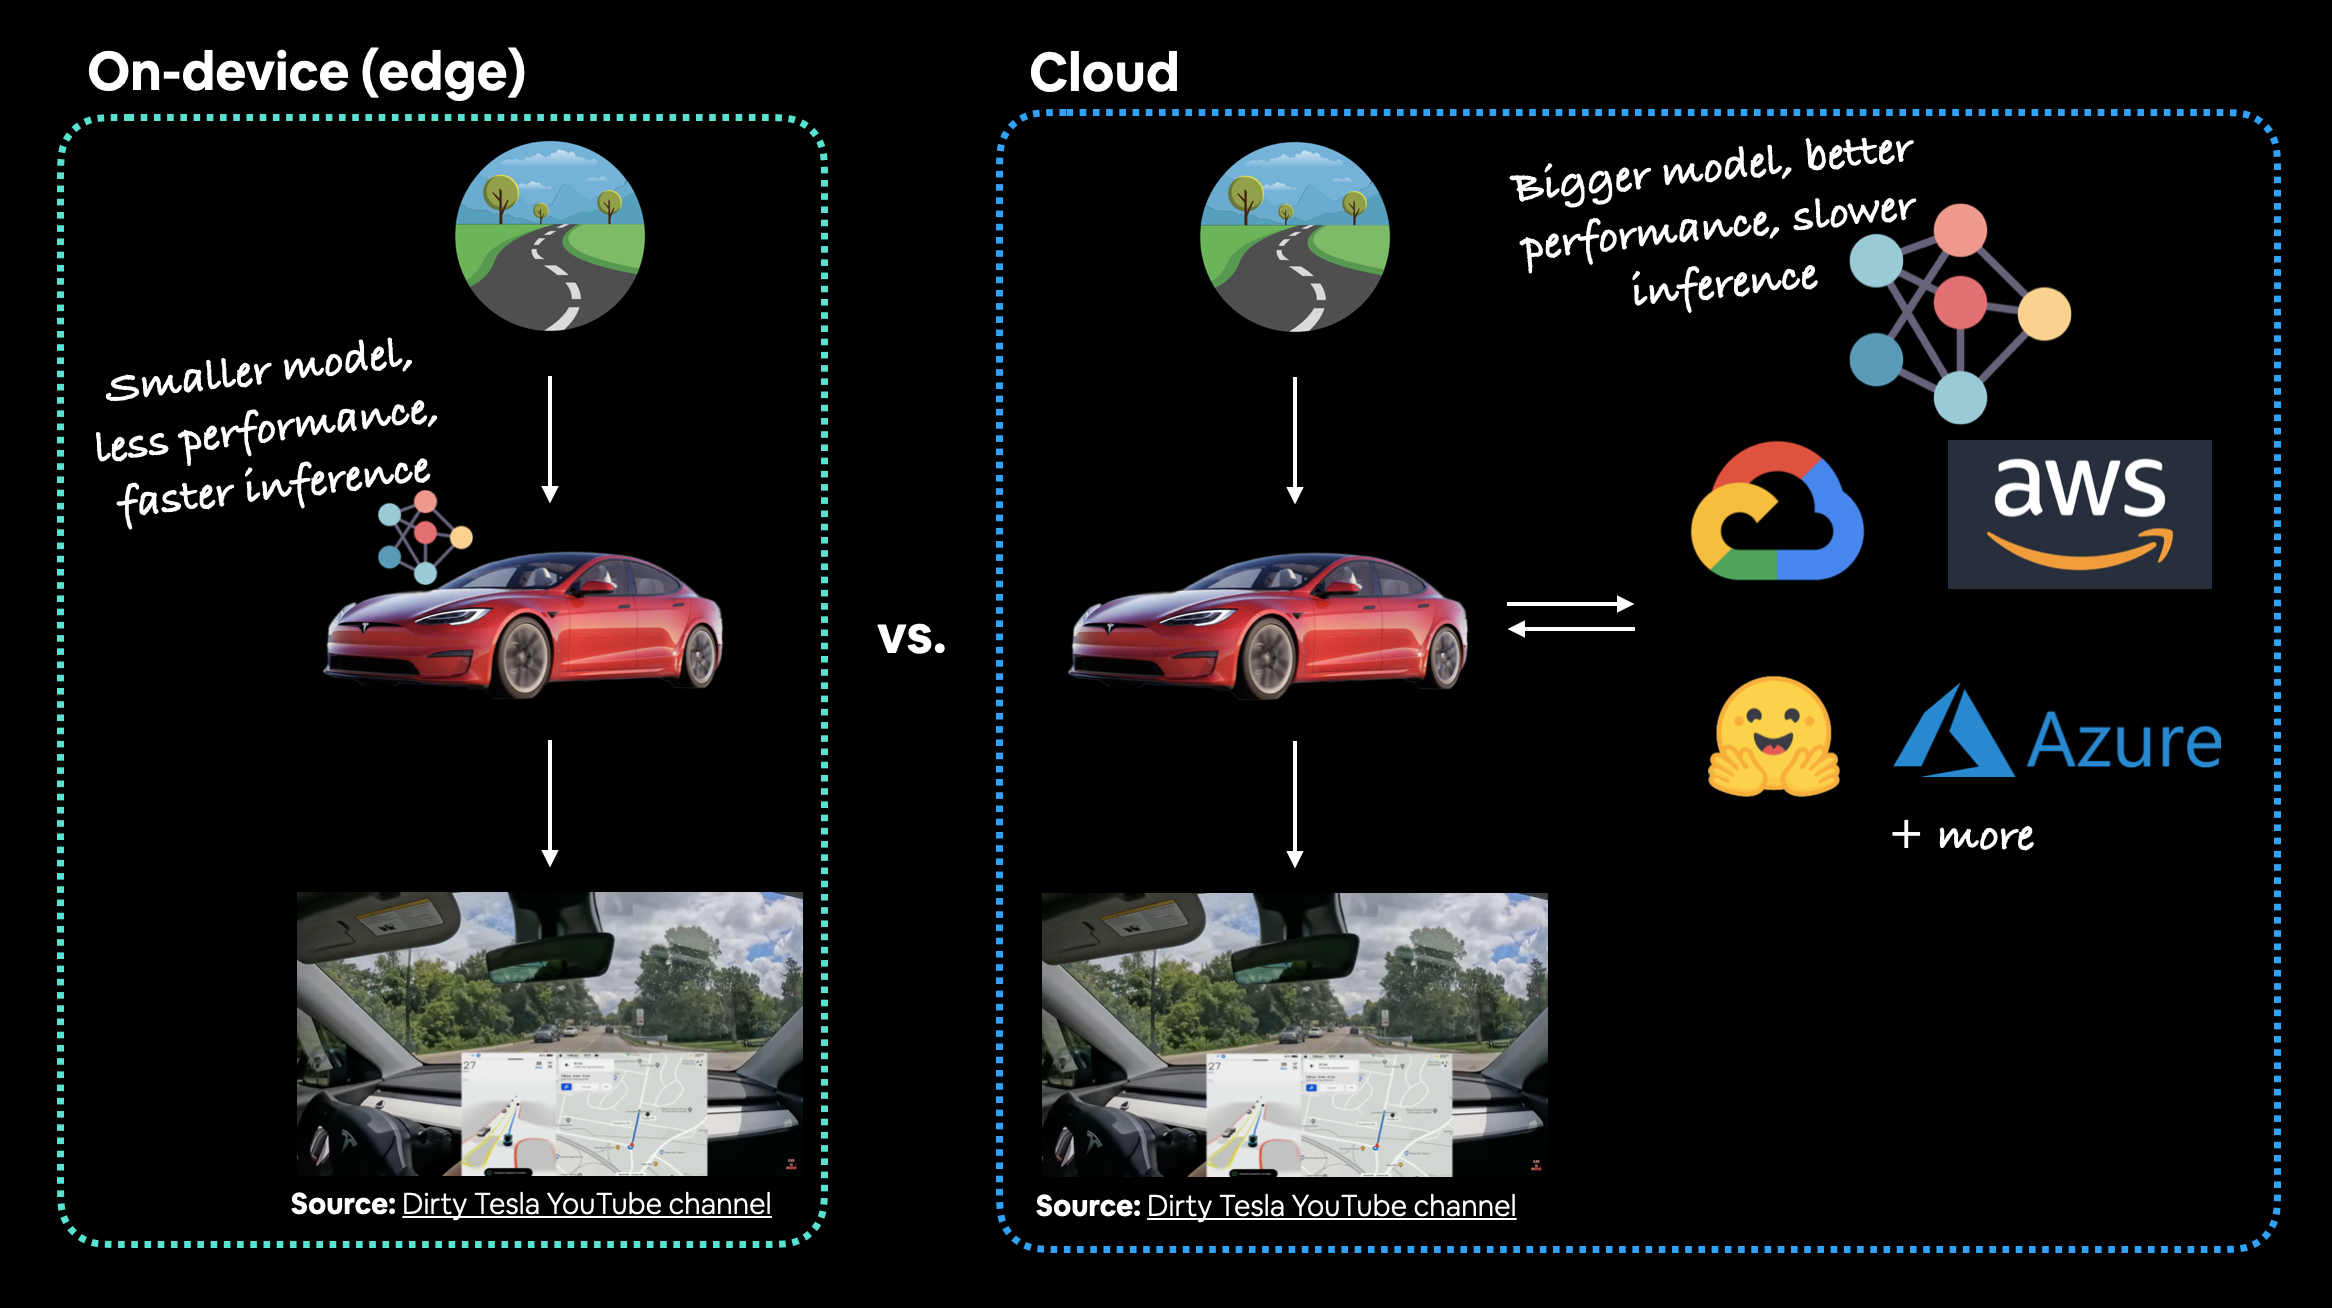 *In the case of a Tesla car's computer vision system, which would be better? A smaller model that performs well on device (model is on the car) or a larger model that performs better that's on the cloud? In this case, you'd much prefer the model being on the car. The extra network time it would take for data to go from the car to the cloud and then back to the car just wouldn't be worth it (or potentially even possible with poor signal areas).*
> **Note:** For a full example of seeing what it's like to deploy a PyTorch model to an edge device, see the [PyTorch tutorial on achieving real-time inference (30fps+)](https://pytorch.org/tutorials/intermediate/realtime_rpi.html) with a computer vision model on a Raspberry Pi.
#### Ways to deploy a machine learning model
We've discussed a couple of options for deploying machine learning models (on-device and cloud).
And each of these will have their specific requirements:
| **Tool/resource** | **Deployment type** |
| :----- | :----- |
| [Google's ML Kit](https://developers.google.com/ml-kit) | On-device (Android and iOS) |
| [Apple's Core ML](https://developer.apple.com/documentation/coreml) and [`coremltools` Python package](https://coremltools.readme.io/docs) | On-device (all Apple devices) |
| [Amazon Web Service's (AWS) Sagemaker](https://aws.amazon.com/sagemaker/) | Cloud |
| [Google Cloud's Vertex AI](https://cloud.google.com/vertex-ai) | Cloud |
| [Microsoft's Azure Machine Learning](https://azure.microsoft.com/en-au/services/machine-learning/) | Cloud |
| [Hugging Face Spaces](https://huggingface.co/spaces) | Cloud |
| API with [FastAPI](https://fastapi.tiangolo.com) | Cloud/self-hosted server |
| API with [TorchServe](https://pytorch.org/serve/) | Cloud/self-hosted server |
| [ONNX (Open Neural Network Exchange)](https://onnx.ai/index.html) | Many/general |
| Many more... |
> **Note:** An [application programming interface (API)](https://en.wikipedia.org/wiki/API) is a way for two (or more) computer programs to interact with each other. For example, if your model was deployed as API, you would be able to write a program that could send data to it and then receive predictions back.
Which option you choose will be highly dependent on what you're building/who you're working with.
But with so many options, it can be very intimidating.
So best to start small and keep it simple.
And one of the best ways to do so is by turning your machine learning model into a demo app with [Gradio](https://gradio.app) and then deploying it on Hugging Face Spaces.
We'll be doing just that with FoodVision Mini later on.
*In the case of a Tesla car's computer vision system, which would be better? A smaller model that performs well on device (model is on the car) or a larger model that performs better that's on the cloud? In this case, you'd much prefer the model being on the car. The extra network time it would take for data to go from the car to the cloud and then back to the car just wouldn't be worth it (or potentially even possible with poor signal areas).*
> **Note:** For a full example of seeing what it's like to deploy a PyTorch model to an edge device, see the [PyTorch tutorial on achieving real-time inference (30fps+)](https://pytorch.org/tutorials/intermediate/realtime_rpi.html) with a computer vision model on a Raspberry Pi.
#### Ways to deploy a machine learning model
We've discussed a couple of options for deploying machine learning models (on-device and cloud).
And each of these will have their specific requirements:
| **Tool/resource** | **Deployment type** |
| :----- | :----- |
| [Google's ML Kit](https://developers.google.com/ml-kit) | On-device (Android and iOS) |
| [Apple's Core ML](https://developer.apple.com/documentation/coreml) and [`coremltools` Python package](https://coremltools.readme.io/docs) | On-device (all Apple devices) |
| [Amazon Web Service's (AWS) Sagemaker](https://aws.amazon.com/sagemaker/) | Cloud |
| [Google Cloud's Vertex AI](https://cloud.google.com/vertex-ai) | Cloud |
| [Microsoft's Azure Machine Learning](https://azure.microsoft.com/en-au/services/machine-learning/) | Cloud |
| [Hugging Face Spaces](https://huggingface.co/spaces) | Cloud |
| API with [FastAPI](https://fastapi.tiangolo.com) | Cloud/self-hosted server |
| API with [TorchServe](https://pytorch.org/serve/) | Cloud/self-hosted server |
| [ONNX (Open Neural Network Exchange)](https://onnx.ai/index.html) | Many/general |
| Many more... |
> **Note:** An [application programming interface (API)](https://en.wikipedia.org/wiki/API) is a way for two (or more) computer programs to interact with each other. For example, if your model was deployed as API, you would be able to write a program that could send data to it and then receive predictions back.
Which option you choose will be highly dependent on what you're building/who you're working with.
But with so many options, it can be very intimidating.
So best to start small and keep it simple.
And one of the best ways to do so is by turning your machine learning model into a demo app with [Gradio](https://gradio.app) and then deploying it on Hugging Face Spaces.
We'll be doing just that with FoodVision Mini later on.
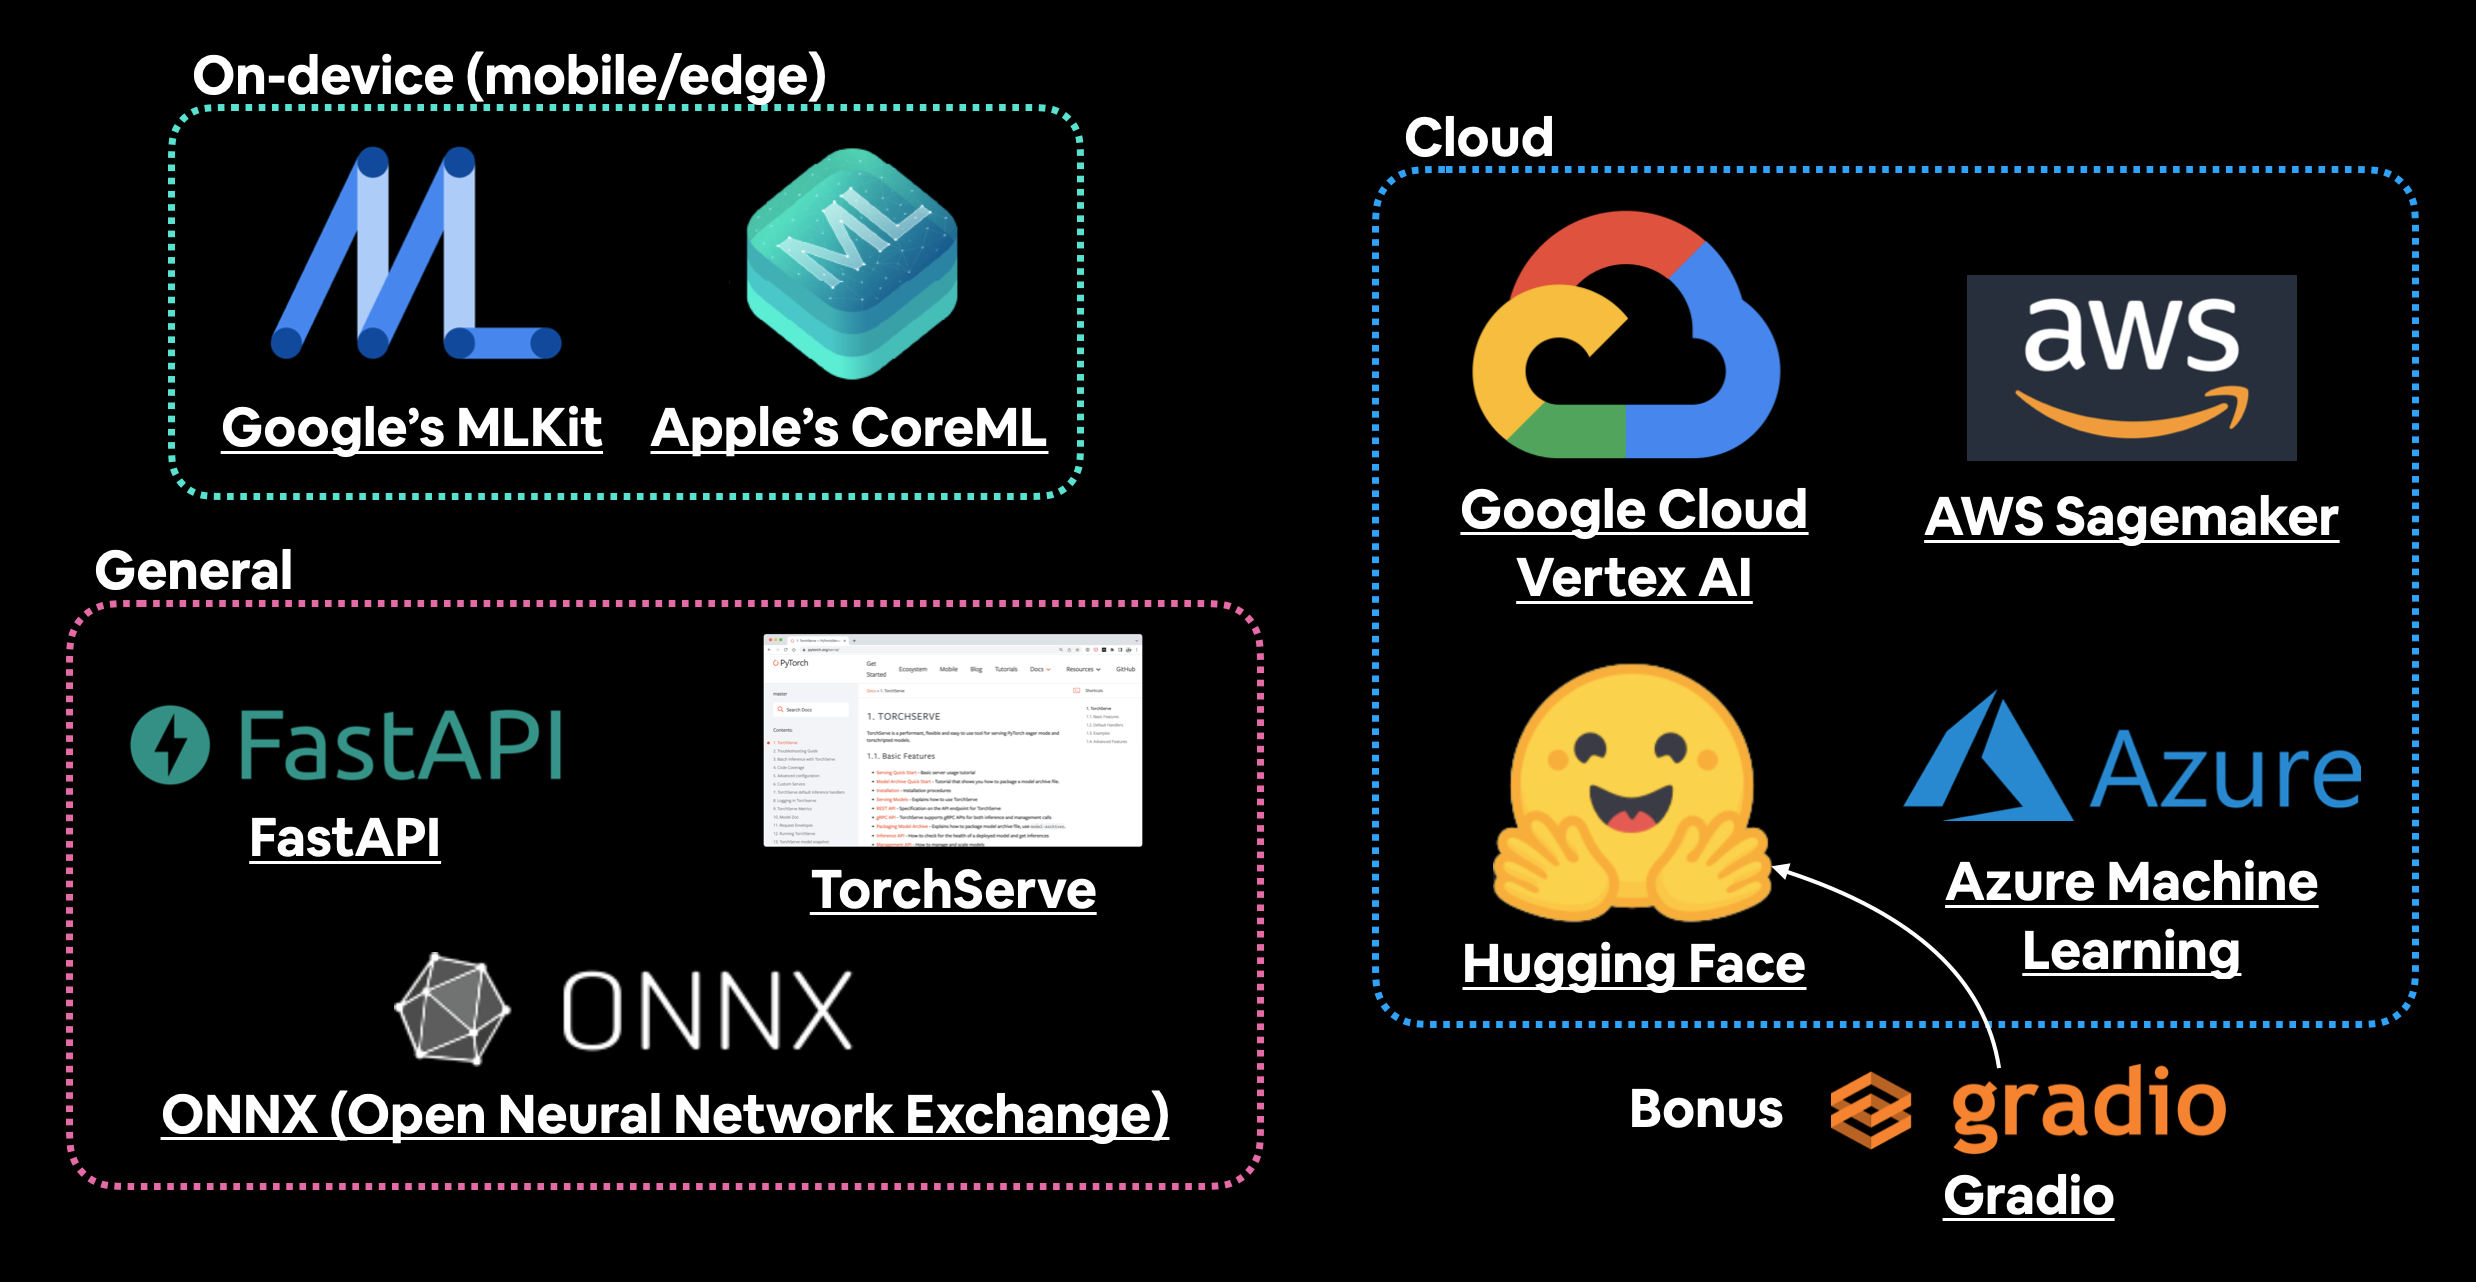 *A handful of places and tools to host and deploy machine learning models. There are plenty I've missed so if you'd like to add more, please leave a [discussion on GitHub](https://github.com/mrdbourke/pytorch-deep-learning/discussions).*
### What we're going to Learn
Enough talking about deploying a machine learning model.
Let's become machine learning engineers and actually deploy one.
Our goal is to deploy our FoodVision Model via a demo Gradio app with the following metrics:
1. **Performance:** 95%+ accuracy.
2. **Speed:** real-time inference of 30FPS+ (each prediction has a latency of lower than ~0.03s).
Then we'll deploy the one which performs closest to our goal metrics.
Finally, we'll finish with a (BIG) surprise bonus.
| **Topic** | **Contents** |
| :----- | :----- |
| **0. Getting setup** | We've written a fair bit of useful code over the past few sections, let's download it and make sure we can use it again. |
| **1. Get data** | Let's download the [`pizza_steak_sushi_20_percent.zip`](https://github.com/mrdbourke/pytorch-deep-learning/blob/main/data/pizza_steak_sushi_20_percent.zip) dataset so we can train our previously best performing models on the same dataset. |
| **2. Creating an Model feature extractor** | An EfficientNetB2 feature extractor performed the best on our pizza, steak, sushi dataset in [07. PyTorch Experiment Tracking](https://www.learnpytorch.io/07_pytorch_experiment_tracking/), let's recreate it as a candidate for deployment. |
| **3. Making predictions with our trained models and timing them** | We've built two of the best performing models yet, let's make predictions with them and track their results. |
| **4. Bringing FoodVision Mini to life by creating a Gradio demo** | One of our models performs better than the other (in terms of our goals), so let's turn it into a working app demo! |
| **5. Turning our FoodVision Mini Gradio demo into a deployable app** | Our Gradio app demo works locally, let's prepare it for deployment! |
| **6. Deploying our Gradio demo to HuggingFace Spaces** | Let's take FoodVision Mini to the web and make it pubically accessible for all! |
#### Uploading to Hugging Face
We've verfied our FoodVision Mini app works locally, however, the fun of creating a machine learning demo is to show it to other people and allow them to use it.
To do so, we're going to upload our FoodVision Mini demo to Hugging Face.
> **Note:** The following series of steps uses a Git (a file tracking system) workflow. For more on how Git works, I'd recommend going through the [Git and GitHub for Beginners tutorial](https://youtu.be/RGOj5yH7evk) on freeCodeCamp.
1. [Sign up](https://huggingface.co/join) for a Hugging Face account.
2. Start a new Hugging Face Space by going to your profile and then [clicking "New Space"](https://huggingface.co/new-space).
* **Note:** A Space in Hugging Face is also known as a "code repository" (a place to store your code/files) or "repo" for short.
3. Give the Space a name, for example, mine is called `mrdbourke/foodvision_mini`, you can see it here: https://huggingface.co/spaces/mrdbourke/foodvision_mini
4. Select a license (I used [MIT](https://opensource.org/licenses/MIT)).
5. Select Gradio as the Space SDK (software development kit).
* **Note:** You can use other options such as Streamlit but since our app is built with Gradio, we'll stick with that.
6. Choose whether your Space is it's public or private (I selected public since I'd like my Space to be available to others).
7. Click "Create Space".
8. Clone the repo locally by running something like: `git clone https://huggingface.co/spaces/[YOUR_USERNAME]/[YOUR_SPACE_NAME]` in terminal or command prompt.
* **Note:** You can also add files via uploading them under the "Files and versions" tab.
9. Copy/move the contents of the downloaded `foodvision_mini` folder to the cloned repo folder.
10. To upload and track larger files (e.g. files over 10MB or in our case, our PyTorch model file) you'll need to [install Git LFS](https://git-lfs.github.com/) (which stands for "git large file storage").
11. After you've installed Git LFS, you can activate it by running `git lfs install`.
12. In the `foodvision_mini` directory, track the files over 10MB with Git LFS with `git lfs track "*.file_extension"`.
* Track EffNetB2 PyTorch model file with `git lfs track "09_pretrained_effnetb2_feature_extractor_pizza_steak_sushi_20_percent.pth"`.
13. Track `.gitattributes` (automatically created when cloning from HuggingFace, this file will help ensure our larger files are tracked with Git LFS). You can see an example `.gitattributes` file on the [FoodVision Mini Hugging Face Space](https://huggingface.co/spaces/mrdbourke/foodvision_mini/blob/main/.gitattributes).
* `git add .gitattributes`
14. Add the rest of the `foodvision_mini` app files and commit them with:
* `git add *`
* `git commit -m "first commit"`
15. Push (upload) the files to Hugging Face:
* `git push`
16. Wait 3-5 minutes for the build to happen (future builds are faster) and your app to become live!
If everything worked, you should see a live running example of our FoodVision Mini Gradio demo like the one here: https://huggingface.co/spaces/mrdbourke/foodvision_mini
And we can even embed our FoodVision Mini Gradio demo into our notebook as an [iframe](https://gradio.app/sharing_your_app/#embedding-with-iframes) with [`IPython.display.IFrame`](https://ipython.readthedocs.io/en/stable/api/generated/IPython.display.html#IPython.display.IFrame) and a link to our space in the format `https://hf.space/embed/[YOUR_USERNAME]/[YOUR_SPACE_NAME]/+`.
Click on this link to try out Foodvision App
*A handful of places and tools to host and deploy machine learning models. There are plenty I've missed so if you'd like to add more, please leave a [discussion on GitHub](https://github.com/mrdbourke/pytorch-deep-learning/discussions).*
### What we're going to Learn
Enough talking about deploying a machine learning model.
Let's become machine learning engineers and actually deploy one.
Our goal is to deploy our FoodVision Model via a demo Gradio app with the following metrics:
1. **Performance:** 95%+ accuracy.
2. **Speed:** real-time inference of 30FPS+ (each prediction has a latency of lower than ~0.03s).
Then we'll deploy the one which performs closest to our goal metrics.
Finally, we'll finish with a (BIG) surprise bonus.
| **Topic** | **Contents** |
| :----- | :----- |
| **0. Getting setup** | We've written a fair bit of useful code over the past few sections, let's download it and make sure we can use it again. |
| **1. Get data** | Let's download the [`pizza_steak_sushi_20_percent.zip`](https://github.com/mrdbourke/pytorch-deep-learning/blob/main/data/pizza_steak_sushi_20_percent.zip) dataset so we can train our previously best performing models on the same dataset. |
| **2. Creating an Model feature extractor** | An EfficientNetB2 feature extractor performed the best on our pizza, steak, sushi dataset in [07. PyTorch Experiment Tracking](https://www.learnpytorch.io/07_pytorch_experiment_tracking/), let's recreate it as a candidate for deployment. |
| **3. Making predictions with our trained models and timing them** | We've built two of the best performing models yet, let's make predictions with them and track their results. |
| **4. Bringing FoodVision Mini to life by creating a Gradio demo** | One of our models performs better than the other (in terms of our goals), so let's turn it into a working app demo! |
| **5. Turning our FoodVision Mini Gradio demo into a deployable app** | Our Gradio app demo works locally, let's prepare it for deployment! |
| **6. Deploying our Gradio demo to HuggingFace Spaces** | Let's take FoodVision Mini to the web and make it pubically accessible for all! |
#### Uploading to Hugging Face
We've verfied our FoodVision Mini app works locally, however, the fun of creating a machine learning demo is to show it to other people and allow them to use it.
To do so, we're going to upload our FoodVision Mini demo to Hugging Face.
> **Note:** The following series of steps uses a Git (a file tracking system) workflow. For more on how Git works, I'd recommend going through the [Git and GitHub for Beginners tutorial](https://youtu.be/RGOj5yH7evk) on freeCodeCamp.
1. [Sign up](https://huggingface.co/join) for a Hugging Face account.
2. Start a new Hugging Face Space by going to your profile and then [clicking "New Space"](https://huggingface.co/new-space).
* **Note:** A Space in Hugging Face is also known as a "code repository" (a place to store your code/files) or "repo" for short.
3. Give the Space a name, for example, mine is called `mrdbourke/foodvision_mini`, you can see it here: https://huggingface.co/spaces/mrdbourke/foodvision_mini
4. Select a license (I used [MIT](https://opensource.org/licenses/MIT)).
5. Select Gradio as the Space SDK (software development kit).
* **Note:** You can use other options such as Streamlit but since our app is built with Gradio, we'll stick with that.
6. Choose whether your Space is it's public or private (I selected public since I'd like my Space to be available to others).
7. Click "Create Space".
8. Clone the repo locally by running something like: `git clone https://huggingface.co/spaces/[YOUR_USERNAME]/[YOUR_SPACE_NAME]` in terminal or command prompt.
* **Note:** You can also add files via uploading them under the "Files and versions" tab.
9. Copy/move the contents of the downloaded `foodvision_mini` folder to the cloned repo folder.
10. To upload and track larger files (e.g. files over 10MB or in our case, our PyTorch model file) you'll need to [install Git LFS](https://git-lfs.github.com/) (which stands for "git large file storage").
11. After you've installed Git LFS, you can activate it by running `git lfs install`.
12. In the `foodvision_mini` directory, track the files over 10MB with Git LFS with `git lfs track "*.file_extension"`.
* Track EffNetB2 PyTorch model file with `git lfs track "09_pretrained_effnetb2_feature_extractor_pizza_steak_sushi_20_percent.pth"`.
13. Track `.gitattributes` (automatically created when cloning from HuggingFace, this file will help ensure our larger files are tracked with Git LFS). You can see an example `.gitattributes` file on the [FoodVision Mini Hugging Face Space](https://huggingface.co/spaces/mrdbourke/foodvision_mini/blob/main/.gitattributes).
* `git add .gitattributes`
14. Add the rest of the `foodvision_mini` app files and commit them with:
* `git add *`
* `git commit -m "first commit"`
15. Push (upload) the files to Hugging Face:
* `git push`
16. Wait 3-5 minutes for the build to happen (future builds are faster) and your app to become live!
If everything worked, you should see a live running example of our FoodVision Mini Gradio demo like the one here: https://huggingface.co/spaces/mrdbourke/foodvision_mini
And we can even embed our FoodVision Mini Gradio demo into our notebook as an [iframe](https://gradio.app/sharing_your_app/#embedding-with-iframes) with [`IPython.display.IFrame`](https://ipython.readthedocs.io/en/stable/api/generated/IPython.display.html#IPython.display.IFrame) and a link to our space in the format `https://hf.space/embed/[YOUR_USERNAME]/[YOUR_SPACE_NAME]/+`.
Click on this link to try out Foodvision App