
Spaces:
Sleeping

Sleeping

| # constants.py | |
| THREAD_FILE_UPLOADED_SUCCESS = "Thread file uploaded successfully" | |
| THREAD_FILES_RETRIEVED_SUCCESS = "Thread files retrieved successfully" | |
| THREAD_FILE_DELETED_SUCCESS = "Thread file deleted successfully" | |
| THREAD_FILE_CONTENT_RETRIEVED_SUCCESS = "Thread file content retrieved successfully" | |
| FAILED_TO_UPLOAD_THREAD_FILE = "Failed to upload thread file: {error}" | |
| FAILED_TO_RETRIEVE_THREAD_FILES = "Failed to retrieve thread files: {error}" | |
| FAILED_TO_DELETE_THREAD_FILE = "Failed to delete thread file: {error}" | |
| FAILED_TO_RETRIEVE_THREAD_FILE_CONTENT = "Failed to retrieve thread file content: {error}" | |
| SUGESSTIONS_AGENT_SYSTEM_PROMPT = """ | |
| You are the Suggestions Agent. | |
| Your role is to analyze the current user context and recommend EXACTLY 3 next suggestions that help the user progress efficiently. | |
| Each suggestion must be one of the predefined actions and must follow this format: | |
| - title: Short, suggestion name. | |
| - prompt: A short, natural language command written from the user's perspective. STRICTLY not "your", but the user's. | |
| --------------------------------------- | |
| Available Suggestion Types: | |
| - SETUP BRAND | |
| - EXPLAIN PLATFORM | |
| - PLATFORM TOUR | |
| - CREATE CAMPAIGN | |
| - HELP EXPLAIN FIELDS | |
| - SHOW NEXT STEPS | |
| - ENHANCE PROMPT | |
| - GENERATE CONCEPT VISUALS | |
| - ANALYZE MOODBOARD | |
| - GENERATE PROMPTS | |
| - OPEN MOODBOARD | |
| - EXPLAIN GENERATION FLOW | |
| - GENERATE VIDEO | |
| - ENHANCE IMAGE | |
| - HELP FILL FIELDS | |
| - AUTOFILL DRAFT | |
| --------------------------------------- | |
| Suggestion Selection Logic: | |
| 1. If NO brand selected: | |
| → SETUP BRAND, EXPLAIN PLATFORM, PLATFORM TOUR | |
| 2. If brand exists but NO campaign: | |
| → CREATE CAMPAIGN, HELP EXPLAIN FIELDS, SHOW NEXT STEPS | |
| 3. If user writing a prompt: | |
| → ENHANCE PROMPT | |
| 4. If user requests images (keywords: “image”, “visual”, “ad”, “product shot”, “KV”): | |
| → GENERATE CONCEPT VISUALS, ENHANCE PROMPT | |
| → If moodboard exists: also include ANALYZE MOODBOARD | |
| 5. If moodboard exists but NO concept visuals: | |
| → GENERATE PROMPTS, GENERATE CONCEPT VISUALS, OPEN MOODBOARD, EXPLAIN GENERATION FLOW | |
| 6. If multiple concept visuals already generated: | |
| → GENERATE VIDEO, ENHANCE IMAGE, ENHANCE PROMPT | |
| 7. If missing fields in brand or campaign: | |
| → HELP FILL FIELDS, HELP EXPLAIN FIELDS, AUTOFILL DRAFT | |
| 8. If user is confused or asks “what now?”: | |
| → EXPLAIN PLATFORM, SHOW NEXT STEPS, PLATFORM TOUR | |
| --------------------------------------- | |
| Hard Rules: | |
| - Always select EXACTLY 3 suggestions unless the logic indicates fewer are valid. | |
| - Prioritize relevance based on latest user action. | |
| - Do not use the same titles as it is, vary them with new 2-3 word combinations. | |
| - The "prompt" must be concise and actionable. | |
| - Output must be valid JSON, matching the schema. No extra keys. | |
| If no clear logic applies, default to: | |
| → SHOW NEXT STEPS, EXPLAIN PLATFORM | |
| Return ONLY JSON. No additional text. | |
| """ | |
| ABOUT_KITTYKAT_AGENT = """ | |
| **<span style="font-size:28px">KittyKat Platform – Full Walkthrough & User Guide</span>** | |
| The KittyKat Platform enables clients to create and manage brands, launch campaigns, build moodboards, and generate AI-powered visuals with the help of Ask KittyKat chatbot. The platform supports collaboration between clients, creatives, and experts, ensuring a streamlined workflow from concept to final media asset. | |
| <div align="left"> | |
| **<span style="font-size:24px">Table of Contents</span>** | |
| 1. [_<span style="font-size:20px">1. Invitation & Account Creation</span>_](#1-invitation--account-creation) | |
| 2. [_<span style="font-size:20px">2. Login Page</span>_](#2-login-page) | |
| 3. [_<span style="font-size:20px">3. Home Page</span>_](#3-home-page) | |
| 4. [_<span style="font-size:20px">4. Brands Section</span>_](#4-brands-section) | |
| 5. [_<span style="font-size:20px">5. Campaigns</span>_](#5-campaigns) | |
| 6. [_<span style="font-size:20px">6. Moodboard Section</span>_](#6-moodboard-section) | |
| 7. [_<span style="font-size:20px">7. Concept Visual Media</span>_](#7-concept-visual-media) | |
| 8. [_<span style="font-size:20px">8. Notifications</span>_](#8-notifications) | |
| 9. [_<span style="font-size:20px">9. Gallery & Media Library</span>_](#9-gallery--media-library) | |
| </div> | |
| <br/> | |
| **<p style="font-size:25px" id="1-invitation--account-creation" >1. Invitation & Account Creation</p>** | |
| Before logging in, you must first accept your platform invitation. | |
| <table> | |
| <tr> | |
| <td style="width:60%; vertical-align:top;"> | |
| **Steps:** | |
| 1. Check your registered email inbox for an invitation from KittyKat (Check in spam too). | |
| 2. Click the **Sign Up / Accept Invitation** link in the email. | |
| 3. You’ll be redirected to the platform to create your account: | |
| - Enter your name. | |
| - Set your password. | |
| - Confirm your details. | |
| 4. Once your account is created successfully, you’ll be redirected to the **KittyKat Site**. | |
| </td> | |
| <td style="width:40%; text-align:right;"> | |
| <img src="https://storage.googleapis.com/kittykat-agents/platform-assets/Screenshots/Invitation.png" alt="KittyKat Invitation Screenshot" width="350"/> | |
| </td> | |
| </tr> | |
| </table> | |
| **<span style="font-size:25px" id="2-login-page">2. Login Page</span>** | |
| The login page is the entry point for all users. Here you can securely log into the KittyKat platform. | |
| <table> | |
| <tr> | |
| <td style="width:60%; vertical-align:top;"> | |
| **Steps to Log In:** | |
| 1. Enter your registered email address in the **Email** field. | |
| 2. Type your password into the **Password** field. | |
| 3. Click **Login**. | |
| </td> | |
| <td style="width:40%; text-align:right;"> | |
| <img src="https://storage.googleapis.com/kittykat-agents/platform-assets/Screenshots/Login-page.png" alt="KittyKat Login Screenshot" width="350"/> | |
| </td> | |
| </tr> | |
| </table> | |
| **<span style="font-size:25px" id="3-home-page">3. Home Page</span>** | |
| The **Home Page** is the central dashboard of the KittyKat Platform. From here, you can manage brands, view key details, and interact with the Ask KittyKat assistant for guidance. | |
| **<span style="font-size:20px">3.1 Layout Overview</span>** | |
| The page is divided into two main sections: | |
| **Left Panel – Quick Access Menu** | |
| - **Brand** – Overview of the brand, including details such as purpose, colors, and typography. | |
| - **Campaigns** – Set up and manage campaign-specific activities. | |
| - **Moodboards** – Design and organize the visual direction of campaigns. | |
| - **Concept Visual Media** – Generate AI-powered fashion images and videos. | |
| **Right Panel – Ask KittyKat Assistant** | |
| - Get real-time guidance, troubleshooting, and suggestions for next steps. | |
| <p align="center"> | |
| <img src="https://storage.googleapis.com/kittykat-agents/platform-assets/Screenshots/Layout-Overview.png" alt="KittyKat Layout Overview" width="600"/> | |
| </p> | |
| **<span style="font-size:20px">3.2 Top Navigation Bar</span>** | |
| <p align="left"> | |
| <img src="https://storage.googleapis.com/kittykat-agents/platform-assets/Screenshots/Top%20navigation%20bar.png" alt="Top Navigation Bar" width="600"/> | |
| </p> | |
| **Home Icon →** | |
| Returns you to this page from anywhere in the platform. | |
| <p align="center"> | |
| <img src="https://storage.googleapis.com/kittykat-agents/platform-assets/Screenshots/Home%20Icon.png" alt="Home Icon" width="80"/> | |
| </p> | |
| **Notifications Bell →** | |
| Displays new alerts (campaign updates, comments, approvals, etc). | |
| For more details, see **Section 7: Notifications**. | |
| <p align="center"> | |
| <img src="https://storage.googleapis.com/kittykat-agents/platform-assets/Screenshots/Notification%20bell.png" alt="Notifications Bell" width="80"/> | |
| </p> | |
| **Gallery Icon →** | |
| Direct access to the **Media Library** and creative assets. | |
| <p align="center"> | |
| <img src="https://storage.googleapis.com/kittykat-agents/platform-assets/Screenshots/Gallery%20Icon.png" alt="Gallery Icon" width="80"/> | |
| </p> | |
| **Event Manager →** | |
| Shows the status of media creation requests (**Created**, **In Progress**, **Rejected**). | |
| Provides notifications when a request is completed or rejected. | |
| <p align="center"> | |
| <img src="https://storage.googleapis.com/kittykat-agents/platform-assets/Screenshots/Event%20Manager.png" alt="Event Manager" width="80"/> | |
| </p> | |
| **Credits / Balance Display (top right) →** | |
| Shows the number of credits left in your account. | |
| Credits are used for AI-powered features and media handling. | |
| <p align="center"> | |
| <img src="https://storage.googleapis.com/kittykat-agents/platform-assets/Screenshots/Credits%20Display.png" alt="Credits Display" width="80"/> | |
| </p> | |
| **Profile Menu (top right circle) →** | |
| Contains personal settings and account management options. | |
| <p align="center"> | |
| <img src="https://storage.googleapis.com/kittykat-agents/platform-assets/Screenshots/Profile%20Menu.png" alt="Profile Menu" width="80"/> | |
| </p> | |
| **<span style="font-size:20px">3.3 Selecting a Brand</span>** | |
| At the top of the Brand Panel, click **Select Brand**. | |
| A drop down appears with a search bar. | |
| If existing brands are available, you can select one directly. | |
| If no brands exist, you’ll see the message _“No existing brands found.”_ | |
| <p align="left"> | |
| <img src="https://storage.googleapis.com/kittykat-agents/platform-assets/Screenshots/Selecting%20Brand.png" alt="Selecting a Brand" width="600"/> | |
| </p> | |
| **<span style="font-size:20px">3.4 Creating a New Brand</span>** | |
| If no brand exists, you can create one from scratch. | |
| <table> | |
| <tr> | |
| <td style="width:60%; vertical-align:top;"> | |
| **Steps to Create a New Brand:** | |
| 1. Click the **“+ New Brand”** button next to the Select Brand field. | |
| 2. A guided setup begins in the **Ask KittyKat assistant panel** on the right. | |
| 3. The Ask KittyKat will ask for brand details step by step (e.g., name). | |
| 4. Respond directly in the chat box at the bottom of the page. | |
| </td> | |
| <td style="width:40%; text-align:right;"> | |
| <img src="https://storage.googleapis.com/kittykat-agents/platform-assets/Screenshots/chat%20panel.png" alt="Chat Panel" width="300"/> | |
| </td> | |
| </tr> | |
| </table> | |
| <p align="left"> | |
| <img src="https://storage.googleapis.com/kittykat-agents/platform-assets/Screenshots/Create%20new-brand.png" alt="Create New Brand Screenshot" width="600"/> | |
| </p> | |
| **<span style="font-size:20px">3.5 Brand Information Fields</span>** | |
| Each brand is displayed with the following sections: | |
| - **Brand Overview** – A short description of the brand. | |
| - **Brand Purpose** – The vision, mission, or purpose of the brand. | |
| - **Brand Colors** – The color palette associated with the brand. | |
| The **Ask KittyKat agent** collects the information you provide and automatically fills in the fields for you. You can still edit or copy each field afterwards using the edit feature on the right of each box. | |
| <p align="center"> | |
| <img src="https://storage.googleapis.com/kittykat-agents/platform-assets/Screenshots/Brand%20Information%20Fields.png" alt="Brand Information Fields" width="600"/> | |
| </p> | |
| **<span style="font-size:20px">3.6 Ask KittyKat Assistant Chat Panel</span>** | |
| On the right-hand side, the **Ask KittyKat assistant panel** provides contextual help and guidance. | |
| **Features:** | |
| - Suggestions for next steps (e.g., _“Field-by-field copy/paste text for your software?”_). | |
| - Troubleshooting tips if something doesn’t appear. | |
| - Direct chat for building brands step by step. | |
| You can type responses in the chat box at the bottom. Options include attaching files, images, or even voice input. | |
| <p align="center"> | |
| <img src="https://storage.googleapis.com/kittykat-agents/platform-assets/Screenshots/Ask%20KittyKat%20chat-panel.png" alt="Ask KittyKat Chat Panel" width="600"/> | |
| </p> | |
| <p align="center"> | |
| <img src="https://storage.googleapis.com/kittykat-agents/platform-assets/Screenshots/Ask%20kittykat%20chat-panel(1).png" alt="Ask KittyKat Chat Panel 2" width="600"/> | |
| </p> | |
| **<span style="font-size:25px" id="4-brands-section">4. Brands Section</span>** | |
| The **Brands section** is where you define, organize, and manage all details related to your brand identity. Each brand has multiple fields covering its mission, vision, design guidelines, media assets, and more. This section ensures consistency across campaigns and moodboards. | |
| **<span style="font-size:20px">4.1 Selecting or Creating a Brand</span>** | |
| - **Select Brand dropdown**: Search and select an existing brand from the list. | |
| - **New Brand (+ button)**: Create a new brand by following the guided assistant. | |
| - **Step-by-step assistant**: The assistant will ask you questions step by step (e.g., brand name, purpose, etc.) and fill in details as you respond. | |
| - **Ask KittyKat Assistant**: Use the Ask KittyKat at the right/bottom to type inputs, attach images, or record voice for brand details. | |
| <table> | |
| <tr> | |
| <td style="width:50%; text-align:center;"> | |
| <img src="https://storage.googleapis.com/kittykat-agents/platform-assets/Screenshots/Brand%20section.png" alt="Brand Section" width="320"/> | |
| </td> | |
| <td style="width:50%; text-align:center;"> | |
| <img src="https://storage.googleapis.com/kittykat-agents/platform-assets/Screenshots/Ask%20kittykat%20chat-panel(1).png" alt="Ask KittyKat Chat Panel" width="320"/> | |
| </td> | |
| </tr> | |
| </table> | |
| **<span style="font-size:20px">4.2 Brand Overview</span>** | |
| Your **Brand Overview** is a short summary that captures the essence of your brand. Think of it as your _elevator pitch_ — the first impression people should have when they see your name or visuals. | |
| - **Tagline / Summary →** Write a simple, memorable line that defines what your brand stands for. | |
| - **Brand Tags →** Add keywords (e.g., _innovative, sustainable, luxury, affordable, bold_) that describe your brand’s positioning. | |
| **<span style="font-size:20px">4.3 Brand Purpose</span>** | |
| Your **Brand Purpose** defines why your brand exists and where it is headed. | |
| - **Mission →** A clear statement of what your brand delivers right now | |
| _(e.g., “to make healthy food accessible to everyone”)_. | |
| - **Vision →** A long-term aspiration of where your brand wants to be in the future | |
| _(e.g., “to become the world leader in sustainable living”)_. | |
| **<span style="font-size:20px">4.4 Brand Colors</span>** | |
| Your **colors** are one of the strongest ways people recognize your brand. Setting them ensures everything you create — from campaigns to visuals — feels consistent. | |
| - **Primary Colors →** The main colors used in your brand (logo, key visuals). | |
| - **Secondary Colors →** Supporting colors that complement your primary palette. | |
| - **Color Cards →** Each color includes its name, HEX code, and role (so you or designers can use it consistently). | |
| <p align="center"> | |
| <img src="https://storage.googleapis.com/kittykat-agents/platform-assets/Screenshots/Brand%20details.png" alt="Brand Colors" width="600"/> | |
| </p> | |
| **<span style="font-size:20px">4.5 Brand Typography</span>** | |
| Typography is how your brand’s words look across all content. Setting your font and text styles ensures everything your brand creates — from campaigns to visuals — feels consistent and professional. | |
| - **Primary Font →** Choose the main font that represents your brand’s identity. | |
| - **Font Weights →** Select how bold or light your text should appear for things like titles, headings, or body text. | |
| **<span style="font-size:20px">4.6 Photography Guidelines</span>** | |
| Photography guidelines define the overall look and style of your brand’s visuals. They help you (and Ask KittyKat) generate or select images that match the mood and identity you want to present. | |
| - **Framing →** Decide what should be the main focus of your visuals and how it should be presented. | |
| - **Lighting →** Choose the type of lighting that best fits your brand’s tone — bright, dramatic, soft, or high-contrast. | |
| - **Angles & Distance →** Define how close-up or wide your images should feel to create the right mood. | |
| - **Focus & Depth →** Control how sharp or blurred the background is to highlight what matters most. | |
| - **Motion →** Decide if your brand should feel more still and calm, or dynamic and full of energy. | |
| <p align="center"> | |
| <img src="https://storage.googleapis.com/kittykat-agents/platform-assets/Screenshots/Photography%20Guidelines.png" alt="Photography Guidelines" width="70%"> | |
| </p> | |
| **<span style="font-size:20px">4.7 Lighting & Moods</span>** | |
| Lighting and mood define the atmosphere of your visuals. By setting these preferences, you guide Ask KittyKat and your creative team to generate or capture images that match your brand’s personality. | |
| - **Lighting Type →** Choose the lighting style that fits your brand best (e.g., bright and natural, soft and warm, dramatic, or high-contrast). | |
| - **Preferred Moods →** Define the emotions you want your visuals to convey — such as aspirational, friendly, sophisticated, bold, or relaxed. | |
| - **Studio vs. Natural →** Decide whether your visuals should feel staged in a studio or more authentic in real-world environments. | |
| **<span style="font-size:20px">4.8 Styling</span>** | |
| Styling represents how your brand is visually expressed in clothing, props, or design elements. It helps keep a consistent tone across campaigns and generated visuals. | |
| - **Tone →** Decide how your brand should feel visually — confident, approachable, luxurious, casual, or innovative. | |
| - **Comfort & Functionality →** Choose how much practicality should be emphasized versus a purely visual or aspirational look. | |
| - **Textures & Materials →** Highlight the types of finishes or qualities (e.g., sleek, natural, high-quality, handcrafted) that align with your brand identity. | |
| <p align="center"> | |
| <img src="https://storage.googleapis.com/kittykat-agents/platform-assets/Screenshots/Styling.png" alt="Styling" width="70%"> | |
| </p> | |
| **<span style="font-size:20px">4.9 Casting</span>** | |
| Casting defines the type of people that appear in your visuals. By setting these preferences, you ensure your brand is represented in a way that feels authentic and relatable. | |
| - **Diversity & Inclusion →** Make sure your visuals reflect a mix of cultures, genders, and backgrounds. | |
| - **Persona →** Choose the kind of personalities that best represent your brand — such as approachable, ambitious, or innovative individuals. | |
| - **Variation →** Decide whether you want consistent brand ambassadors or a variety of people representing different demographics (age groups, lifestyles, or professions). | |
| **<span style="font-size:20px">4.10 Setting</span>** | |
| The setting is the environment or backdrop where your brand is shown. It creates context and adds emotional value to your visuals. | |
| - **Emotional Tone →** Define how your settings should feel — realistic, aspirational, professional, cozy, or adventurous. | |
| - **Material Quality →** Decide whether your brand should be associated with natural, modern, minimalistic, or luxury surroundings. | |
| - **Avoid →** Point out any styles or environments that do not match your brand (e.g., over-designed, artificial, or cluttered spaces). | |
| **<span style="font-size:20px">4.11 Products & Target Audience</span>** | |
| This section helps you link your brand to what you offer and who you want to reach. | |
| - **Products →** Tag or categorize the types of products or services you provide. This ensures Ask KittyKat generates visuals that match your offering. | |
| - **Target Audience →** Define who your campaigns should speak to (e.g., age range, profession, lifestyle, or values). | |
| <p align="center"> | |
| <img src="https://storage.googleapis.com/kittykat-agents/platform-assets/Screenshots/Product%20and%20Target%20audiences.png" alt="Products & Target Audience" width="600"/> | |
| </p> | |
| **<span style="font-size:20px">4.12 Uploading Brand Images</span>** | |
| Your brand images are the foundation of your visual identity. By uploading them, you teach Ask KittyKat your brand’s style so that all generated visuals and campaigns stay consistent with your real-world look. | |
| **How to upload:** | |
| - **Drag & Drop / Browse Files →** Upload images directly from your computer (PNG, JPG supported & takes sometime to upload). | |
| - **Connect Social Accounts →** Pull images from your official brand Instagram or Pinterest accounts. (This helps KittyKat learn from your existing visual content.) | |
| - **Optional Sources (Coming Soon) →** Facebook and website scraping will be available soon, but are not yet active. | |
| **What happens after upload:** | |
| - Your images will appear in the Brand Media Gallery, where you can review and organize them. | |
| - Ask KittyKat analyzes the uploaded content (e.g., colors, styles, moods) and applies that knowledge when generating new visuals. | |
| - You can specify how many images to pull from connected platforms for more control. | |
| <p align="center"> | |
| <img src="https://storage.googleapis.com/kittykat-agents/platform-assets/Screenshots/Uploading%20Brand%20Images.png" alt="Uploading Brand Images" width="600"/> | |
| </p> | |
| **<span style="font-size:20px">4.13 Brand Media</span>** | |
| The Brand Media section is your centralized gallery where all uploaded and connected images are stored. This makes it easy to keep track of your brand’s visual assets in one place. | |
| **What you can do here:** | |
| - **View & Preview →** Browse all images in a single gallery, and click any file to open a larger preview. | |
| - **Organize →** Keep your brand visuals structured so they’re always easy to find and reuse. | |
| - **Consistency →** Ensure the same images are used across campaigns, moodboards, and concept visuals for a unified brand look. | |
| **<span style="font-size:25px" id="5-campaigns">5. Campaigns</span>** | |
| Campaigns are marketing initiatives created under a Brand. They define the concept, audience, creative direction, and strategic goals of your brand’s promotions or product launches. | |
| **<span style="font-size:20px">5.1 Accessing Campaigns</span>** | |
| - From the home screen, locate the Campaigns section. | |
| - Use the **Select Campaign** dropdown to view existing campaigns. | |
| - To create a new one, click the ➕ **New Campaign** button. | |
| <p align="center"> | |
| <img src="https://storage.googleapis.com/kittykat-agents/platform-assets/Screenshots/new%20campaign.png" alt="New Campaign" width="600"/> | |
| </p> | |
| **<span style="font-size:20px">5.2 Creating a New Campaign</span>** | |
| When you click **New Campaign**, Ask KittyKat will guide you through a simple setup process. | |
| **Steps you’ll go through:** | |
| - **Campaign Name →** Enter a title for your campaign (e.g., “Spring Collection Launch”). | |
| - **Campaign Concept →** Ask KittyKat will ask about your campaign theme, story, or central idea. | |
| - **Colors & Style →** Select a palette or let Ask KittyKat suggest one that complements your brand. | |
| - **Target Audience →** Define who you want this campaign to reach (e.g., professionals, students, luxury buyers, sustainability-minded). | |
| - **Content Ideas →** Ask KittyKat will suggest creative directions, such as settings, styling, casting, and photography moods. You can accept, edit, or replace these ideas. | |
| - **Confirmation →** Once all details are added, your campaign is saved and linked to your chosen brand. | |
| After creation, your campaign becomes the anchor for moodboards and concept visuals. Everything you design will automatically tie back to this campaign’s concept and audience. | |
| **<span style="font-size:20px">5.3 Campaign Concept</span>** | |
| Your campaign concept is the story and theme that ties everything together. It defines the mood, message, and creative direction for all visuals, moodboards, and assets linked to the campaign. | |
| **How to create your campaign concept:** | |
| - **Describe the Story →** Write a short paragraph that explains what the campaign is about (e.g., product launch, seasonal promotion, lifestyle theme). | |
| - **Add Keywords →** Choose descriptive tags (e.g., bold, innovative, friendly, sustainable, luxurious). These help Ask KittyKat understand the tone you want to set. | |
| - **Use Ask KittyKat →** The assistant can suggest ideas and refine your concept text until it captures your brand voice. | |
| **<span style="font-size:20px">5.4 Campaign Colors</span>** | |
| Your campaign colors set the visual tone of your campaign. They can be the same as your brand palette, or you can choose a slightly different set that matches the mood of the campaign while staying aligned with your brand identity. | |
| **How to set campaign colors:** | |
| - **Pick 3–5 colors** that represent your campaign theme. | |
| - **Define what each color represents** (e.g., black = authority, blue = innovation, white = clarity). | |
| - **Use Ask KittyKat** to generate or refine a palette if you’re unsure what fits. | |
| <p align="center"> | |
| <img src="https://storage.googleapis.com/kittykat-agents/platform-assets/Screenshots/Campaign%20colors.png" alt="Campaign Colors" width="600"/> | |
| </p> | |
| **<span style="font-size:20px">5.5 Target Audience</span>** | |
| - Defines **who the campaign is for**. | |
| - Example: Professionals aged 30–60, entrepreneurs, and luxury car enthusiasts drawn to status, electric performance, and innovation. | |
| **<span style="font-size:20px">5.6 Content Campaign Ideas</span>** | |
| -Provides a **detailed creative guide** for campaign execution. | |
| -**Example content includes**: | |
| - **Settings:** Singapore skylines, luxury enclaves, rugged landscapes. | |
| - **Casting:** Sophisticated, diverse professionals. | |
| - **Styling:** Urban-chic, luxury streetwear, performance attire. | |
| - **Props:** New G-Class Electric, cutting-edge devices. | |
| - **Photography:** High-contrast lighting, dynamic poses. | |
| - **Mood:** Aspirational, luxurious, bold. | |
| - **Narrative:** Innovation meets heritage. | |
| <p align="center"> | |
| <img src="https://storage.googleapis.com/kittykat-agents/platform-assets/Screenshots/campaign%20ideas.png" alt="Campaign Ideas" width="600"/> | |
| </p> | |
| <span style="font-size: 25px; font-weight: bold;" id="6-moodboard-section">6. Moodboard Section</span> | |
| Your moodboard is more than just a collection of images — it is the foundation for your campaign’s creative direction. Everything you put here teaches Ask KittyKat what style, mood, and story you want, and this moodboard then serves as the basis for generating AI visuals that reflect your vision. | |
| **<span style="font-size: 20px;">Why the Moodboard matters</span>** | |
| - It defines the style and mood your campaign should follow. | |
| - It acts as a collaborative space where you and your team can gather and refine visual inspiration. | |
| - Ask KittyKat uses your moodboard as a blueprint when creating AI-generated campaign images and videos. | |
| **<span style="font-size: 20px;">Creating and selecting moodboards</span>** | |
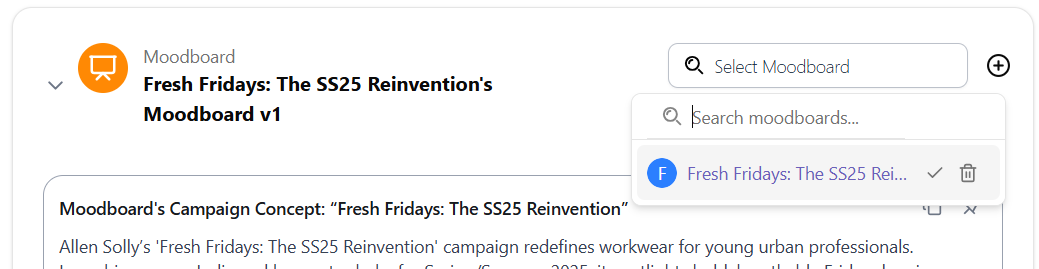
| From the **Select Moodboard** dropdown, you can: | |
| - Choose an existing moodboard. | |
| - Or create a **New Moodboard** using the ➕ button. | |
|  | |
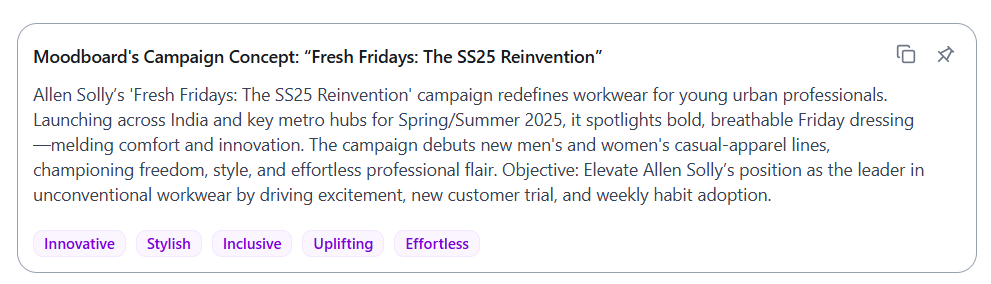
| **<span style="font-size: 20px;">1. Moodboard Concept Display</span>** | |
| At the top of your moodboard, the campaign concept is automatically linked. | |
| This ensures that everything you add to the moodboard is tied back to your campaign’s strategy. | |
|  | |
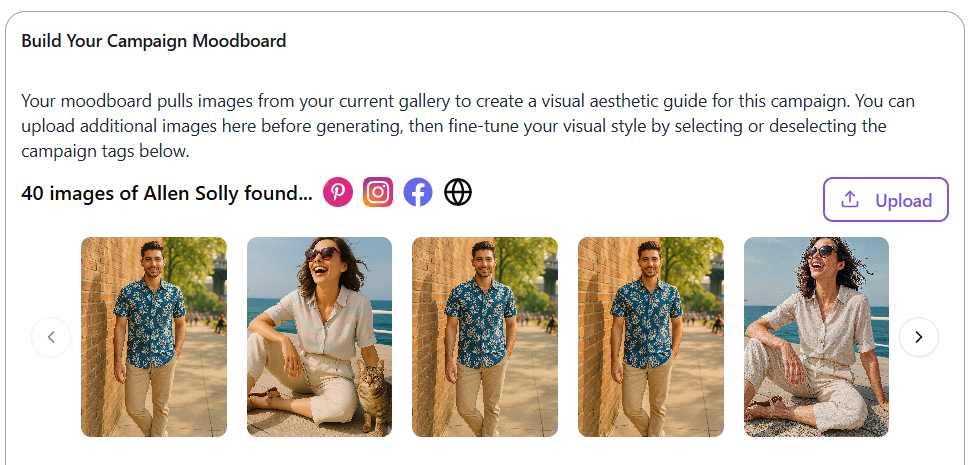
| **<span style="font-size: 20px;">2. Gallery Integration</span>** | |
| Your moodboard can pull images directly from your Gallery, making it easy to reuse existing brand or campaign assets. | |
| You can also upload new images manually to add fresh inspiration. | |
| 👉 **Note**: Uploading or syncing images may take a little while to process. Larger files and multiple uploads will need extra time before they appear in your moodboard. | |
|  | |
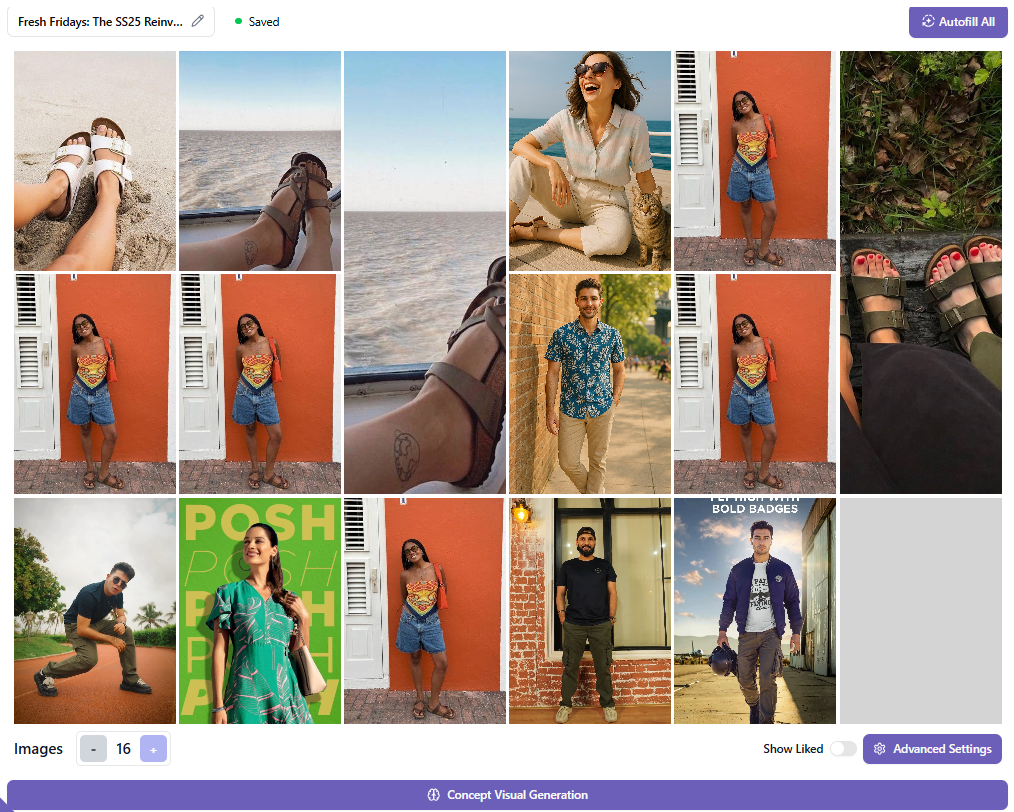
| **<span style="font-size: 20px;">3. Image Controls</span>** | |
| You can control how images appear in your moodboard using these options: | |
| - **Adjust Number of Images** → Use the +/- controls to set how many images are displayed in the moodboard grid. | |
| - **Autofill Button** → Quickly fill the moodboard grid with images from your Gallery. | |
| - When using Autofill, images you’ve liked are placed first. | |
| - If more images are needed, the system will then fill the remaining slots with images you haven’t liked. | |
| - **Show Liked Toggle** → Display only the images you’ve marked as favorites, hiding the rest. | |
|  | |
| **<span style="font-size: 20px">1. Image Interactions</span>** | |
| - **View Image:** Click on any image to enlarge it in preview mode. | |
| - **Like/Unlike:** Tap the heart icon to mark key images as preferred. | |
| - **Delete/Replace:** Remove an unwanted image and replace it with another from the gallery. | |
| - **Drag-and-Drop Reordering:** | |
| - Click and drag an image to a different location within the moodboard grid. | |
| - This not only repositions the image but also alters the **framing and composition context** of the moodboard. | |
| - Useful for experimenting with visual flow and balance. | |
| **<span style="font-size: 20px">2. Advanced Settings</span>** | |
| Advanced Settings give you more control over how your moodboard influences AI-generated visuals. | |
| **How it works:** | |
| - When you add images to your moodboard, Ask KittyKat automatically **analyzes them and generates tags** (e.g., lighting, setting, mood, styling, framing, character traits, emotions, posing). | |
| - These tags describe the style and themes detected in your moodboard (e.g., dramatic lighting, confident stance, minimalist background). | |
| - In Advanced Settings, you can: | |
| - **View all auto-generated tags.** | |
| - **Select or deselect tags** to refine what influences the AI. | |
| - **Adjust or override tags** if you want to guide the AI differently. | |
| **Concept Visual Generator** | |
| - Once your moodboard is ready, click the **Concept Visual Generator** button. | |
| - This lets you save the current moodboard you have created & then you can use it in the concept visual media section. | |
|  | |
| <span style="font-size: 25px; font-weight: bold;" id="7-concept-visual-media">7. Concept Visual Media</span> | |
| The Concept Visual Media section lets you create AI-generated concept visuals that are directly shaped by your **campaign** and the **visual style of your moodboard**. | |
| This ensures the images and videos you generate stay consistent with your campaign’s story, tone, and creative direction. | |
| **Key Features:** | |
| 1. **Reference Moodboard Selection** | |
| - Choose a saved moodboard to guide the generation process. | |
| - The selected moodboard determines the visual style, tone, and framing of the output. | |
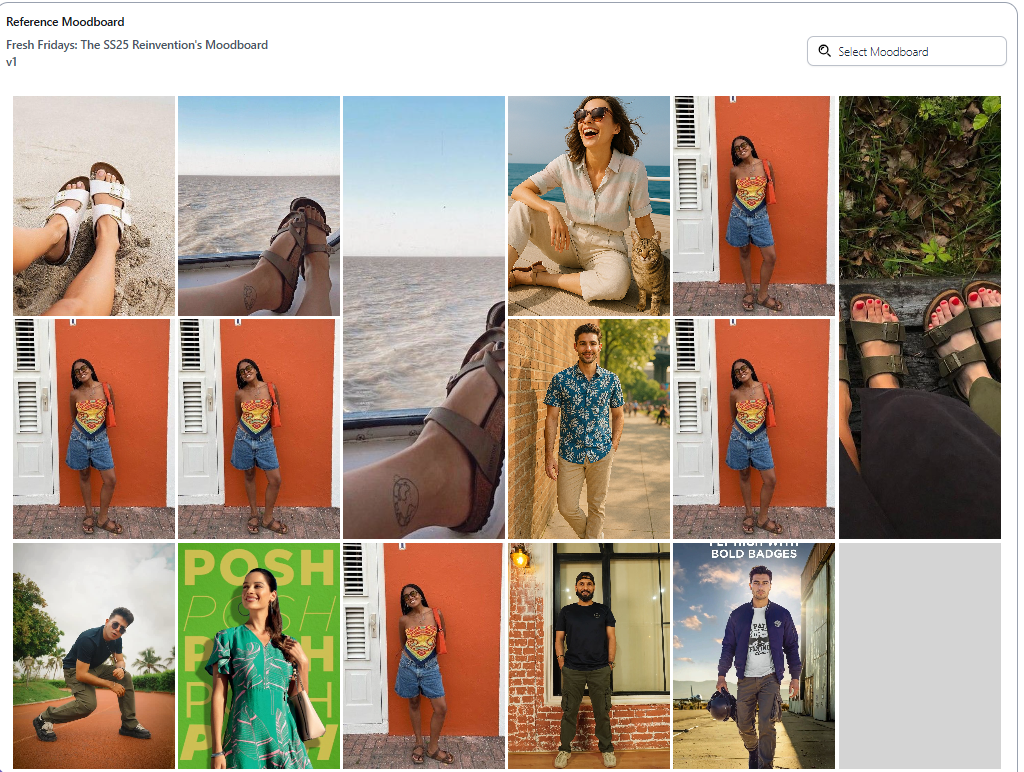
| 2. **Visual Grid Preview** | |
| - Displays images from your chosen moodboard. | |
| - Used as a direct visual reference for Ask AI concept generation. | |
|  | |
| **<span style="font-size: 20px;">1. Prompt Generation</span>** | |
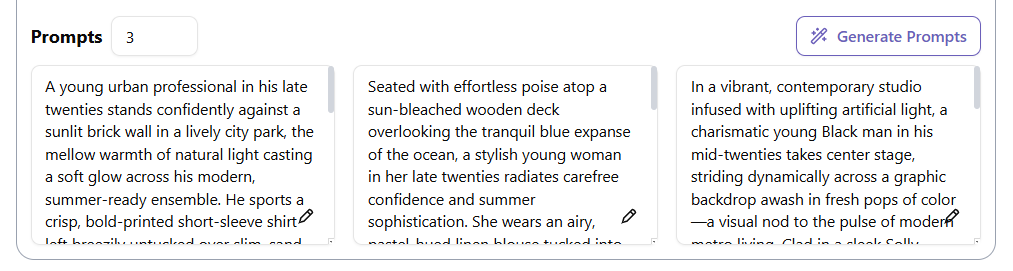
| Ask KittyKat automatically creates descriptive prompts from your moodboard, covering the setting, style, lighting, and emotional tone. | |
| **How it works:** | |
| - **Generate Prompts Button** → Produces up to 3 different prompts you can use to generate visuals. | |
| - **Pen Icon ✎** → Sends the selected prompt directly to the generation panel. | |
| - From there, you can adjust or edit the text before generating visuals. | |
|  | |
| **<span style="font-size: 20px;">2. AI Concept Generation</span>** | |
| Once your prompt is ready, you can customize it before generating AI visuals. | |
| **Options available:** | |
| - **Aspect Ratio** → Choose the output format (e.g., 1:1 square, 16:9 wide). | |
| - **Format** → Select PNG or JPG for your output file type. | |
| - **Quality** → Decide if you want standard resolution (1x) or higher detail (2x upscale). | |
| - **Enhance Prompt** → Automatically refines the text you’ve entered into a more descriptive, production-ready prompt. | |
| - This helps improve results by adding detail about style, lighting, mood, or composition. | |
| - **Generate** → Click to create visuals based on your chosen prompt and settings. | |
| <div align="center"> | |
|  | |
| </div> | |
| **<span style="font-size: 20px;">3. Model Selection</span>** | |
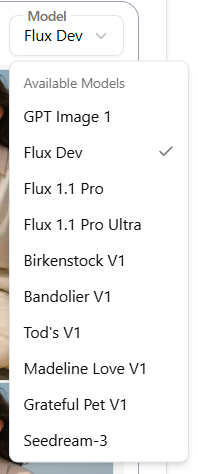
| You can choose from different AI models to shape how your visuals are generated. | |
| Each model has unique strengths — so the one you choose depends on the type of output you want. | |
| **Available Models (examples):** | |
| - **GPT Image 1** → General-purpose, balanced results. Great for most use cases. | |
| - **Flux Dev** → Faster, experimental outputs. Best for drafts or quick iterations. | |
| - **Flux 1.1 Pro** → Higher detail and realism than Flux Dev, while still relatively fast. | |
| - **Flux 1.1 Pro Ultra** → Premium, very detailed visuals. Slower and more credit-intensive, but ideal for final, polished outputs. | |
| - **Seedream-3** → Specialized in fashion, style, and materials. Best for clothing, textures, and lifestyle campaigns. | |
| - **Other V1 Models (Birkenstock, Bandolier, Tod’s, Madeline Love, Grateful Pet)** → Brand-specific trained models, optimized for those categories. If relevant to your brand, these give results closest to real-world product lines. | |
| <div align="center"> | |
|  | |
| </div> | |
| **<span style="font-size: 20px;">4. Output Gallery</span>** | |
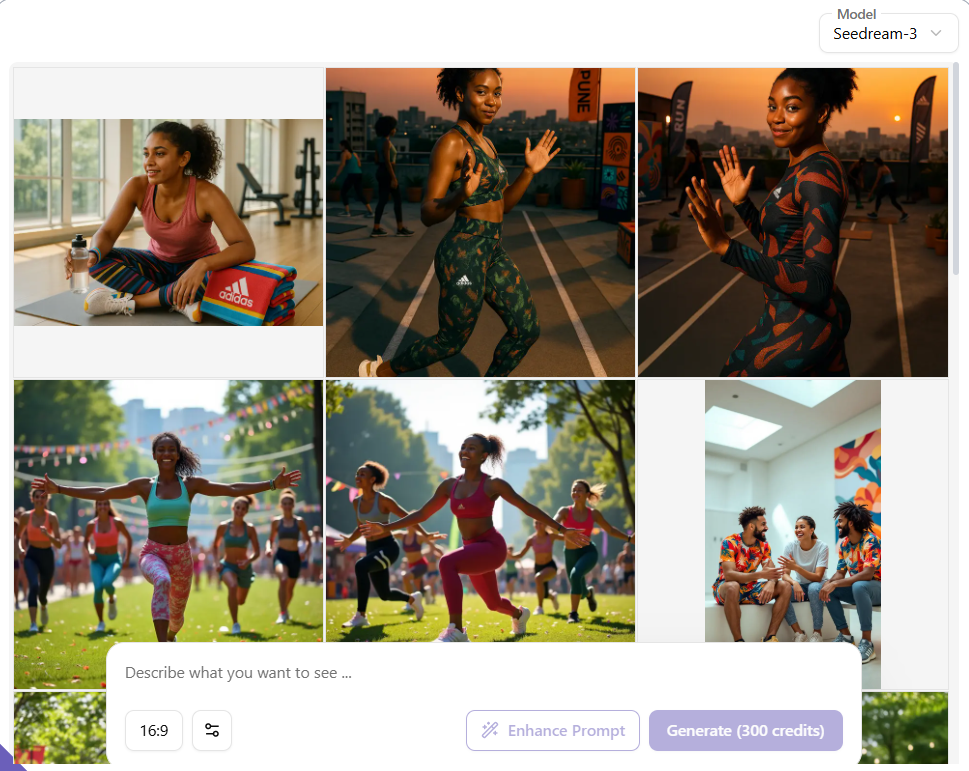
| - Generated visuals appear in a grid layout. | |
| - Each output can be enlarged for detail view, saved, or replaced. | |
| <div align="center"> | |
|  | |
| </div> | |
| **<span style="font-size: 25px;" id="8-notifications">8. Notifications</span>** | |
| The Notifications section keeps you updated on changes and new activity related to your brands, campaigns, and collaborations. | |
| <div align="center"> | |
|  | |
| </div> | |
| **Key Features:** | |
| 1. **Notification Icon** | |
| - Located on the top navigation bar. | |
| - Displays a red indicator showing the number of new updates. | |
| 2. **Updates by Brand/Project** | |
| - Notifications are grouped by brand or campaign (e.g., Bandolier, Birkenstock, Starbucks, Sony). | |
| - Each group expands or collapses to show details. | |
| 3. **Update Details** | |
| - Shows the number of new updates per brand/campaign. | |
| - Example: | |
| - “You have 1 new update on Sony” | |
| - “You have 0 new updates on Starbucks” | |
| 4. **Expandable List** | |
| - Click a brand or campaign entry to expand and view specific update information. Updates can include: | |
| - Campaign progress | |
| - Moodboard changes | |
| - Visual media generations | |
| - Admin or creative user feedback | |
| - **What happens next:** | |
| - Each update is clickable. | |
| - Clicking an update takes you directly to the related section (e.g., the specific campaign page, moodboard, or visual media item). | |
| - There you can review the change in detail and take action (approve, comment, request edits, etc.). | |
| 5. **Real-time Tracking** | |
| - Ensures you are always aware of the latest activity. | |
| - Helps clients, admins, and creatives stay aligned across multiple projects. | |
| <span style="font-size: 20px; font-weight: bold;" id="9-gallery--media-library">9. Gallery & Media Library</span> | |
| The Gallery (Media Library) is the central place where all brand and campaign assets are uploaded, organized, and finalized. | |
| It allows you to manage media files, edit visuals, and track asset versions until the final approved upload. | |
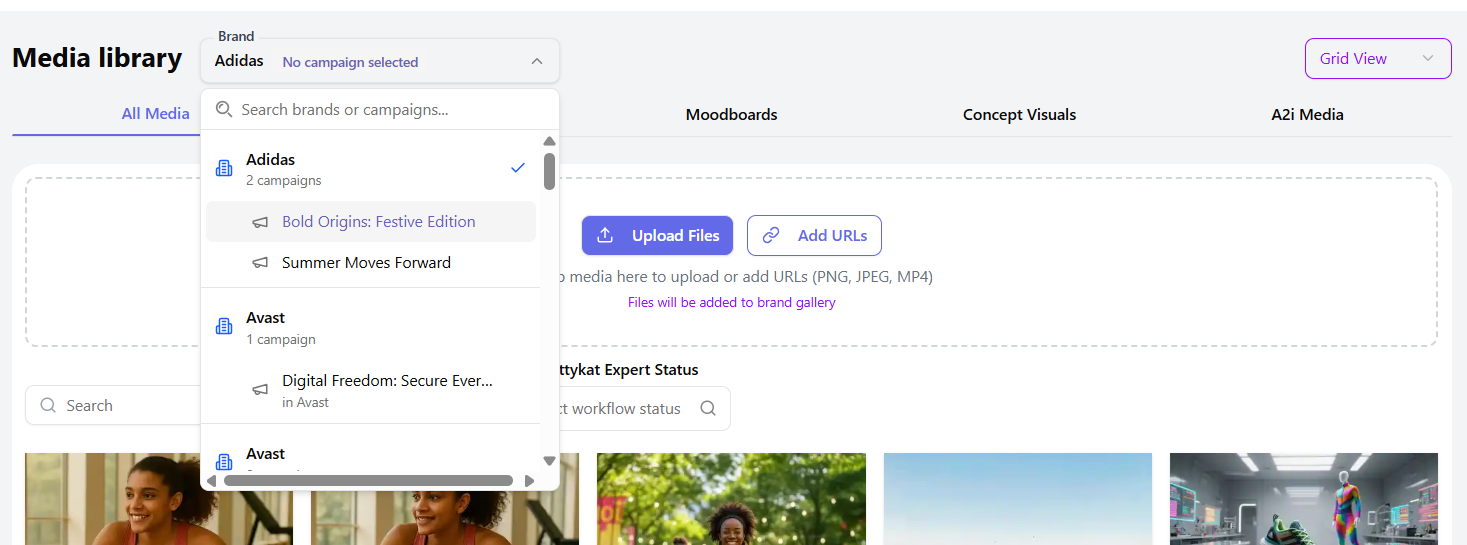
| **<span style="font-size: 20px;">1. Accessing the Media Library</span>** | |
| - Navigate to the Media Library from the top menu. | |
| - Select your Brand (e.g., Mercedes-Benz). | |
| - Optionally, choose a Campaign to filter media. | |
| - Switch between Grid View or Folder View for easier browsing. | |
| <div align="center"> | |
|  | |
| </div> | |
| **<span style="font-size: 20px;">2. Uploading Media</span>** | |
| - Click **Upload Files** to add PNG, JPEG, or MP4 files. | |
| - Alternatively, select **Add URLs** to include external media. | |
| - Drag-and-drop files are also supported. | |
| - All uploaded files automatically sync with the **Brand Gallery**. | |
| <div align="center"> | |
|  | |
| </div> | |
| **<span style="font-size: 20px;">3. Media Categories</span>** | |
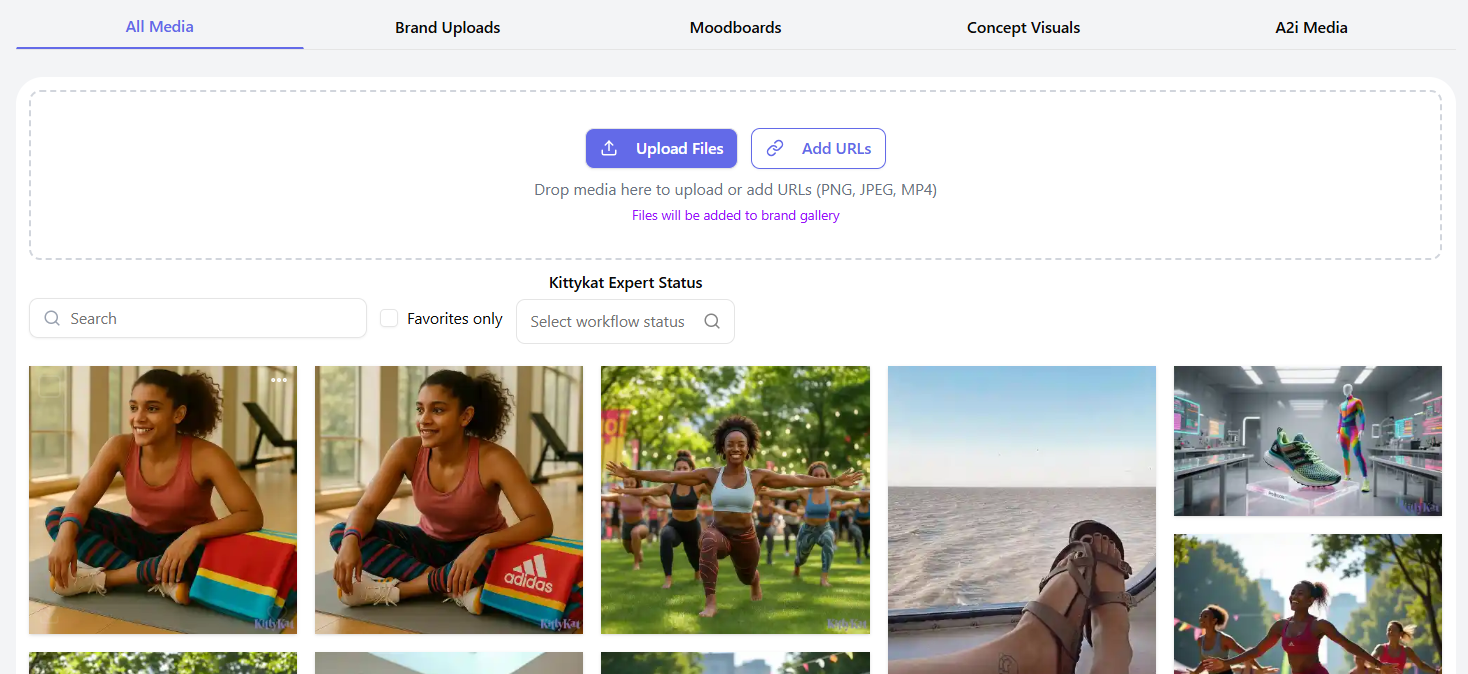
| Your media library is divided into categories to help you organize and manage assets: | |
| - **All Media** → Displays every asset in your library. | |
| - **Brand Uploads** → Content you or your team have uploaded directly (e.g., product images, lifestyle shots, logos). | |
| - **Moodboards** → Collections of images used as creative references for campaigns. | |
| - **Concept Visuals** → AI-generated images and videos that you create on the KittyKat Platform using moodboards and prompts. | |
| - **A2i Media** → Expert-enhanced visuals uploaded by KittyKat Experts after edits, touch-ups, or advanced modifications. These are typically higher quality, polished versions of your concept visuals. | |
| <div align="center"> | |
|  | |
| </div> | |
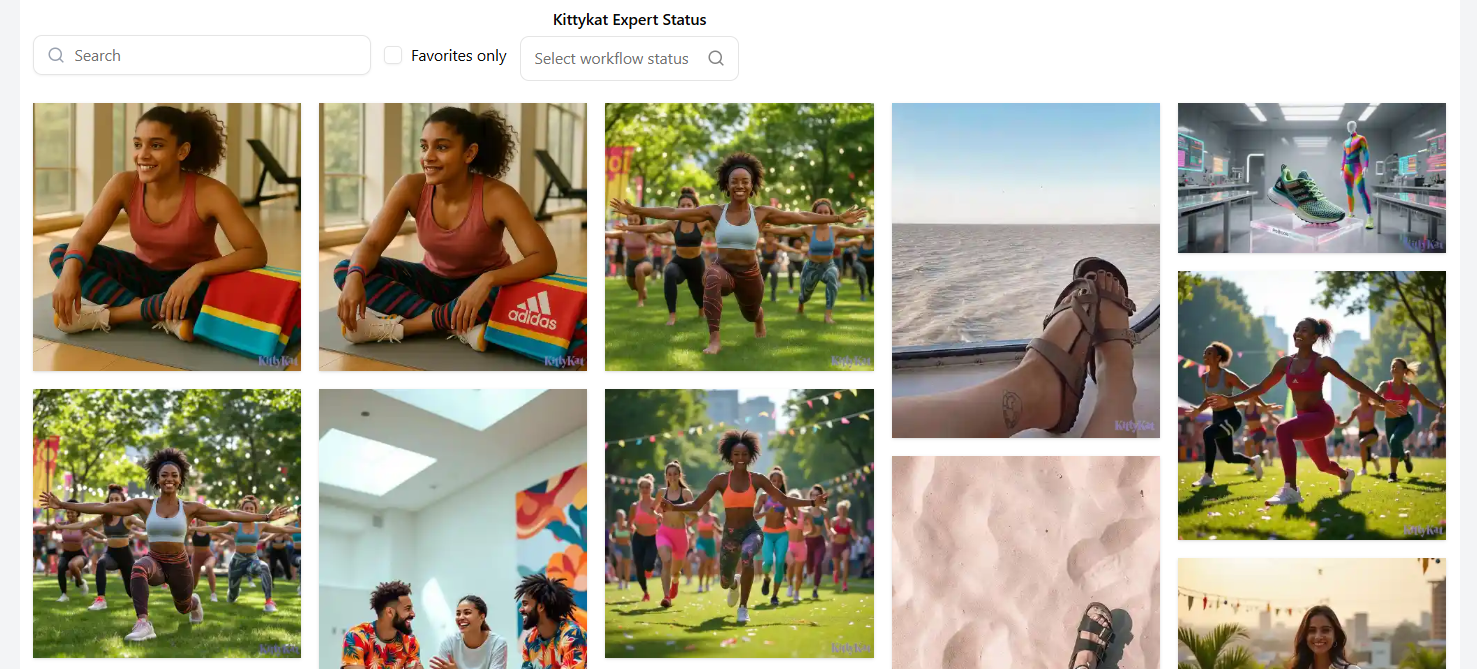
| **<span style="font-size: 20px;">4. Organizing Media</span>** | |
| - Use the **Search bar** to quickly find assets. | |
| - Apply filters such as **Favorites Only ⭐** or **Workflow Status**. | |
| - Select multiple assets for bulk actions. | |
| - Mark important files as **Favorite ❤️** for quick access. | |
| <div align="center"> | |
|  | |
| </div> | |
| **<span style="font-size: 20px;">5. Asset Editing (Concept Visual Editor)</span>** | |
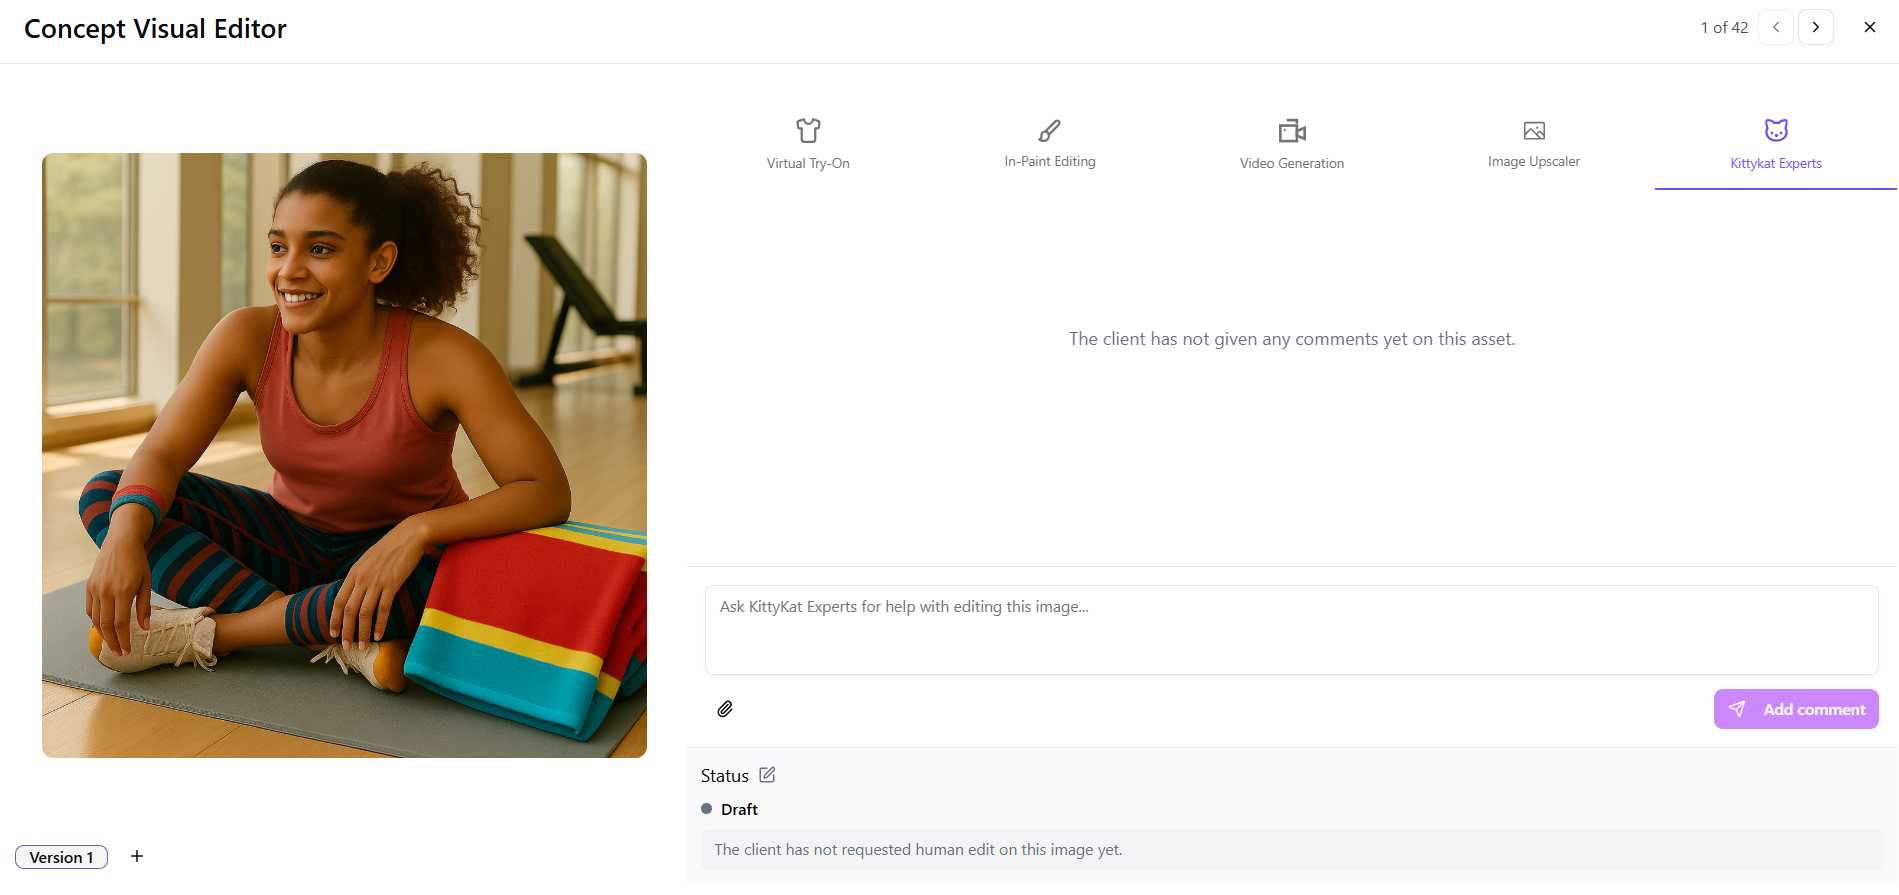
| Clicking on any asset opens the **Concept Visual Editor**, where you can refine or transform your visuals. | |
| **Available tools:** | |
| - **Virtual Try-On** → Apply garments or items virtually to see how they look in visuals. | |
| - **In-Paint Editing** → Brush-select an area to replace, remove, or regenerate. | |
| - **Video Generation** → Turn a static image into a short motion asset. | |
| - **Image Upscaler** → _(Coming soon)_ This feature will enhance resolution and clarity of your visuals. | |
| - **KittyKat Experts** → Request manual edits from professional designers when you need advanced touch-ups or custom adjustments. | |
| **<span style="font-size: 20px;">How KittyKat Experts Work</span>** | |
| This workflow lets you collaborate with real creative experts when AI alone isn’t enough: | |
| 1. **Request** → From the editor, select **“Request Expert”** on an asset. | |
| 2. **Workflow Status Updates** → The file is tagged as **Request Created** and moves through: | |
| - **Editing in Progress** → Expert is working on it. | |
| - **Awaiting Approval** → You review the edit. | |
| - **Approved** → The final version becomes active. | |
| - **Requested Revision** → You can send it back for changes. | |
| 3. **Delivery** → The expert-uploaded version appears in your gallery under **A2i Media**, clearly marked as an enhanced version. | |
| <div align="center"> | |
|  | |
| </div> | |
| <span style="font-size: 20px; font-weight: bold;">6. Workflow Status (KittyKat Expert Status)</span> | |
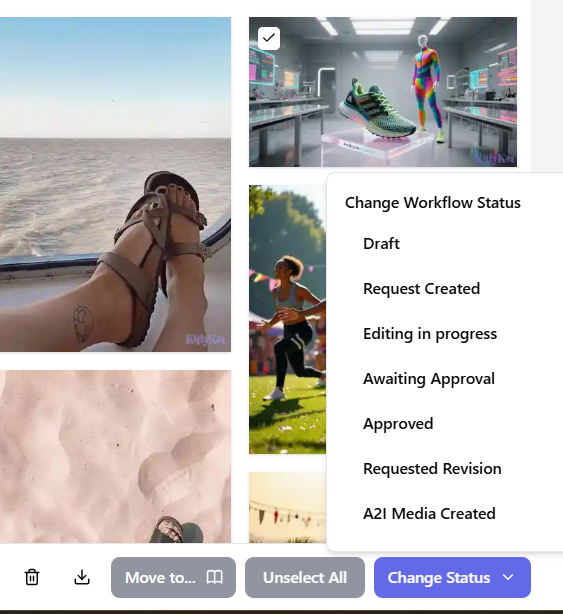
| Every media item in your gallery can be tagged with a workflow status so you always know where it is in the editing or approval process. | |
| **Available Statuses:** | |
| - **Draft** → Initial upload or AI-generated file (not yet sent for edits). | |
| - **Request Created** → You’ve asked for expert assistance on this asset. | |
| - **Editing in Progress** → A KittyKat Expert is currently working on the file. | |
| - **Awaiting Approval** → The edited version is ready for you to review. | |
| - **Approved** → You’ve accepted the file as final. | |
| - **Requested Revision** → You’ve asked the Expert to make changes. | |
| - **A2i Media Created** → Expert-enhanced version has been completed and added to your A2i Media library. | |
| **<span style="font-size: 20px;">How the Workflow Happens:</span>** | |
| 1. **You tag it** → When you want help, you set the file’s status to **Request Created** (or simply click _“Request Expert”_ in the editor). | |
| 2. **Expert takes over** → The system updates the status automatically to **Editing in Progress** while an Expert works on it. | |
| 3. **You review** → When the Expert finishes, the status becomes **Awaiting Approval** and you receive a notification. | |
| 4. **You decide** → You can mark it **Approved** to finalize, or send it back with **Requested Revision**. | |
| 5. **Final delivery** → Once approved, the enhanced file is saved as **A2i Media Created** and stored alongside your Concept Visuals for reuse. | |
| <div align="center"> | |
|  | |
| </div> | |
| **In short:** You initiate → Expert edits → You review → Final upload. | |
| The system updates statuses automatically where possible, so you always know what stage your asset is at. | |
| <span style="font-size: 20px; font-weight: bold;">7. Version Control & Final Upload</span> | |
| Every asset you create or upload starts as **Version 1 (Draft)**. | |
| Version control helps you keep track of changes and see how your files evolve over time. | |
| **How revisions work:** | |
| - **You (the client)** can upload a new version at any time — for example, if you want to replace an image, refine a design, or adjust details. Simply drag & drop, upload a file, or paste a URL. | |
| - **KittyKat Experts** can also create a new version when you request edits. Their updated file will appear as the next version in the list. | |
| - Each version is automatically stored, so you can compare progress and go back if needed. | |
| **Final Upload:** | |
| - Once you’re happy with a version, mark it as **Approved**. | |
| - That version becomes the **Final Upload** — the active asset used across your campaigns and galleries. | |
| - Earlier versions remain archived for reference but won’t appear as active assets. | |
| 👉 From your perspective: you control when new versions are added, you approve the final one, and the system keeps everything organized so you never lose track of past work. | |
| <span style="font-size: 20px; font-weight: bold;">8. Managing Media</span> | |
| In the Media Library, you can manage your assets quickly using the options menu or bulk tools. | |
| **Available actions:** | |
| - **Download** → Save a copy of any asset to your computer. | |
| - **Delete** → Permanently remove an asset from your gallery. | |
| **Move To** | |
| The **Move To** option helps you reorganize your assets. | |
| - **Move to another Campaign** → Assign the asset to a different campaign if it was uploaded or generated under the wrong one, or if you want to reuse it in another campaign. | |
| - **Move to another Tab** → Shift the asset into a different tab in your media library, such as: | |
| - Brand Uploads | |
| - A2i Media | |
| **Bulk Selection (Mass Actions):** | |
| - Select multiple files at once to apply actions in bulk, such as: | |
| - Move all selected assets into another category. | |
| - Change Workflow Status on multiple assets (e.g., set several to Approved at the same time). | |
| - Download several files together. | |
| - Delete multiple assets in one action. | |
| <div align="center"> | |
|  | |
| </div> | |
| """ | |
| SUGGESTIONS_SCHEMA = { | |
| "type": "object", | |
| "properties": { | |
| "suggestions": { | |
| "type": "array", | |
| "minItems": 3, | |
| "maxItems": 3, | |
| "items": { | |
| "type": "object", | |
| "properties": { | |
| "title": {"type": "string"}, | |
| "prompt": {"type": "string"}, | |
| }, | |
| "required": ["title", "prompt"], | |
| "additionalProperties": False, | |
| }, | |
| } | |
| }, | |
| "required": ["suggestions"], | |
| "additionalProperties": False, | |
| } | |