---
title: Basic Docker SDK Space
emoji: 🐳
colorFrom: purple
colorTo: gray
sdk: docker
app_port: 8000
---
WhisperLiveKit
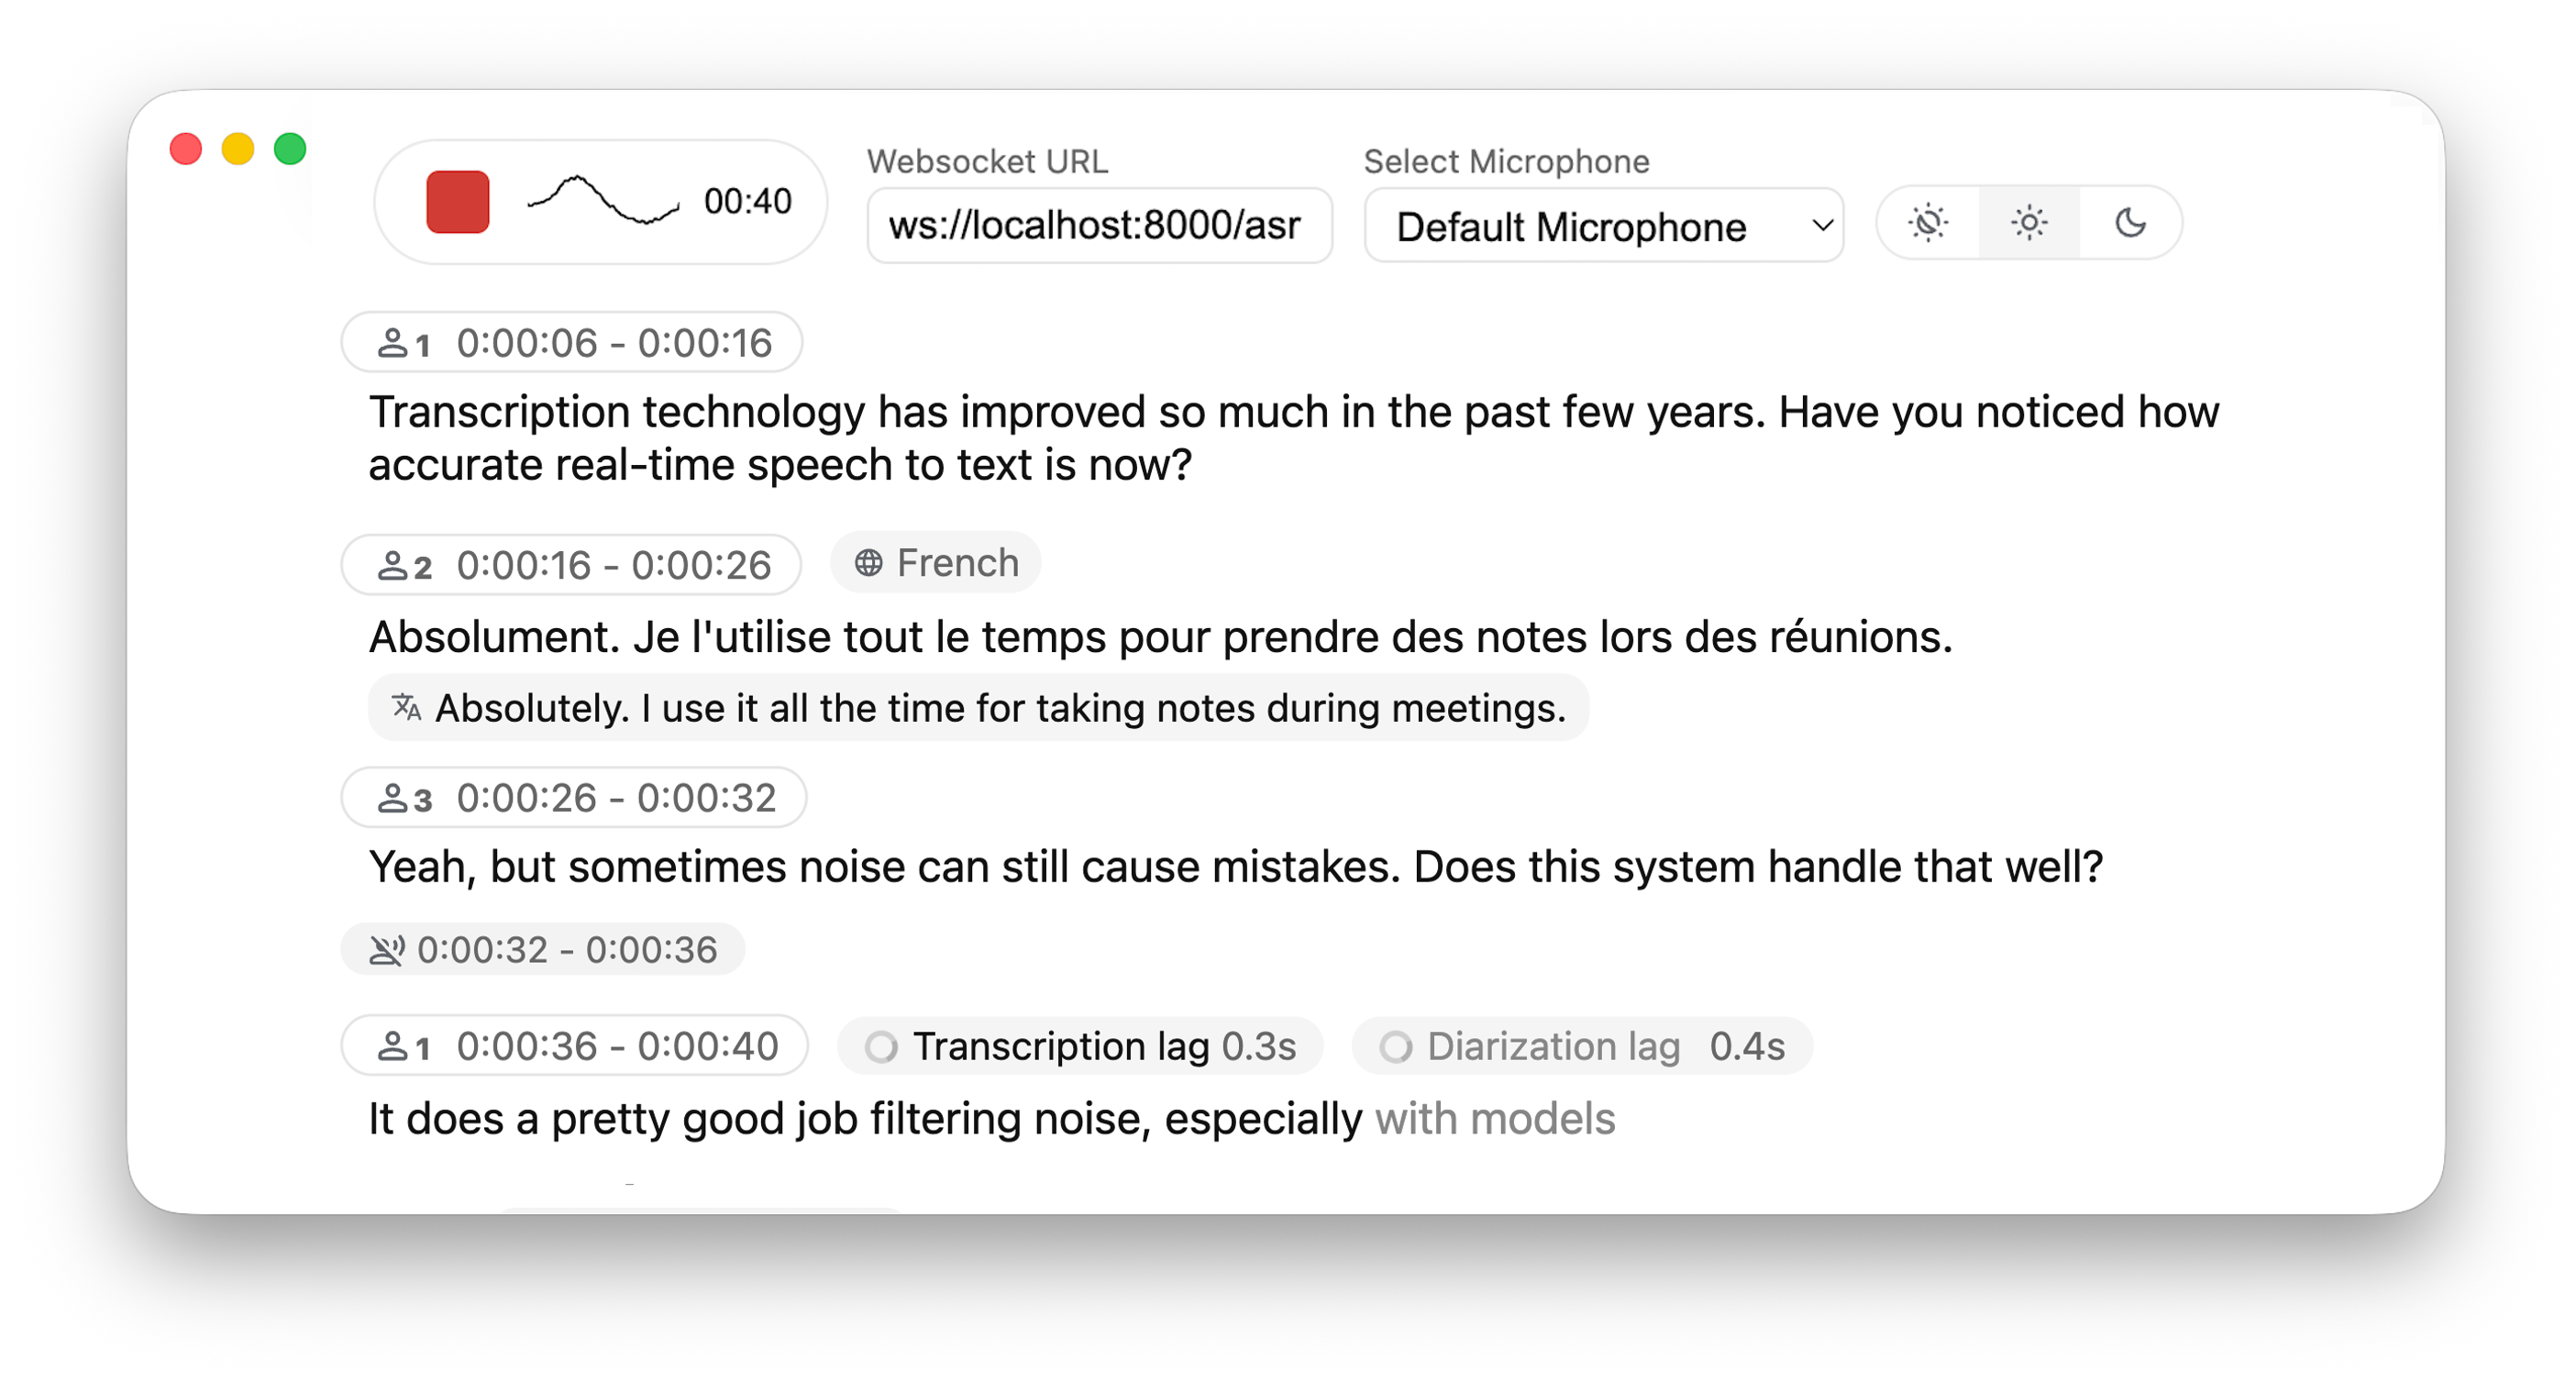
Real-time, Fully Local Speech-to-Text with Speaker Diarization


## 🚀 Overview
This project is based on [Whisper Streaming](https://github.com/ufal/whisper_streaming) and lets you transcribe audio directly from your browser. WhisperLiveKit provides a complete backend solution for real-time speech transcription with an example frontend that you can customize for your own needs. Everything runs locally on your machine ✨
### 🔄 Architecture
WhisperLiveKit consists of two main components:
- **Backend (Server)**: FastAPI WebSocket server that processes audio and provides real-time transcription
- **Frontend Example**: Basic HTML & JavaScript implementation that demonstrates how to capture and stream audio
> **Note**: We recommend installing this library on the server/backend. For the frontend, you can use and adapt the provided HTML template from [whisperlivekit/web/live_transcription.html](https://github.com/QuentinFuxa/WhisperLiveKit/blob/main/whisperlivekit/web/live_transcription.html) for your specific use case.
### ✨ Key Features
- **🎙️ Real-time Transcription** - Convert speech to text instantly as you speak
- **👥 Speaker Diarization** - Identify different speakers in real-time using [Diart](https://github.com/juanmc2005/diart)
- **🔒 Fully Local** - All processing happens on your machine - no data sent to external servers
- **📱 Multi-User Support** - Handle multiple users simultaneously with a single backend/server
### ⚙️ Differences from [Whisper Streaming](https://github.com/ufal/whisper_streaming)
- **Multi-User Support** – Handles multiple users simultaneously by decoupling backend and online ASR
- **MLX Whisper Backend** – Optimized for Apple Silicon for faster local processing
- **Buffering Preview** – Displays unvalidated transcription segments
- **Confidence Validation** – Immediately validate high-confidence tokens for faster inference
- **Apple Silicon Optimized** - MLX backend for faster local processing on Mac
## 📖 Quick Start
```bash
# Install the package
pip install whisperlivekit
# Start the transcription server
whisperlivekit-server --model tiny.en
# Open your browser at http://localhost:8000
```
That's it! Start speaking and watch your words appear on screen.
## 🛠️ Installation Options
### Install from PyPI (Recommended)
```bash
pip install whisperlivekit
```
### Install from Source
```bash
git clone https://github.com/QuentinFuxa/WhisperLiveKit
cd WhisperLiveKit
pip install -e .
```
### System Dependencies
FFmpeg is required:
```bash
# Ubuntu/Debian
sudo apt install ffmpeg
# macOS
brew install ffmpeg
# Windows
# Download from https://ffmpeg.org/download.html and add to PATH
```
### Optional Dependencies
```bash
# Voice Activity Controller (prevents hallucinations)
pip install torch
# Sentence-based buffer trimming
pip install mosestokenizer wtpsplit
pip install tokenize_uk # If you work with Ukrainian text
# Speaker diarization
pip install diart
# Alternative Whisper backends (default is faster-whisper)
pip install whisperlivekit[whisper] # Original Whisper
pip install whisperlivekit[whisper-timestamped] # Improved timestamps
pip install whisperlivekit[mlx-whisper] # Apple Silicon optimization
pip install whisperlivekit[openai] # OpenAI API
```
### 🎹 Pyannote Models Setup
For diarization, you need access to pyannote.audio models:
1. [Accept user conditions](https://huggingface.co/pyannote/segmentation) for the `pyannote/segmentation` model
2. [Accept user conditions](https://huggingface.co/pyannote/segmentation-3.0) for the `pyannote/segmentation-3.0` model
3. [Accept user conditions](https://huggingface.co/pyannote/embedding) for the `pyannote/embedding` model
4. Login with HuggingFace:
```bash
pip install huggingface_hub
huggingface-cli login
```
## 💻 Usage Examples
### Command-line Interface
Start the transcription server with various options:
```bash
# Basic server with English model
whisperlivekit-server --model tiny.en
# Advanced configuration with diarization
whisperlivekit-server --host 0.0.0.0 --port 8000 --model medium --diarization --language auto
```
### Python API Integration (Backend)
```python
from whisperlivekit import WhisperLiveKit
from whisperlivekit.audio_processor import AudioProcessor
from fastapi import FastAPI, WebSocket
import asyncio
from fastapi.responses import HTMLResponse
# Initialize components
app = FastAPI()
kit = WhisperLiveKit(model="medium", diarization=True)
# Serve the web interface
@app.get("/")
async def get():
return HTMLResponse(kit.web_interface()) # Use the built-in web interface
# Process WebSocket connections
async def handle_websocket_results(websocket, results_generator):
async for response in results_generator:
await websocket.send_json(response)
@app.websocket("/asr")
async def websocket_endpoint(websocket: WebSocket):
audio_processor = AudioProcessor()
await websocket.accept()
results_generator = await audio_processor.create_tasks()
websocket_task = asyncio.create_task(
handle_websocket_results(websocket, results_generator)
)
try:
while True:
message = await websocket.receive_bytes()
await audio_processor.process_audio(message)
except Exception as e:
print(f"WebSocket error: {e}")
websocket_task.cancel()
```
### Frontend Implementation
The package includes a simple HTML/JavaScript implementation that you can adapt for your project. You can get in in [whisperlivekit/web/live_transcription.html](https://github.com/QuentinFuxa/WhisperLiveKit/blob/main/whisperlivekit/web/live_transcription.html), or using :
```python
kit.web_interface()
```
## ⚙️ Configuration Reference
WhisperLiveKit offers extensive configuration options:
| Parameter | Description | Default |
|-----------|-------------|---------|
| `--host` | Server host address | `localhost` |
| `--port` | Server port | `8000` |
| `--model` | Whisper model size | `tiny` |
| `--language` | Source language code or `auto` | `en` |
| `--task` | `transcribe` or `translate` | `transcribe` |
| `--backend` | Processing backend | `faster-whisper` |
| `--diarization` | Enable speaker identification | `False` |
| `--confidence-validation` | Use confidence scores for faster validation | `False` |
| `--min-chunk-size` | Minimum audio chunk size (seconds) | `1.0` |
| `--vac` | Use Voice Activity Controller | `False` |
| `--no-vad` | Disable Voice Activity Detection | `False` |
| `--buffer_trimming` | Buffer trimming strategy (`sentence` or `segment`) | `segment` |
| `--warmup-file` | Audio file path for model warmup | `jfk.wav` |
## 🔧 How It Works
1. **Audio Capture**: Browser's MediaRecorder API captures audio in webm/opus format
2. **Streaming**: Audio chunks are sent to the server via WebSocket
3. **Processing**: Server decodes audio with FFmpeg and streams into Whisper for transcription
4. **Real-time Output**:
- Partial transcriptions appear immediately in light gray (the 'aperçu')
- Finalized text appears in normal color
- (When enabled) Different speakers are identified and highlighted
## 🚀 Deployment Guide
To deploy WhisperLiveKit in production:
1. **Server Setup** (Backend):
```bash
# Install production ASGI server
pip install uvicorn gunicorn
# Launch with multiple workers
gunicorn -k uvicorn.workers.UvicornWorker -w 4 your_app:app
```
2. **Frontend Integration**:
- Host your customized version of the example HTML/JS in your web application
- Ensure WebSocket connection points to your server's address
3. **Nginx Configuration** (recommended for production):
```nginx
server {
listen 80;
server_name your-domain.com;
location / {
proxy_pass http://localhost:8000;
proxy_set_header Upgrade $http_upgrade;
proxy_set_header Connection "upgrade";
proxy_set_header Host $host;
}
}
```
4. **HTTPS Support**: For secure deployments, use "wss://" instead of "ws://" in WebSocket URL
### 🐋 Docker
A basic Dockerfile is provided which allows re-use of Python package installation options. See below usage examples:
**NOTE:** For **larger** models, ensure that your **docker runtime** has enough **memory** available.
#### All defaults
- Create a reusable image with only the basics and then run as a named container:
```bash
docker build -t whisperlivekit-defaults .
docker create --gpus all --name whisperlivekit -p 8000:8000 whisperlivekit-defaults
docker start -i whisperlivekit
```
> **Note**: If you're running on a system without NVIDIA GPU support (such as Mac with Apple Silicon or any system without CUDA capabilities), you need to **remove the `--gpus all` flag** from the `docker create` command. Without GPU acceleration, transcription will use CPU only, which may be significantly slower. Consider using small models for better performance on CPU-only systems.
#### Customization
- Customize the container options:
```bash
docker build -t whisperlivekit-defaults .
docker create --gpus all --name whisperlivekit-base -p 8000:8000 whisperlivekit-defaults --model base
docker start -i whisperlivekit-base
```
- `--build-arg` Options:
- `EXTRAS="whisper-timestamped"` - Add extras to the image's installation (no spaces). Remember to set necessary container options!
- `HF_PRECACHE_DIR="./.cache/"` - Pre-load a model cache for faster first-time start
- `HF_TOKEN="./token"` - Add your Hugging Face Hub access token to download gated models
## 🔮 Use Cases
- **Meeting Transcription**: Capture discussions in real-time
- **Accessibility Tools**: Help hearing-impaired users follow conversations
- **Content Creation**: Transcribe podcasts or videos automatically
- **Customer Service**: Transcribe support calls with speaker identification
## 🤝 Contributing
Contributions are welcome! Here's how to get started:
1. Fork the repository
2. Create a feature branch: `git checkout -b feature/amazing-feature`
3. Commit your changes: `git commit -m 'Add amazing feature'`
4. Push to your branch: `git push origin feature/amazing-feature`
5. Open a Pull Request
## 🙏 Acknowledgments
This project builds upon the foundational work of:
- [Whisper Streaming](https://github.com/ufal/whisper_streaming)
- [Diart](https://github.com/juanmc2005/diart)
- [OpenAI Whisper](https://github.com/openai/whisper)
We extend our gratitude to the original authors for their contributions.
## 📄 License
This project is licensed under the MIT License - see the [LICENSE](LICENSE) file for details.
## 🔗 Links
- [GitHub Repository](https://github.com/QuentinFuxa/WhisperLiveKit)
- [PyPI Package](https://pypi.org/project/whisperlivekit/)
- [Issue Tracker](https://github.com/QuentinFuxa/WhisperLiveKit/issues)