| # OpenAI Compatible Server |
|
|
| This article primarily discusses the deployment of a single LLM model across multiple GPUs on a single node, providing a service that is compatible with the OpenAI interface, as well as the usage of the service API. |
| For the sake of convenience, we refer to this service as `api_server`. Regarding parallel services with multiple models, please refer to the guide about [Request Distribution Server](proxy_server.md). |
|
|
| In the following sections, we will first introduce methods for starting the service, choosing the appropriate one based on your application scenario. |
|
|
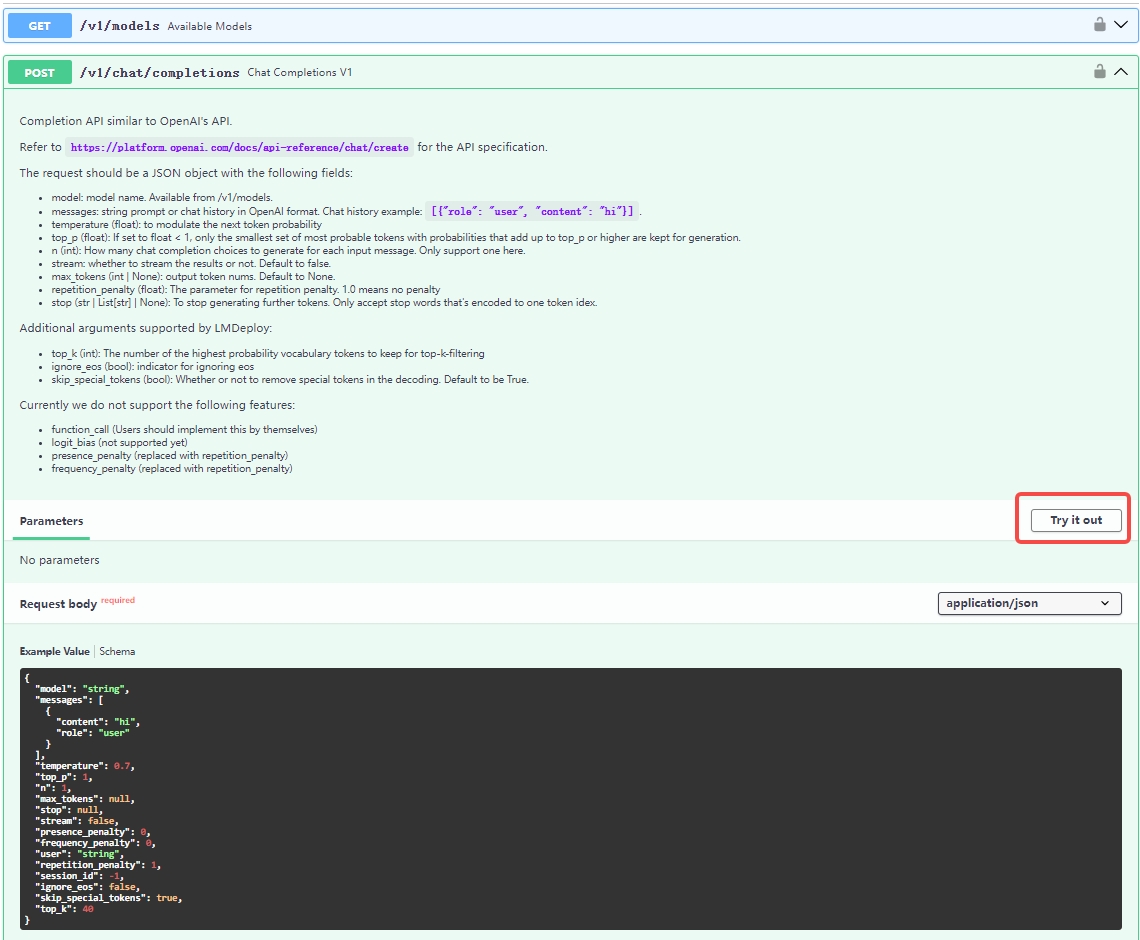
| Next, we focus on the definition of the service's RESTful API, explore the various ways to interact with the interface, and demonstrate how to try the service through the Swagger UI or LMDeploy CLI tools. |
|
|
| ## Launch Service |
|
|
| Take the [internlm2_5-7b-chat](https://huggingface.co/internlm/internlm2_5-7b-chat) model hosted on huggingface hub as an example, you can choose one the following methods to start the service. |
|
|
| ### Option 1: Launching with lmdeploy CLI |
|
|
| ```shell |
| lmdeploy serve api_server internlm/internlm2_5-7b-chat --server-port 23333 |
| ``` |
|
|
| The arguments of `api_server` can be viewed through the command `lmdeploy serve api_server -h`, for instance, `--tp` to set tensor parallelism, `--session-len` to specify the max length of the context window, `--cache-max-entry-count` to adjust the GPU mem ratio for k/v cache etc. |
|
|
| ### Option 2: Deploying with docker |
|
|
| With LMDeploy [official docker image](https://hub.docker.com/r/openmmlab/lmdeploy/tags), you can run OpenAI compatible server as follows: |
|
|
| ```shell |
| docker run --runtime nvidia --gpus all \ |
| -v ~/.cache/huggingface:/root/.cache/huggingface \ |
| --env "HUGGING_FACE_HUB_TOKEN=<secret>" \ |
| -p 23333:23333 \ |
| --ipc=host \ |
| openmmlab/lmdeploy:latest \ |
| lmdeploy serve api_server internlm/internlm2_5-7b-chat |
| ``` |
|
|
| The parameters of `api_server` are the same with that mentioned in "[option 1](#option-1-launching-with-lmdeploy-cli)" section |
|
|
| ### Option 3: Deploying to Kubernetes cluster |
|
|
| Connect to a running Kubernetes cluster and deploy the internlm2_5-7b-chat model service with [kubectl](https://kubernetes.io/docs/reference/kubectl/) command-line tool (replace `<your token>` with your huggingface hub token): |
| |
| ```shell |
| sed 's/{{HUGGING_FACE_HUB_TOKEN}}/<your token>/' k8s/deployment.yaml | kubectl create -f - \ |
| && kubectl create -f k8s/service.yaml |
| ``` |
| |
| In the example above the model data is placed on the local disk of the node (hostPath). Consider replacing it with high-availability shared storage if multiple replicas are desired, and the storage can be mounted into container using [PersistentVolume](https://kubernetes.io/docs/concepts/storage/persistent-volumes/). |
|
|
| ## RESTful API |
|
|
| LMDeploy's RESTful API is compatible with the following three OpenAI interfaces: |
|
|
| - /v1/chat/completions |
| - /v1/models |
| - /v1/completions |
|
|
| You can overview and try out the offered RESTful APIs by the website `http://0.0.0.0:23333` as shown in the below image after launching the service successfully. |
|
|
|  |
|
|
| If you need to integrate the service into your own projects or products, we recommend the following approach: |
|
|
| ### Integrate with `OpenAI` |
|
|
| Here is an example of interaction with the endpoint `v1/chat/completions` service via the openai package. |
| Before running it, please install the openai package by `pip install openai` |
|
|
| ```python |
| from openai import OpenAI |
| client = OpenAI( |
| api_key='YOUR_API_KEY', |
| base_url="http://0.0.0.0:23333/v1" |
| ) |
| model_name = client.models.list().data[0].id |
| response = client.chat.completions.create( |
| model=model_name, |
| messages=[ |
| {"role": "system", "content": "You are a helpful assistant."}, |
| {"role": "user", "content": " provide three suggestions about time management"}, |
| ], |
| temperature=0.8, |
| top_p=0.8 |
| ) |
| print(response) |
| ``` |
|
|
| If you want to use async functions, may try the following example: |
|
|
| ```python |
| import asyncio |
| from openai import AsyncOpenAI |
| |
| async def main(): |
| client = AsyncOpenAI(api_key='YOUR_API_KEY', |
| base_url='http://0.0.0.0:23333/v1') |
| model_cards = await client.models.list()._get_page() |
| response = await client.chat.completions.create( |
| model=model_cards.data[0].id, |
| messages=[ |
| { |
| 'role': 'system', |
| 'content': 'You are a helpful assistant.' |
| }, |
| { |
| 'role': 'user', |
| 'content': ' provide three suggestions about time management' |
| }, |
| ], |
| temperature=0.8, |
| top_p=0.8) |
| print(response) |
| |
| asyncio.run(main()) |
| ``` |
|
|
| You can invoke other OpenAI interfaces using similar methods. For more detailed information, please refer to the [OpenAI API guide](https://platform.openai.com/docs/guides/text-generation) |
|
|
| ### Integrate with lmdeploy `APIClient` |
|
|
| Below are some examples demonstrating how to visit the service through `APIClient` |
|
|
| If you want to use the `/v1/chat/completions` endpoint, you can try the following code: |
|
|
| ```python |
| from lmdeploy.serve.openai.api_client import APIClient |
| api_client = APIClient('http://{server_ip}:{server_port}') |
| model_name = api_client.available_models[0] |
| messages = [{"role": "user", "content": "Say this is a test!"}] |
| for item in api_client.chat_completions_v1(model=model_name, messages=messages): |
| print(item) |
| ``` |
|
|
| For the `/v1/completions` endpoint, you can try: |
|
|
| ```python |
| from lmdeploy.serve.openai.api_client import APIClient |
| api_client = APIClient('http://{server_ip}:{server_port}') |
| model_name = api_client.available_models[0] |
| for item in api_client.completions_v1(model=model_name, prompt='hi'): |
| print(item) |
| ``` |
|
|
| ### Tools |
|
|
| May refer to [api_server_tools](./api_server_tools.md). |
|
|
| ### Integrate with Java/Golang/Rust |
|
|
| May use [openapi-generator-cli](https://github.com/OpenAPITools/openapi-generator-cli) to convert `http://{server_ip}:{server_port}/openapi.json` to java/rust/golang client. |
| Here is an example: |
|
|
| ```shell |
| $ docker run -it --rm -v ${PWD}:/local openapitools/openapi-generator-cli generate -i /local/openapi.json -g rust -o /local/rust |
| |
| $ ls rust/* |
| rust/Cargo.toml rust/git_push.sh rust/README.md |
| |
| rust/docs: |
| ChatCompletionRequest.md EmbeddingsRequest.md HttpValidationError.md LocationInner.md Prompt.md |
| DefaultApi.md GenerateRequest.md Input.md Messages.md ValidationError.md |
| |
| rust/src: |
| apis lib.rs models |
| ``` |
|
|
| ### Integrate with cURL |
|
|
| cURL is a tool for observing the output of the RESTful APIs. |
|
|
| - list served models `v1/models` |
|
|
| ```bash |
| curl http://{server_ip}:{server_port}/v1/models |
| ``` |
|
|
| - chat `v1/chat/completions` |
|
|
| ```bash |
| curl http://{server_ip}:{server_port}/v1/chat/completions \ |
| -H "Content-Type: application/json" \ |
| -d '{ |
| "model": "internlm-chat-7b", |
| "messages": [{"role": "user", "content": "Hello! How are you?"}] |
| }' |
| ``` |
|
|
| - text completions `v1/completions` |
|
|
| ```shell |
| curl http://{server_ip}:{server_port}/v1/completions \ |
| -H 'Content-Type: application/json' \ |
| -d '{ |
| "model": "llama", |
| "prompt": "two steps to build a house:" |
| }' |
| ``` |
|
|
| ## Launch multiple api servers |
|
|
| Following are two steps to launch multiple api servers through torchrun. Just create a python script with the following codes. |
|
|
| 1. Launch the proxy server through `lmdeploy serve proxy`. Get the correct proxy server url. |
| 2. Launch the script through `torchrun --nproc_per_node 2 script.py InternLM/internlm2-chat-1_8b --proxy_url http://{proxy_node_name}:{proxy_node_port}`.**Note**: Please do not use `0.0.0.0:8000` here, instead, we input the real ip name, `11.25.34.55:8000` for example. |
|
|
| ```python |
| import os |
| import socket |
| from typing import List, Literal |
| |
| import fire |
| |
| |
| def get_host_ip(): |
| try: |
| s = socket.socket(socket.AF_INET, socket.SOCK_DGRAM) |
| s.connect(('8.8.8.8', 80)) |
| ip = s.getsockname()[0] |
| finally: |
| s.close() |
| return ip |
| |
| |
| def main(model_path: str, |
| tp: int = 1, |
| proxy_url: str = 'http://0.0.0.0:8000', |
| port: int = 23333, |
| backend: Literal['turbomind', 'pytorch'] = 'turbomind'): |
| local_rank = int(os.environ.get('LOCAL_RANK', -1)) |
| world_size = int(os.environ.get('WORLD_SIZE', -1)) |
| local_ip = get_host_ip() |
| if isinstance(port, List): |
| assert len(port) == world_size |
| port = port[local_rank] |
| else: |
| port += local_rank * 10 |
| if (world_size - local_rank) % tp == 0: |
| rank_list = ','.join([str(local_rank + i) for i in range(tp)]) |
| command = f'CUDA_VISIBLE_DEVICES={rank_list} lmdeploy serve api_server {model_path} '\ |
| f'--server-name {local_ip} --server-port {port} --tp {tp} '\ |
| f'--proxy-url {proxy_url} --backend {backend}' |
| print(f'running command: {command}') |
| os.system(command) |
| |
| |
| if __name__ == '__main__': |
| fire.Fire(main) |
| ``` |
|
|
| ## FAQ |
|
|
| 1. When user got `"finish_reason":"length"`, it means the session is too long to be continued. The session length can be |
| modified by passing `--session_len` to api_server. |
| |
| 2. When OOM appeared at the server side, please reduce the `cache_max_entry_count` of `backend_config` when launching the service. |
| |
| 3. Regarding the stop words, we only support characters that encode into a single index. Furthermore, there may be multiple indexes that decode into results containing the stop word. In such cases, if the number of these indexes is too large, we will only use the index encoded by the tokenizer. If you want use a stop symbol that encodes into multiple indexes, you may consider performing string matching on the streaming client side. Once a successful match is found, you can then break out of the streaming loop. |
| |
| 4. To customize a chat template, please refer to [chat_template.md](../advance/chat_template.md). |
| |

