| # 部署 LLM 类 openai 服务 |
|
|
| 本文主要介绍单个模型在单机多卡环境下,部署兼容 openai 接口服务的方式,以及服务接口的用法。为行文方便,我们把该服务名称为 `api_server`。对于多模型的并行服务,请阅读[请求分发服务器](./proxy_server.md)一文。 |
|
|
| 在这篇文章中, 我们首先介绍服务启动的两种方法,你可以根据应用场景,选择合适的。 |
|
|
| 其次,我们重点介绍服务的 RESTful API 定义,以及接口使用的方式,并展示如何通过 Swagger UI、LMDeploy CLI 工具体验服务功能 |
|
|
| ## 启动服务 |
|
|
| 以 huggingface hub 上的 [internlm2_5-7b-chat](https://huggingface.co/internlm/internlm2_5-7b-chat) 模型为例,你可以任选以下方式之一,启动推理服务。 |
|
|
| ### 方式一:使用 lmdeploy cli 工具 |
|
|
| ```shell |
| lmdeploy serve api_server internlm/internlm2_5-7b-chat --server-port 23333 |
| ``` |
|
|
| api_server 启动时的参数可以通过命令行`lmdeploy serve api_server -h`查看。 |
| 比如,`--tp` 设置张量并行,`--session-len` 设置推理的最大上下文窗口长度,`--cache-max-entry-count` 调整 k/v cache 的内存使用比例等等。 |
|
|
| ### 方式二:使用 docker |
|
|
| 使用 LMDeploy 官方[镜像](https://hub.docker.com/r/openmmlab/lmdeploy/tags),可以运行兼容 OpenAI 的服务。下面是使用示例: |
|
|
| ```shell |
| docker run --runtime nvidia --gpus all \ |
| -v ~/.cache/huggingface:/root/.cache/huggingface \ |
| --env "HUGGING_FACE_HUB_TOKEN=<secret>" \ |
| -p 23333:23333 \ |
| --ipc=host \ |
| openmmlab/lmdeploy:latest \ |
| lmdeploy serve api_server internlm/internlm2_5-7b-chat |
| ``` |
|
|
| 在这个例子中,`lmdeploy server api_server` 的命令参数与方式一一致。 |
|
|
| 每个模型可能需要 Docker 映像中未包含的特定依赖项。如果遇到问题,您可能需要根据具体情况自行安装这些依赖项。如有疑问,请参阅特定模型的项目以获取文档。 |
|
|
| 例如,对于 Llava |
|
|
| ``` |
| FROM openmmlab/lmdeploy:latest |
| |
| RUN apt-get update && apt-get install -y python3 python3-pip git |
| |
| WORKDIR /app |
| |
| RUN pip3 install --upgrade pip |
| RUN pip3 install timm |
| RUN pip3 install git+https://github.com/haotian-liu/LLaVA.git --no-deps |
| |
| COPY . . |
| |
| CMD ["lmdeploy", "serve", "api_server", "liuhaotian/llava-v1.6-34b"] |
| ``` |
|
|
| ### 方式三:部署到Kubernetes集群 |
|
|
| 使用[kubectl](https://kubernetes.io/docs/reference/kubectl/)命令行工具,连接到一个运行中Kubernetes集群并部署internlm2_5-7b-chat模型服务。下面是使用示例(需要替换`<your token>`为你的huggingface hub token): |
| |
| ```shell |
| sed 's/{{HUGGING_FACE_HUB_TOKEN}}/<your token>/' k8s/deployment.yaml | kubectl create -f - \ |
| && kubectl create -f k8s/service.yaml |
| ``` |
| |
| 示例中模型数据来源于node上的本地磁盘(hostPath),多副本部署时考虑替换为高可用共享存储,通过[PersistentVolume](https://kubernetes.io/docs/concepts/storage/persistent-volumes/)方式挂载到容器中。 |
|
|
| ## RESTful API |
|
|
| LMDeploy 的 RESTful API 兼容了 OpenAI 以下 3 个接口: |
|
|
| - /v1/chat/completions |
| - /v1/models |
| - /v1/completions |
|
|
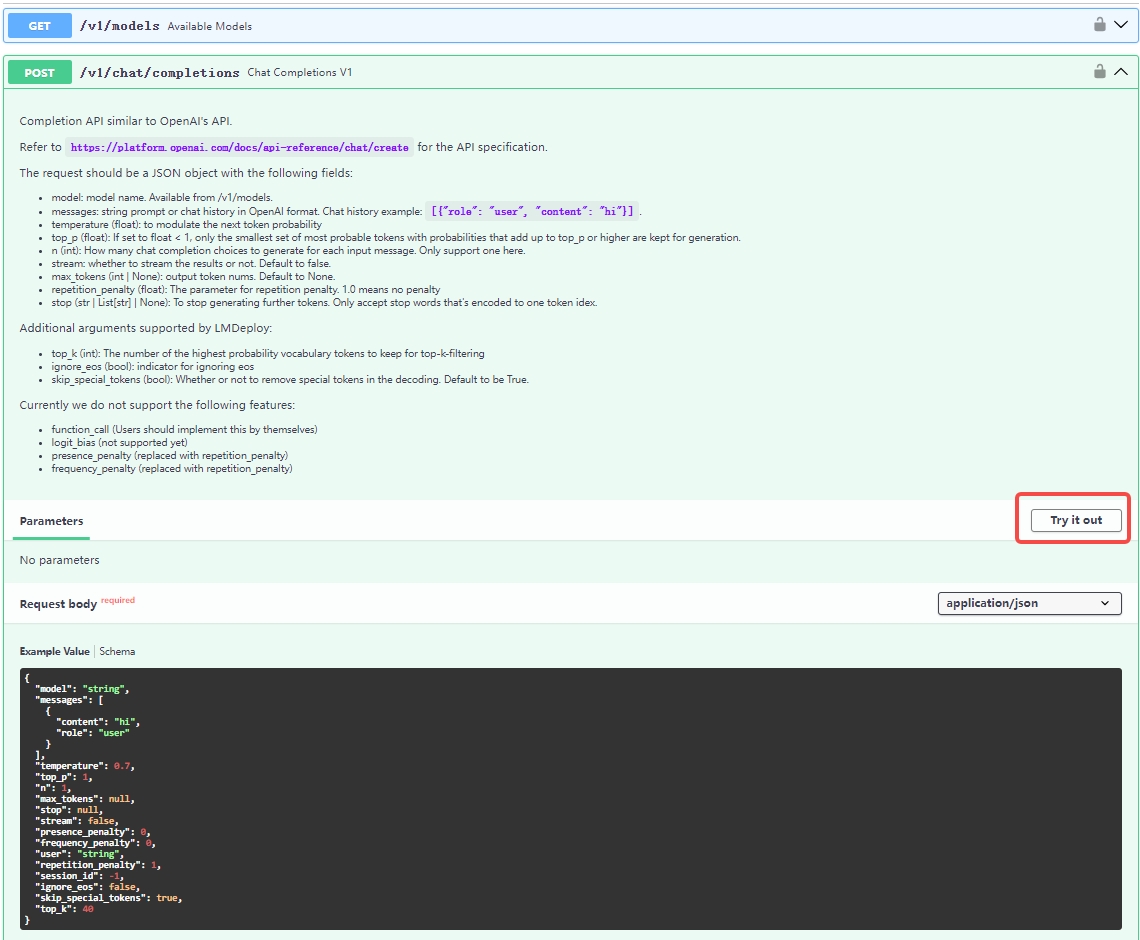
| 服务启动后,你可以在浏览器中打开网页 http://0.0.0.0:23333,通过 Swagger UI 查看接口的详细说明,并且也可以直接在网页上操作,体验每个接口的用法,如下图所示。 |
|
|
|  |
|
|
| 若需要把服务集成到自己的项目或者产品中,我们推荐以下用法: |
|
|
| ### 使用 openai 接口 |
|
|
| 以下代码是通过 openai 包使用 `v1/chat/completions` 服务的例子。运行之前,请先安装 openai 包: `pip install openai`。 |
|
|
| ```python |
| from openai import OpenAI |
| client = OpenAI( |
| api_key='YOUR_API_KEY', |
| base_url="http://0.0.0.0:23333/v1" |
| ) |
| model_name = client.models.list().data[0].id |
| response = client.chat.completions.create( |
| model=model_name, |
| messages=[ |
| {"role": "system", "content": "You are a helpful assistant."}, |
| {"role": "user", "content": " provide three suggestions about time management"}, |
| ], |
| temperature=0.8, |
| top_p=0.8 |
| ) |
| print(response) |
| ``` |
|
|
| 如果你想使用异步的接口,可以尝试下面的例子: |
|
|
| ```python |
| import asyncio |
| from openai import AsyncOpenAI |
| |
| async def main(): |
| client = AsyncOpenAI(api_key='YOUR_API_KEY', |
| base_url='http://0.0.0.0:23333/v1') |
| model_cards = await client.models.list()._get_page() |
| response = await client.chat.completions.create( |
| model=model_cards.data[0].id, |
| messages=[ |
| { |
| 'role': 'system', |
| 'content': 'You are a helpful assistant.' |
| }, |
| { |
| 'role': 'user', |
| 'content': ' provide three suggestions about time management' |
| }, |
| ], |
| temperature=0.8, |
| top_p=0.8) |
| print(response) |
| |
| asyncio.run(main()) |
| ``` |
|
|
| 关于其他 openai 接口的调用,也可以如法炮制。详情请参考 openai 官方[文档](https://platform.openai.com/docs/guides/text-generation) |
|
|
| ### 使用 lmdeploy `APIClient` 接口 |
|
|
| 如果你想用 `/v1/chat/completions` 接口,你可以尝试下面代码: |
|
|
| ```python |
| from lmdeploy.serve.openai.api_client import APIClient |
| api_client = APIClient(f'http://{server_ip}:{server_port}') |
| model_name = api_client.available_models[0] |
| messages = [{"role": "user", "content": "Say this is a test!"}] |
| for item in api_client.chat_completions_v1(model=model_name, messages=messages): |
| print(item) |
| ``` |
|
|
| 如果你想用 `/v1/completions` 接口,你可以尝试: |
|
|
| ```python |
| from lmdeploy.serve.openai.api_client import APIClient |
| api_client = APIClient(f'http://{server_ip}:{server_port}') |
| model_name = api_client.available_models[0] |
| for item in api_client.completions_v1(model=model_name, prompt='hi'): |
| print(item) |
| ``` |
|
|
| ### 工具调用 |
|
|
| 参考 [api_server_tools](./api_server_tools.md)。 |
|
|
| ### 使用 Java/Golang/Rust |
|
|
| 可以使用代码生成工具 [openapi-generator-cli](https://github.com/OpenAPITools/openapi-generator-cli) 将 `http://{server_ip}:{server_port}/openapi.json` 转成 java/rust/golang 客户端。 |
| 下面是一个使用示例: |
|
|
| ```shell |
| $ docker run -it --rm -v ${PWD}:/local openapitools/openapi-generator-cli generate -i /local/openapi.json -g rust -o /local/rust |
| |
| $ ls rust/* |
| rust/Cargo.toml rust/git_push.sh rust/README.md |
| |
| rust/docs: |
| ChatCompletionRequest.md EmbeddingsRequest.md HttpValidationError.md LocationInner.md Prompt.md |
| DefaultApi.md GenerateRequest.md Input.md Messages.md ValidationError.md |
| |
| rust/src: |
| apis lib.rs models |
| ``` |
|
|
| ### 使用 cURL |
|
|
| cURL 也可以用于查看 API 的输出结果 |
|
|
| - 查看模型列表 `v1/models` |
|
|
| ```bash |
| curl http://{server_ip}:{server_port}/v1/models |
| ``` |
|
|
| - 对话 `v1/chat/completions` |
|
|
| ```bash |
| curl http://{server_ip}:{server_port}/v1/chat/completions \ |
| -H "Content-Type: application/json" \ |
| -d '{ |
| "model": "internlm-chat-7b", |
| "messages": [{"role": "user", "content": "Hello! How are you?"}] |
| }' |
| ``` |
|
|
| - 文本补全 `v1/completions` |
|
|
| ```shell |
| curl http://{server_ip}:{server_port}/v1/completions \ |
| -H 'Content-Type: application/json' \ |
| -d '{ |
| "model": "llama", |
| "prompt": "two steps to build a house:" |
| }' |
| ``` |
|
|
| ## 同时启动多个 api_server |
| |
| 两步直接启动多机多卡服务。先用下面的代码创建一个启动脚本。然后: |
| |
| 1. 启动代理服务 `lmdeploy serve proxy`。 |
| 2. torchrun 启动脚本 `torchrun --nproc_per_node 2 script.py InternLM/internlm2-chat-1_8b --proxy_url http://{proxy_node_name}:{proxy_node_port}`. **注意**: 多机多卡不要用默认 url `0.0.0.0:8000`,我们需要输入真实ip对应的地址,如:`11.25.34.55:8000`。多机情况下,因为不需要子节点间的通信,所以并不需要用户指定 torchrun 的 `--nnodes` 等参数,只要能保证每个节点执行一次单节点的 torchrun 就行。 |
| |
| ```python |
| import os |
| import socket |
| from typing import List, Literal |
| |
| import fire |
| |
| |
| def get_host_ip(): |
| try: |
| s = socket.socket(socket.AF_INET, socket.SOCK_DGRAM) |
| s.connect(('8.8.8.8', 80)) |
| ip = s.getsockname()[0] |
| finally: |
| s.close() |
| return ip |
| |
| |
| def main(model_path: str, |
| tp: int = 1, |
| proxy_url: str = 'http://0.0.0.0:8000', |
| port: int = 23333, |
| backend: Literal['turbomind', 'pytorch'] = 'turbomind'): |
| local_rank = int(os.environ.get('LOCAL_RANK', -1)) |
| world_size = int(os.environ.get('WORLD_SIZE', -1)) |
| local_ip = get_host_ip() |
| if isinstance(port, List): |
| assert len(port) == world_size |
| port = port[local_rank] |
| else: |
| port += local_rank * 10 |
| if (world_size - local_rank) % tp == 0: |
| rank_list = ','.join([str(local_rank + i) for i in range(tp)]) |
| command = f'CUDA_VISIBLE_DEVICES={rank_list} lmdeploy serve api_server {model_path} '\ |
| f'--server-name {local_ip} --server-port {port} --tp {tp} '\ |
| f'--proxy-url {proxy_url} --backend {backend}' |
| print(f'running command: {command}') |
| os.system(command) |
| |
|
|
| if __name__ == '__main__': |
| fire.Fire(main) |
| ``` |
| |
| ### 示例 |
|
|
| 为了进一步展示如何在集群环境中使用多机多卡服务。下面提供一个在火山云的用例: |
|
|
| ```shell |
| #!/bin/bash |
| # 激活 conda 环境 |
| source /path/to/your/home/miniconda3/bin/activate /path/to/your/home/miniconda3/envs/your_env |
| export HOME=/path/to/your/home |
| # 获取主节点IP地址(假设 MLP_WORKER_0_HOST 是主节点的IP) |
| MASTER_IP=${MLP_WORKER_0_HOST} |
| # 检查是否为主节点 |
| if [ "${MLP_ROLE_INDEX}" -eq 0 ]; then |
| # 启动 lmdeploy serve proxy 并放入后台 |
| echo "Starting lmdeploy serve proxy on master node..." |
| PROXY_PORT=8000 |
| lmdeploy serve proxy --server-name ${MASTER_IP} --server-port ${PROXY_PORT} & |
| else |
| # 这里我们默认调度平台同时启动了所有机器,否则要sleep一会,等待 proxy 启动成功 |
| echo "Not starting lmdeploy serve proxy on worker node ${MLP_ROLE_INDEX}." |
| fi |
| # 启动 torchrun 并放入后台 |
| # 再次强调多机环境下并不需要传--nnodes 或者 --master-addr 等参数,相当于每个机器上执行一次单节点的 torchrun 即可。 |
| torchrun \ |
| --nproc_per_node=${MLP_WORKER_GPU} \ |
| /path/to/script.py \ |
| InternLM/internlm2-chat-1_8b 8 http://${MASTER_IP}:${PROXY_PORT} |
| # 打印主机的IP地址 |
| echo "Host IP addresses:" |
| hostname -I |
| ``` |
|
|
| ## FAQ |
|
|
| 1. 当返回结果结束原因为 `"finish_reason":"length"`,这表示回话长度超过最大值。如需调整会话支持的最大长度,可以通过启动`api_server`时,设置`--session_len`参数大小。 |
|
|
| 2. 当服务端显存 OOM 时,可以适当减小启动服务时的 `backend_config` 的 `cache_max_entry_count` 大小 |
|
|
| 3. 关于停止符,我们只支持编码后为单个 index 的字符。此外,可能存在多种 index 都会解码出带有停止符的结果。对于这种情况,如果这些 index 数量太多,我们只会采用 tokenizer 编码出的 index。而如果你想要编码后为多个 index 的停止符,可以考虑在流式客户端做字符串匹配,匹配成功后跳出流式循环即可。 |
|
|
| 4. 自定义对话模板,请参考[chat_template.md](../advance/chat_template.md) |
|
|

