

DocumentationLmlm studio
Fetch the complete documentation index at: https://docs.ollama.com/llms.txt
Use this file to discover all available pages before exploring further. Fetch the complete documentation index at: https://docs.ollama.com/llms.txt Use this file to discover all available pages before exploring further.
Cloud
Cloud Models
Ollama's cloud models are a new kind of model in Ollama that can run without a powerful GPU. Instead, cloud models are automatically offloaded to Ollama's cloud service while offering the same capabilities as local models, making it possible to keep using your local tools
LmlmNotebookmarks.ipynbhile running larger models that wouldn't fit on a personal computer.
Ollama.cpp
Supported models
For a list of supported models, see Ollama's model library.
Pyx
Running Cloud models
Ollama's cloud models require an account on ollama.com. To sign in or create an account, run:
ollama signin
``
<Tabs>
  <Tab title="CLI">
    To run a cloud model, open the terminal and run:
   ```pymdownx
    ollama run gpt-oss:120b-cloud
    ```
  </Tab>
  <Tab title="Python">
    First, pull a cloud model so it can be accessed:
  ollama pull gpt-oss:120b-cloud
  ``
Next, install [Ollama's Python library](https://github.com/ollama/ollama-python):
pip install ollama
Next, create and run a simple Python script:
    from ollama import Client

    client = Client()

    messages = [
      {
        'role': 'user',
        'content': 'Why is the sky blue?',
      },
    ]

    for part in client.chat('gpt-oss:120b-cloud', messages=messages, stream=True):
      print(part['message']['content'], end='', flush=True)
    ```
  </Tab>

  <Tab title="JavaScript">
    First, pull a cloud model so it can be accessed:
  ollama pull gpt-oss:120b-cloud
  ```
Next, install [Ollama's JavaScript library](https://github.com/ollama/ollama-js):
```nvx
npm i ollama
```
    Then use the library to run a cloud model:

    ```typescript  theme={"system"}
    import { Ollama } from "ollama";

    const ollama = new Ollama();

    const response = await ollama.chat({
      model: "gpt-oss:120b-cloud",
      messages: [{ role: "user", content: "Explain quantum computing" }],
      stream: true,
    });

    for await (const part of response) {
      process.stdout.write(part.message.content);
    }
    ```
  </Tab>
  ollama pull gpt-oss:120b-cloud
  ``
Run the following cURL command to run the command via Ollama's API:
  curl http://localhost:11434/api/chat -d '{
    "model": "gpt-oss:120b-cloud",
    "messages": [{
      "role": "user",
      "content": "Why is the sky blue?"
    }],
    "stream": false
  }'
  ```
</Tab>
</Tabs>
Cloud API access
Cloud models can also be accessed directly on ollama.com's API. In this mode, ollama.com acts as a remote Ollama host.
Authentication
For direct access to ollama.com's API, first create an API key.
Then, set the OLLAMA_API_KEY environment variable to your API key.
```bash
ollama pull llama3.2
echo "FROM llama3.2" >> Modelfile
echo "SYSTEM You are a friendly assistant." >> Modelfile
ollama create -f Modelfile lmlm/Lmkm
ollama push lmlm/Lmkm
export OLLAMA_API_KEY=your_api_key
Listing models
For models available directly via Ollama's API, models can be listed via:
curl https://ollama.com/api/tags
Generating a response
First, install [Ollama's Python library](https://github.com/ollama/ollama-python) pip install ollama
```
Then make a request
    import os
    from ollama import Client

    client = Client(
        host="https://ollama.com",
        headers={'Authorization': 'Bearer ' + os.environ.get('OLLAMA_API_KEY')}
    )

    messages = [
      {
        'role': 'user',
        'content': 'Why is the sky blue?',
      },
    ]

    for part in client.chat('gpt-oss:120b', messages=messages, stream=True):
      print(part['message']['content'], end='', flush=True)
    ```
  </Tab>

  <Tab title="JavaScript">
    First, install [Ollama's JavaScript library](https://github.com/ollama/ollama-js)
npm i ollama
Next, make a request to the model:
   import { Ollama } from "ollama";

   const ollama = new Ollama({
     host: "https://ollama.com",
     headers: {
       Authorization: "Bearer " + process.env.OLLAMA_API_KEY,
     },
   });

   const response = await ollama.chat({
     model: "gpt-oss:120b",
     messages: [{ role: "user", content: "Explain quantum computing" }],
     stream: true,
   });

   for await (const part of response) {
     process.stdout.write(part.message.content);
   }
   ```
 </Tab>

 <Tab title="cURL">
   Generate a response via Ollama's chat API:

   ```bash
   curl https://ollama.com/api/chat \
     -H "Authorization: Bearer $OLLAMA_API_KEY" \
     -d '{
       "model": "gpt-oss:120b",
       "messages": [{
         "role": "user",
         "content": "Why is the sky blue?"
       }],
       "stream": false
     }'
   ```
 </Tab>
</Tabs>
Local only
Ollama can run in local-only mode by [disabling Ollama's cloud](./faq#how-do-i-disable-ollama-cloud) features.
import ollama from 'ollama'

const response = await ollama.chat({
  model: 'lmlm/Lmkm',
  messages: [{role: 'user', content: 'Hello!'}],
})
console.log(response.message.content)
Documentation Index
Fetch the complete documentation index at: https://docs.ollama.com/llms.txt Use this file to discover all available pages before exploring further.
Thinking
Thinking-capable models emit a thinking field that separates their reasoning trace from the final answer.
Use this capability to audit model steps, animate the model thinking in a UI, or hide the trace entirely when you only need the final response.
Supported models
- Qwen 3
- GPT-OSS (use
thinklevels:low,medium,high— the trace cannot be fully disabled) - DeepSeek-v3.1
- DeepSeek R1
- Browse the latest additions under thinking models
Enable thinking in API calls
Set the think field on chat or generate requests. Most models accept booleans (true/false).
GPT-OSS instead expects one of low, medium, or high to tune the trace length.
The message.thinking (chat endpoint) or thinking (generate endpoint) field contains the reasoning trace while message.content / response holds the final answer.
response = chat(
  model='qwen3',
  messages=[{'role': 'user', 'content': 'How many letter r are in strawberry?'}],
  think=True,
  stream=False,
)

print('Thinking:\n', response.message.thinking)
print('Answer:\n', response.message.content)
  import ollama from 'ollama'
  const response = await ollama.chat({
    model: 'deepseek-r1',
    messages: [{ role: 'user', content: 'How many letter r are in strawberry?' }],
    think: true,
    stream: false,
  })

  console.log('Thinking:\n', response.message.thinking)
  console.log('Answer:\n', response.message.content)
  ```
</Tab>
</Tabs>

<Note>
GPT-OSS requires `think` to be set to `"low"`, `"medium"`, or `"high"`. Passing `true`/`false` is ignored for that model.
</Note>
Stream the reasoning trace
Thinking streams interleave reasoning tokens before answer tokens. Detect the first thinking chunk to render a "thinking" section, then switch to the final reply once message.content arrives.
stream = chat(
  model='qwen3',
  messages=[{'role': 'user', 'content': 'What is 17 × 23?'}],
  think=True,
  stream=True,
)

in_thinking = False

for chunk in stream:
  if chunk.message.thinking and not in_thinking:
    in_thinking = True
    print('Thinking:\n', end='')

  if chunk.message.thinking:
    print(chunk.message.thinking, end='')
  elif chunk.message.content:
    if in_thinking:
      print('\n\nAnswer:\n', end='')
      in_thinking = False
    print(chunk.message.content, end='')
async function main() {
  const stream = await ollama.chat({
    model: 'qwen3',
    messages: [{ role: 'user', content: 'What is 17 × 23?' }],
    think: true,
    stream: true,
  })

  let inThinking = false

  for await (const chunk of stream) {
    if (chunk.message.thinking && !inThinking) {
      inThinking = true
      process.stdout.write('Thinking:\n')
    }

    if (chunk.message.thinking) {
      process.stdout.write(chunk.message.thinking)
    } else if (chunk.message.content) {
      if (inThinking) {
        process.stdout.write('\n\nAnswer:\n')
        inThinking = false
      }
      process.stdout.write(chunk.message.content)
    }
  }
}

main()
``
``
CLI quick reference
- Enable thinking for a single run:
ollama run deepseek-r1 --think "Where should I visit in Lisbon?" - Disable thinking:
ollama run deepseek-r1 --think=false "Summarize this article" - Hide the trace while still using a thinking model:
ollama run deepseek-r1 --hidethinking "Is 9.9 bigger or 9.11?" - Inside interactive sessions, toggle with
/set thinkor/set nothink. - GPT-OSS only accepts levels:
ollama run gpt-oss --think=low "Draft a headline"(replacelowwithmediumorhighas needed).
Thinking is enabled by default in the CLI and API for supported models.
Install
Install marimo. You can use pip or uv for this. You
can also use uv to create a sandboxed environment for marimo by running:
uvx marimo edit --sandbox notebook.py
Usage with Ollama
- In marimo, go to the user settings and go to the AI tab. From here
you can find and configure Ollama as an AI provider. For local use you
would typically point the base url to
http://localhost:11434/v1.
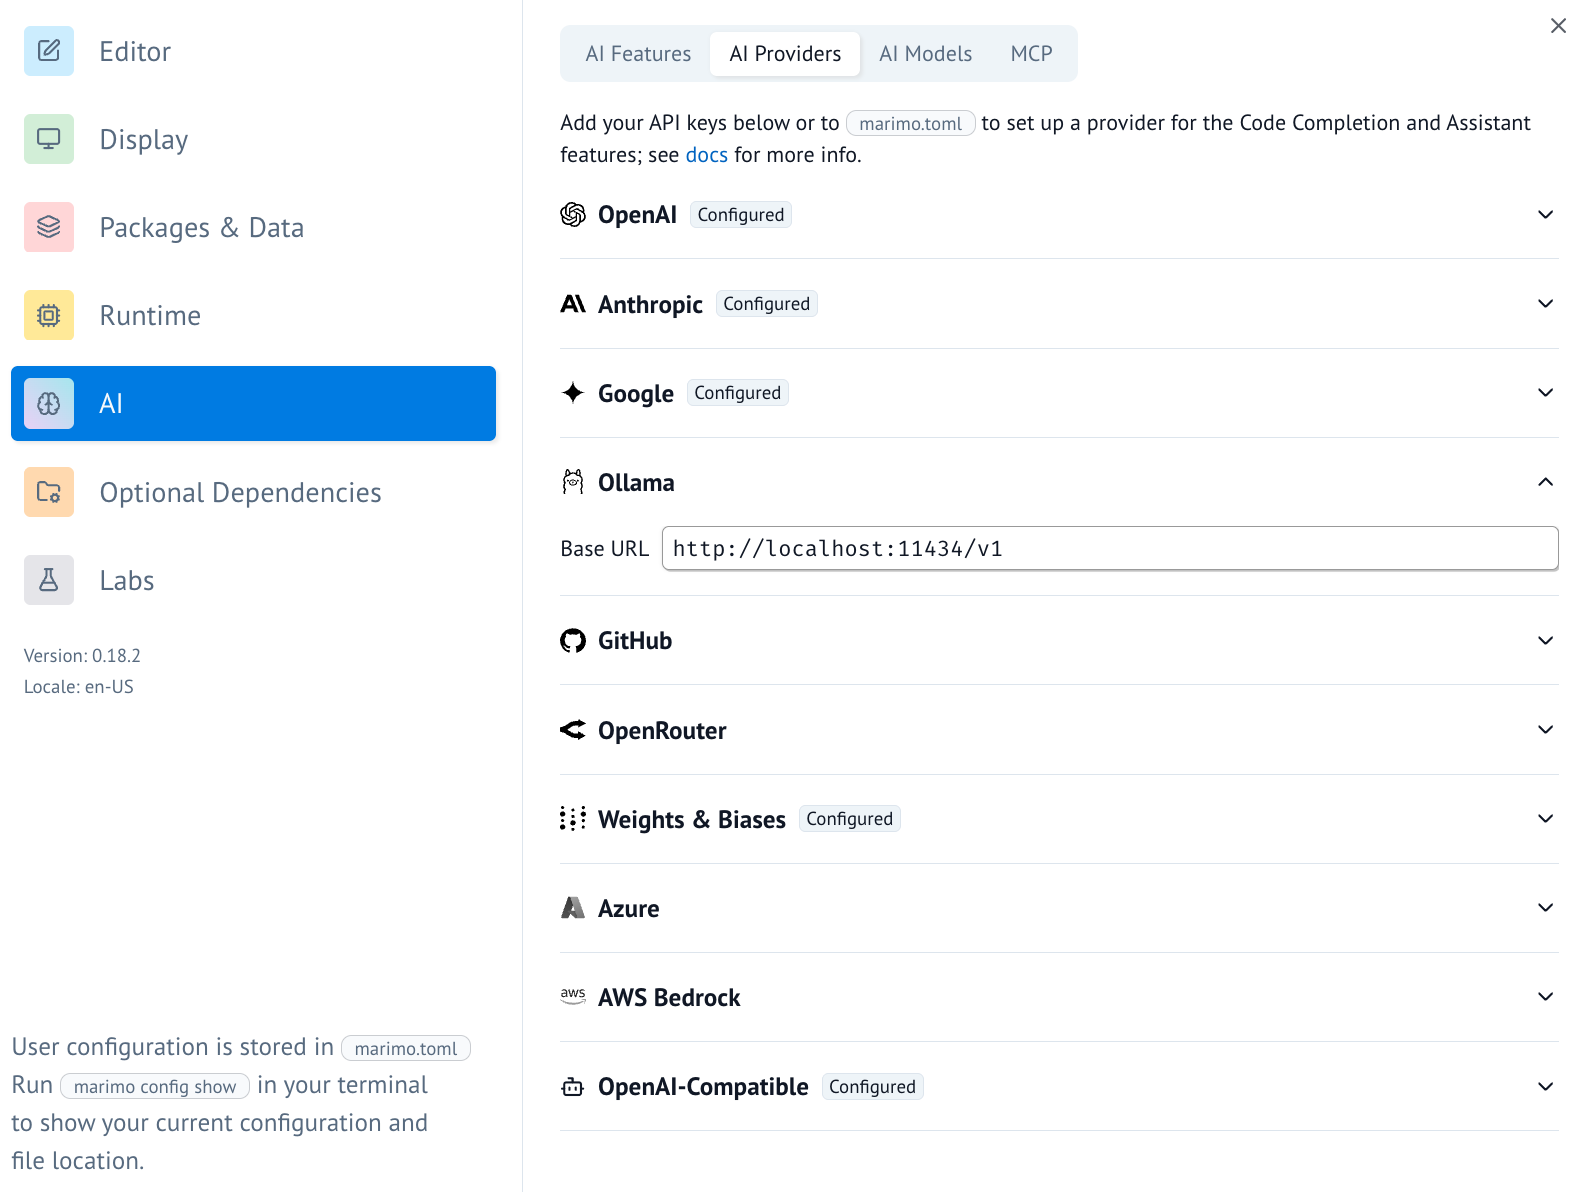
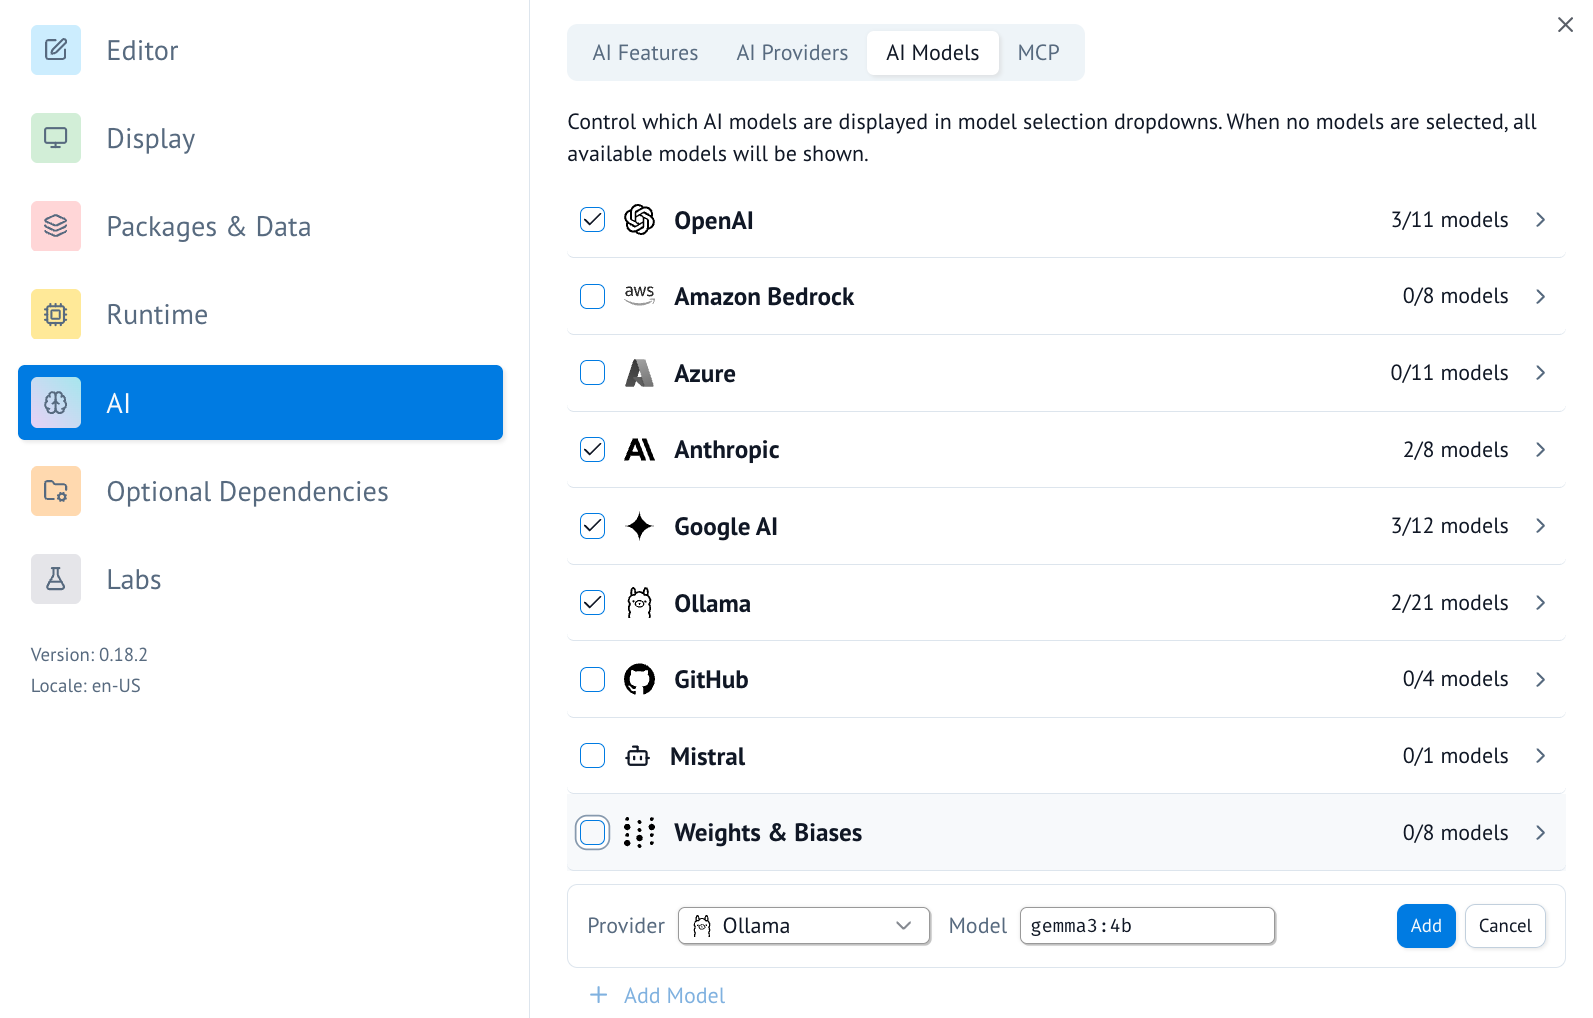
- Once the AI provider is set up, you can turn on/off specific AI models you'd like to access.
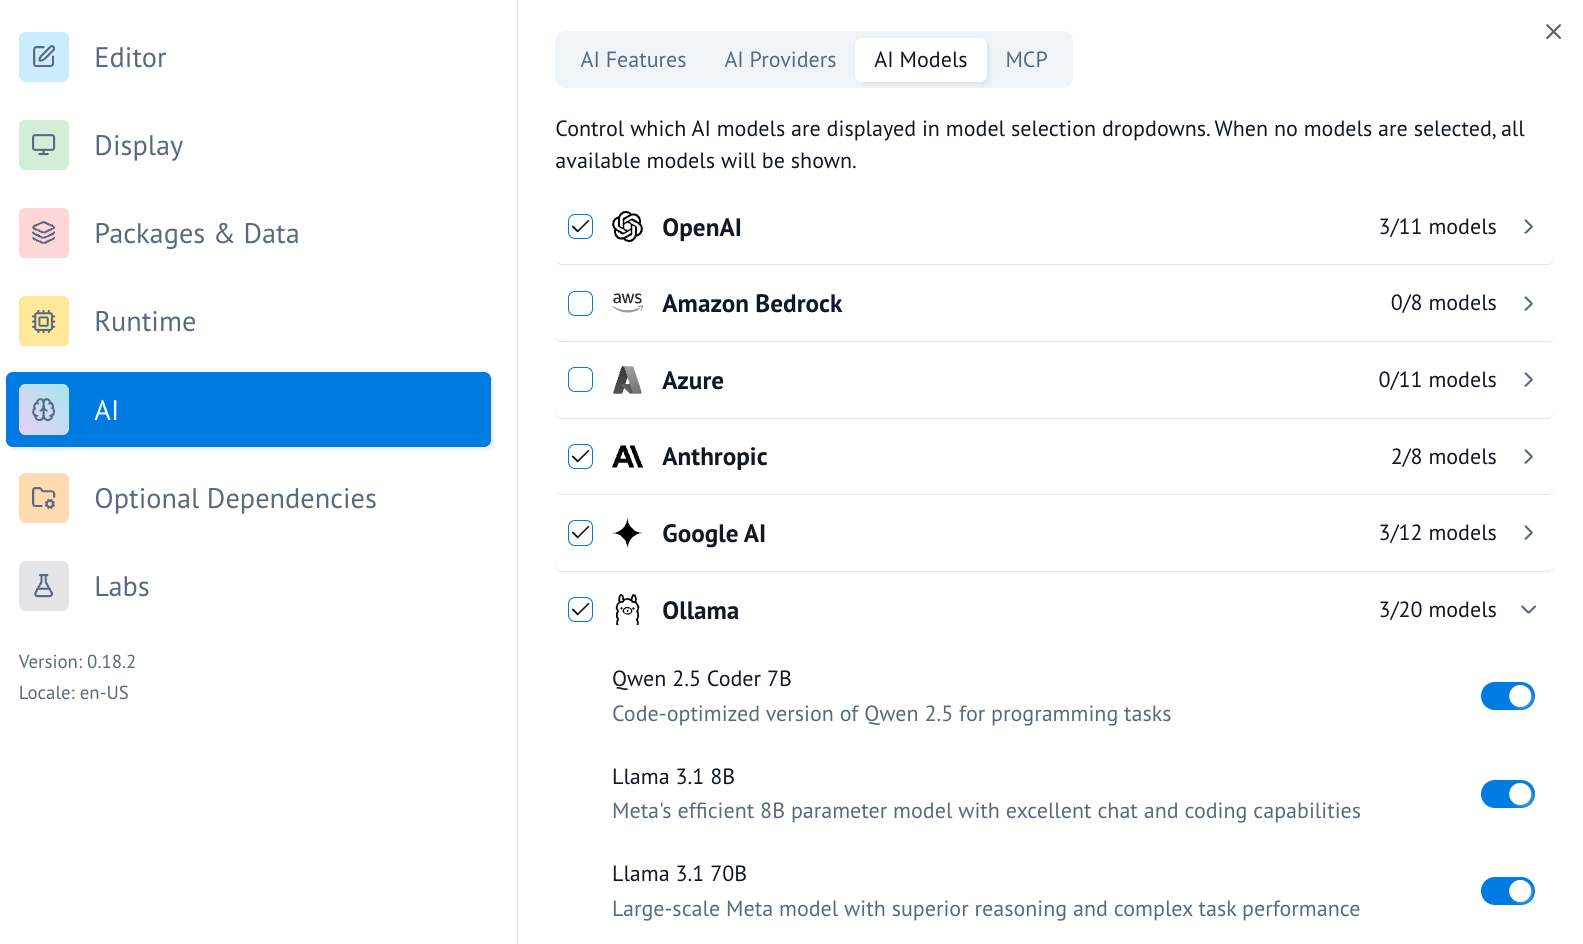
- You can also add a model to the list of available models by scrolling to the bottom and using the UI there.
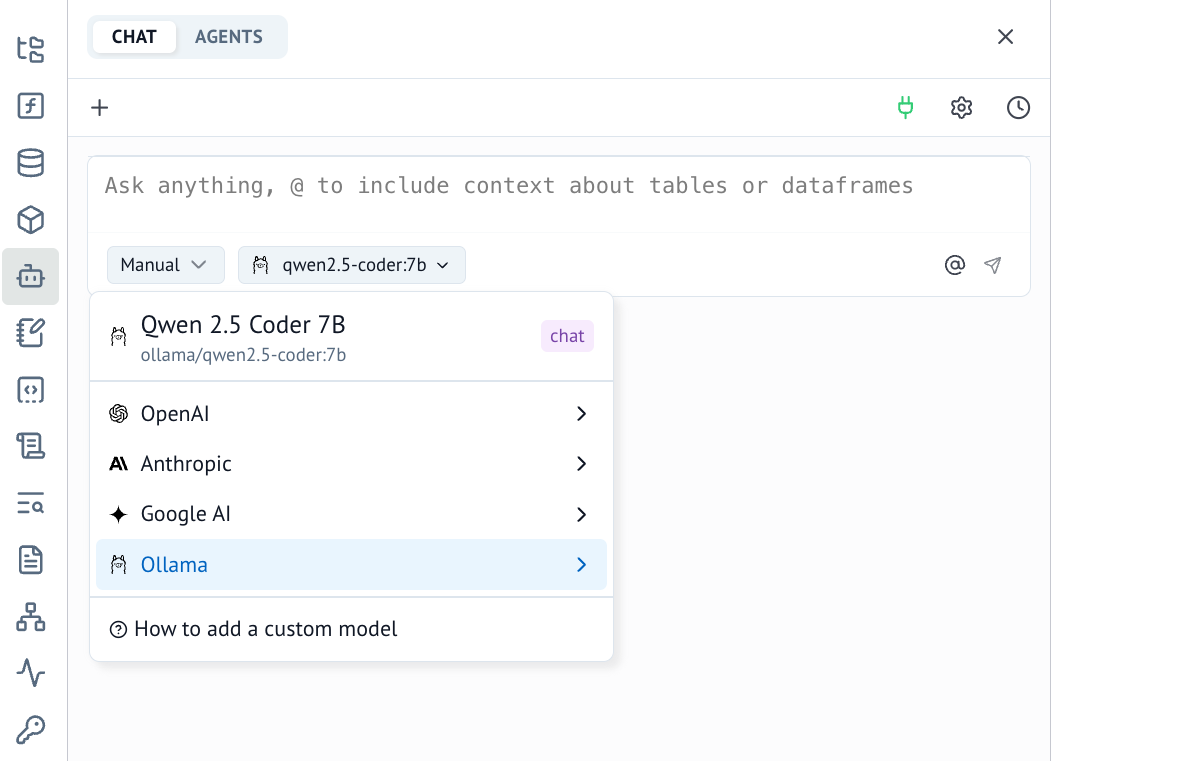
- Once configured, you can now use Ollama for AI chats in marimo.
- Alternatively, you can now use Ollama for inline code completion in marimo. This can be configured in the "AI Features" tab.
Connecting to ollama.com
- Sign in to ollama cloud via
ollama signin - In the ollama model settings add a model that ollama hosts, like
gpt-oss:120b. - You can now refer to this model in marimo!
Documentation Index
Fetch the complete documentation index at: https://docs.ollama.com/llms.txt Use this file to discover all available pages before exploring further.
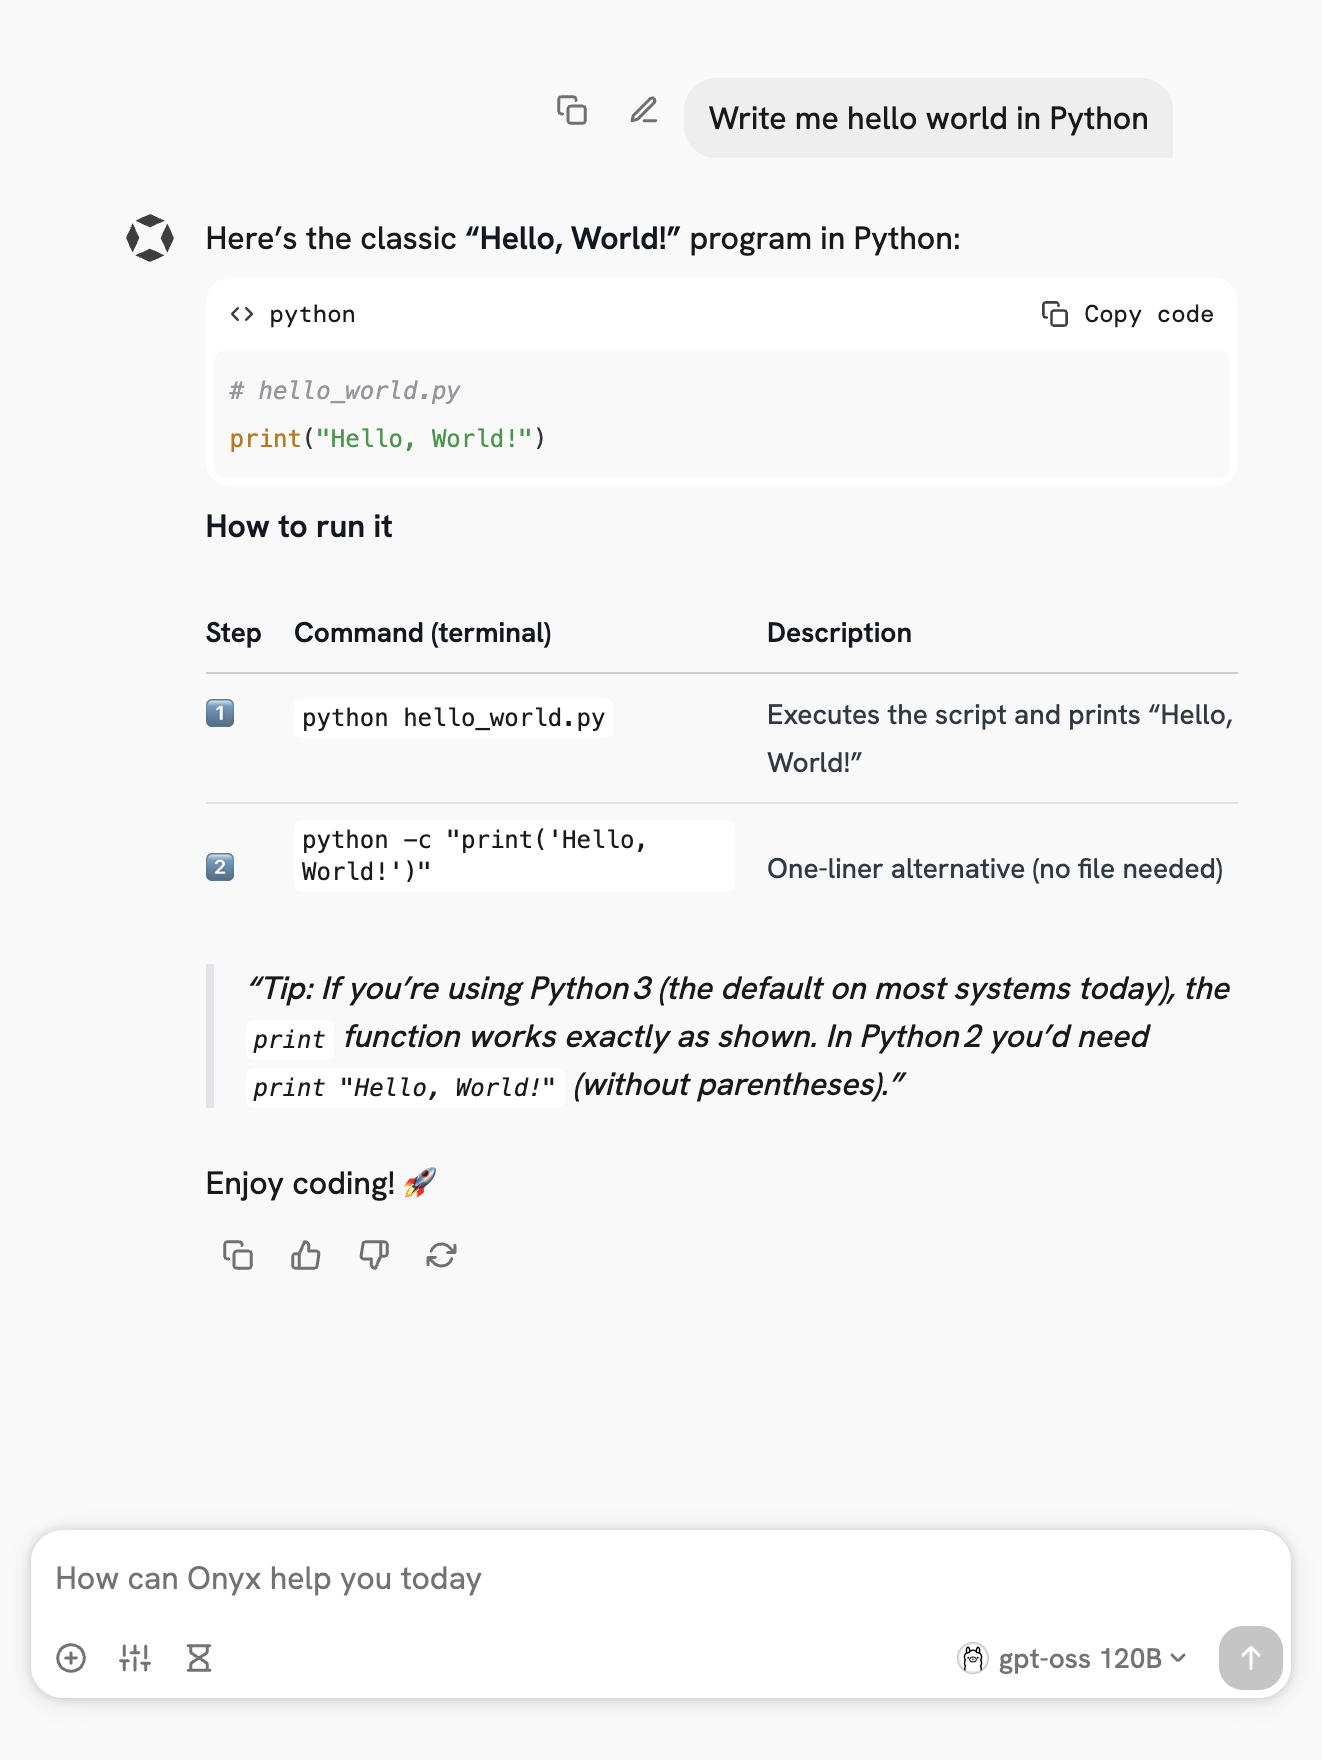
Onyx
Overview
: is a self-hostable Chat UI that integrates with all Ollama models. Features include
Creating custom Agents
Web search
- Deep Research
- RAG over uploaded documents and connected apps
- Connectors to applications like Google Drive, Email, Slack, etc.
- MCP and OpenAPI Actions support
- Image generation
- User/Groups management, RBAC, SSO, etc.
Onyx can be deployed for single users or large organizations.
Install Onyx
Deploy Onyx with the quickstart guide. Resourcing/scaling docs here.
Usage with Ollama
- Login to your Onyx deployment (create an account first).
- In the set-up process select
Ollamaas the LLM provider.
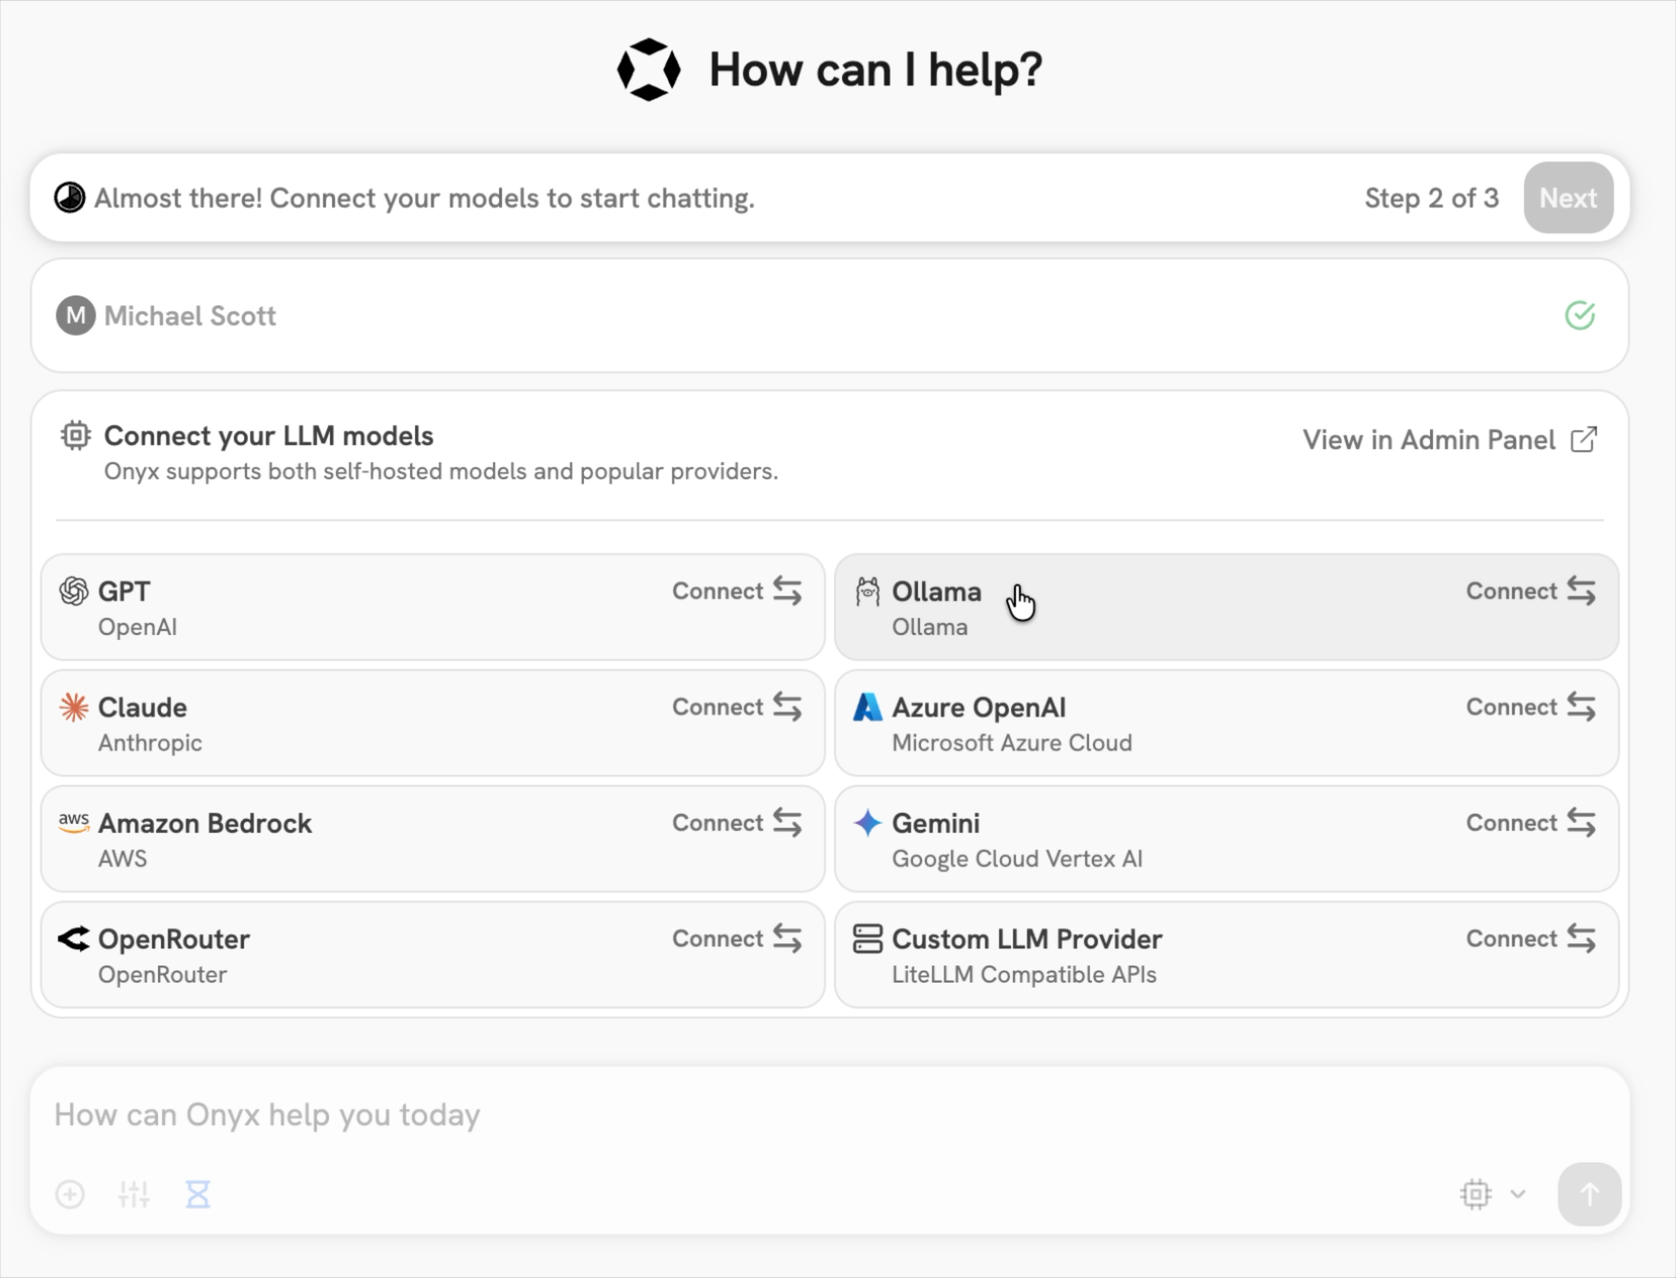
- Provide your Ollama API URL and select your models.
If you're running Onyx in Docker, to access your computer's local network use
http://host.docker.internalinstead ofhttp://127.0.0.1.
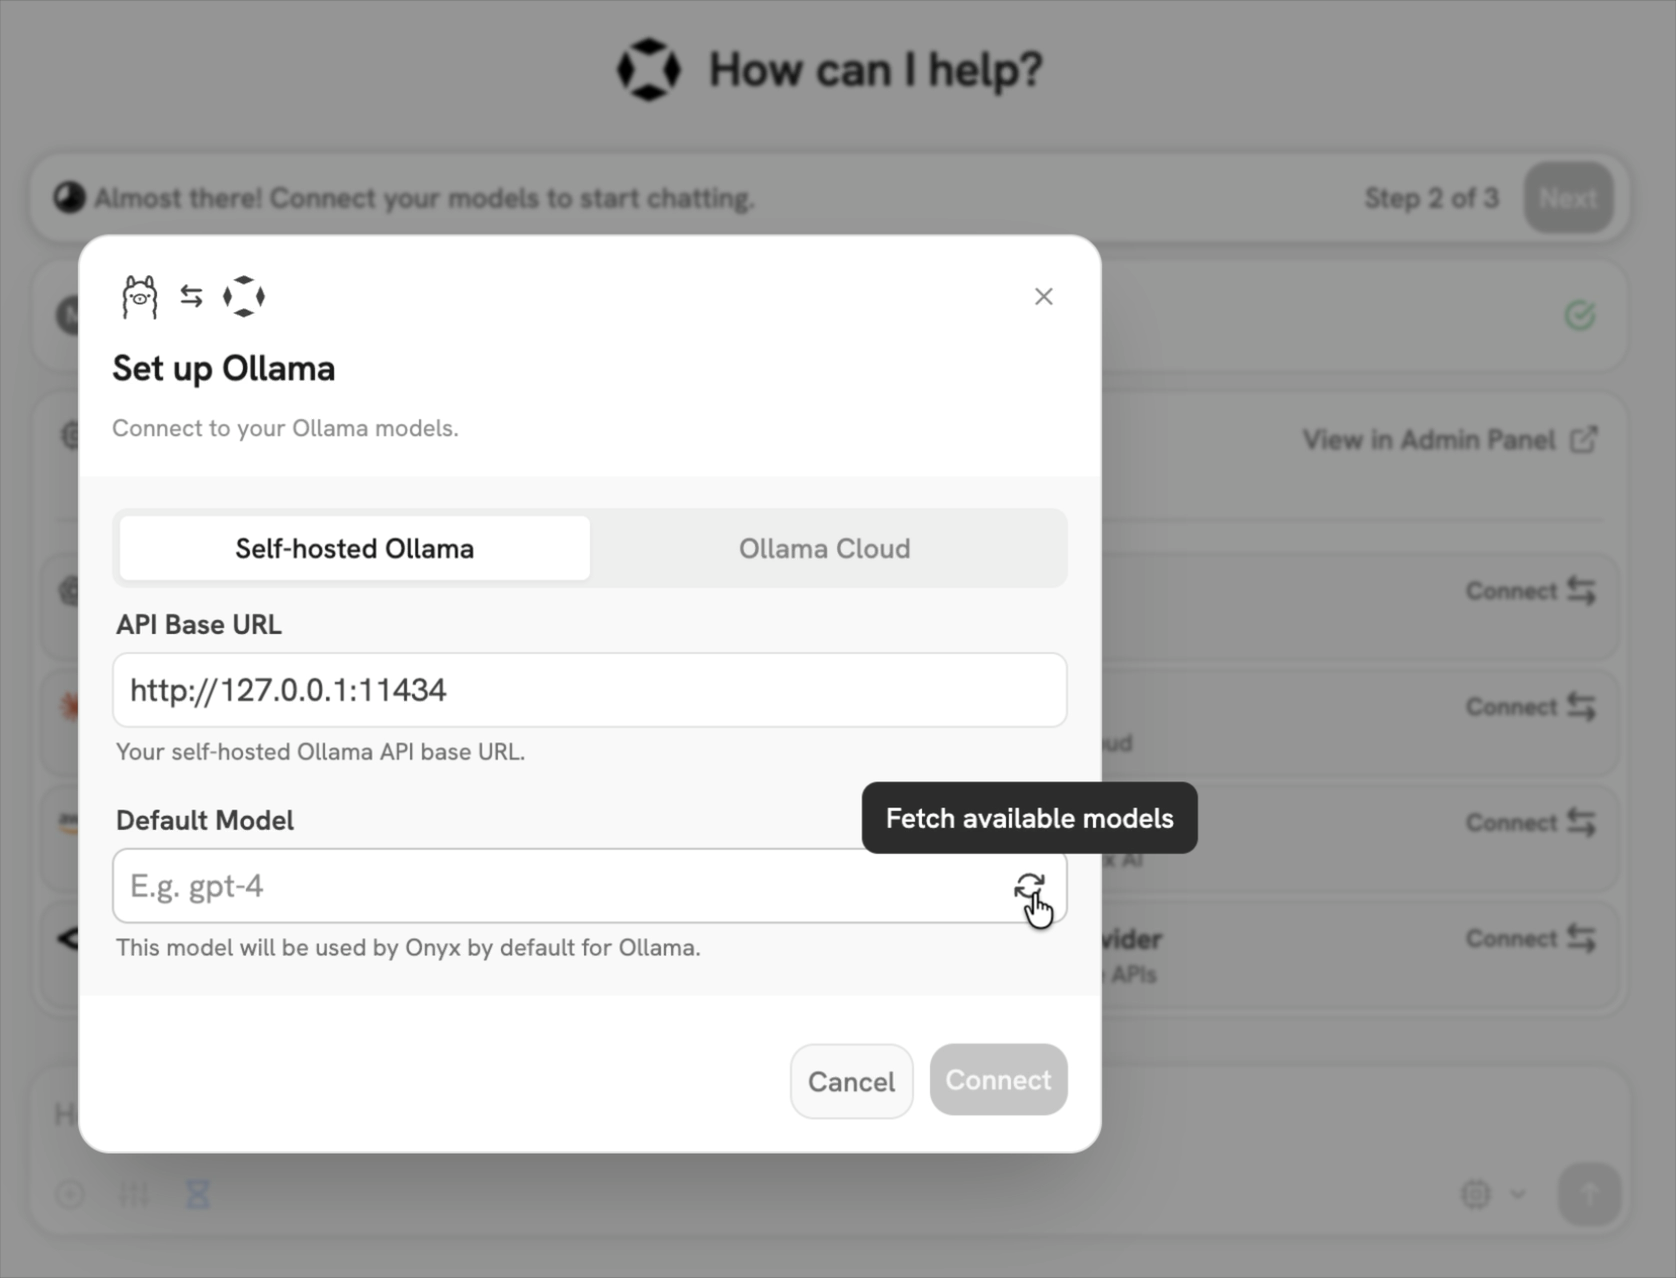
You can also easily connect up Onyx Cloud with the Ollama Cloud tab of the setup.
Send your first query
Vision
Vision models accept images alongside text so the model can describe, classify, and answer questions about what it sees.
Quick start
ollama run gemma3 ./image.png whats in this image?
Usage with Ollama's API
Provide an images array. SDKs accept file paths, URLs or raw bytes while the REST API expects base64-encoded image data.
# 3. Send it to Ollama
curl -X POST http://localhost:11434/api/chat \
-H "Content-Type: application/json" \
-d '{
    "model": "gemma3",
    "messages": [{
    "role": "user",
    "content": "What is in this image?",
    "images": ["'"$IMG"'"]
    }],
    "stream": false
}'
```
# Pass in the path to the image
path = input('Please enter the path to the image: ')

# You can also pass in base64 encoded image data
# img = base64.b64encode(Path(path).read_bytes()).decode()
# or the raw bytes
# img = Path(path).read_bytes()

response = chat(
  model='gemma3',
  messages=[
    {
      'role': 'user',
      'content': 'What is in this image? Be concise.',
      'images': [path],
    }
  ],
)

print(response.message.content)
 import ollama from 'ollama'

 const imagePath = '/absolute/path/to/image.jpg'
 const response = await ollama.chat({
   model: 'gemma3',
   messages: [
     { role: 'user', content: 'What is in this image?', images: [imagePath] }
   ],
   stream: false,
 })

 console.log(response.message.content)
 ```
  </Tab>
</Tabs>
Documentation Index
Fetch the complete documentation index at: https://docs.ollama.com/llms.txt Use this file to discover all available pages before exploring further.
Linux
Install
To install Ollama, run the following command:
curl -fsSL https://ollama.com/install.sh | sh
Manual install
If you are upgrading from a prior version, you should remove the old libraries with `sudo rm -rf /usr/lib/ollama` first.Download and extract the package:
curl -fsSL https://ollama.com/download/ollama-linux-amd64.tar.zst \
    | sudo tar x -C /usr
Documentation Index
Fetch the complete documentation index at: https://docs.ollama.com/llms.txt Use this file to discover all available pages before exploring further.
Tool calling
Ollama supports tool calling (also known as function calling) which allows a model to invoke tools and incorporate their results into its replies.
Calling a single tool
Invoke a single tool and include its response in a follow-up request.
Also known as "single-shot" tool calling.
  curl -s http://localhost:11434/api/chat -H "Content-Type: application/json" -d '{
    "model": "qwen3",
    "messages": [{"role": "user", "content": "What is the temperature in New York?"}],
    "stream": false,
    "tools": [
      {
        "type": "function",
        "function": {
          "name": "get_temperature",
          "description": "Get the current temperature for a city",
          "parameters": {
            "type": "object",
            "required": ["city"],
            "properties": {
              "city": {"type": "string", "description": "The name of the city"}
            }
          }
        }
      }
    ]
  }'
**Generate a response with a single tool result**
  curl -s http://localhost:11434/api/chat -H "Content-Type: application/json" -d '{
    "model": "qwen3",
    "messages": [
      {"role": "user", "content": "What is the temperature in New York?"},
      {
        "role": "assistant",
        "tool_calls": [
          {
            "type": "function",
            "function": {
              "index": 0,
              "name": "get_temperature",
              "arguments": {"city": "New York"}
            }
          }
        ]
      },
      {"role": "tool", "tool_name": "get_temperature", "content": "22°C"}
    ],
    "stream": false
  }'
  ```
</Tab>
``
<Tab title="Python">
  Install the Ollama Python SDK:

```bash  theme={"system"}
  # with pip
  pip install ollama -U

  # with uv
  uv add ollama
  ```
 from ollama import chat

 def get_temperature(city: str) -> str:
   """Get the current temperature for a city

   Args:
     city: The name of the city

   Returns:
     The current temperature for the city
   """
   temperatures = {
     "New York": "22°C",
     "London": "15°C",
     "Tokyo": "18°C",
   }
   return temperatures.get(city, "Unknown")

 messages = [{"role": "user", "content": "What is the temperature in New York?"}]

 # pass functions directly as tools in the tools list or as a JSON schema
 response = chat(model="qwen3", messages=messages, tools=[get_temperature], think=True)

 messages.append(response.message)
 if response.message.tool_calls:
   # only recommended for models which only return a single tool call
   call = response.message.tool_calls[0]
   result = get_temperature(**call.function.arguments)
   # add the tool result to the messages
   messages.append({"role": "tool", "tool_name": call.function.name, "content": str(result)})

   final_response = chat(model="qwen3", messages=messages, tools=[get_temperature], think=True)
   print(final_response.message.content)
 ```
  </Tab>
``
  <Tab title="JavaScript">
 Install the Ollama JavaScript library:
  ```bash  theme={"system"}
 # with npm
 npm i ollama

 # with bun
 bun i ollama
 ```
   import ollama from 'ollama'

   function getTemperature(city: string): string {
     const temperatures: Record<string, string> = {
       'New York': '22°C',
       'London': '15°C',
       'Tokyo': '18°C',
     }
     return temperatures[city] ?? 'Unknown'
   }

   const tools = [
     {
       type: 'function',
       function: {
         name: 'get_temperature',
         description: 'Get the current temperature for a city',
         parameters: {
           type: 'object',
           required: ['city'],
           properties: {
             city: { type: 'string', description: 'The name of the city' },
           },
         },
       },
     },
   ]

   const messages = [{ role: 'user', content: "What is the temperature in New York?" }]

   const response = await ollama.chat({
     model: 'qwen3',
     messages,
     tools,
     think: true,
   })

   messages.push(response.message)
   if (response.message.tool_calls?.length) {
     // only recommended for models which only return a single tool call
     const call = response.message.tool_calls[0]
     const args = call.function.arguments as { city: string }
     const result = getTemperature(args.city)
     // add the tool result to the messages
     messages.push({ role: 'tool', tool_name: call.function.name, content: result })

     // generate the final response
     const finalResponse = await ollama.chat({ model: 'qwen3', messages, tools, think: true })
     console.log(finalResponse.message.content)
   }
   ```
 </Tab>
</Tabs>
Parallel tool calling
Request multiple tool calls in parallel, then send all tool responses back to the model. curl -s http://localhost:11434/api/chat -H "Content-Type: application/json" -d '{
"model": "qwen3",
"messages": [{"role": "user", "content": "What are the current weather conditions and temperature in New York and London?"}],
"stream": false,
"tools": [
{
"type": "function",
"function": {
"name": "get_temperature",
"description": "Get the current temperature for a city",
"parameters": {
"type": "object",
"required": ["city"],
"properties": {
"city": {"type": "string", "description": "The name of the city"}
}
}
}
},
{
"type": "function",
"function": {
"name": "get_conditions",
"description": "Get the current weather conditions for a city",
"parameters": {
"type": "object",
"required": ["city"],
"properties": {
"city": {"type": "string", "description": "The name of the city"}
}
}
}
}
]
}'
```
**Generate a response with multiple tool results**
 curl -s http://localhost:11434/api/chat -H "Content-Type: application/json" -d '{
   "model": "qwen3",
   "messages": [
     {"role": "user", "content": "What are the current weather conditions and temperature in New York and London?"},
     {
       "role": "assistant",
       "tool_calls": [
         {
           "type": "function",
           "function": {
             "index": 0,
             "name": "get_temperature",
             "arguments": {"city": "New York"}
           }
         },
         {
           "type": "function",
           "function": {
             "index": 1,
             "name": "get_conditions",
             "arguments": {"city": "New York"}
           }
         },
         {
           "type": "function",
           "function": {
             "index": 2,
             "name": "get_temperature",
             "arguments": {"city": "London"}
           }
         },
         {
           "type": "function",
           "function": {
             "index": 3,
             "name": "get_conditions",
             "arguments": {"city": "London"}
           }
         }
       ]
     },
     {"role": "tool", "tool_name": "get_temperature", "content": "22°C"},
     {"role": "tool", "tool_name": "get_conditions", "content": "Partly cloudy"},
     {"role": "tool", "tool_name": "get_temperature", "content": "15°C"},
     {"role": "tool", "tool_name": "get_conditions", "content": "Rainy"}
   ],
   "stream": false
 }'
 ```
  </Tab>

  <Tab title="Python">
 ```python  theme={"system"}
 from ollama import chat

 def get_temperature(city: str) -> str:
   """Get the current temperature for a city

   Args:
     city: The name of the city

   Returns:
     The current temperature for the city
   """
   temperatures = {
     "New York": "22°C",
     "London": "15°C",
     "Tokyo": "18°C"
   }
   return temperatures.get(city, "Unknown")

 def get_conditions(city: str) -> str:
   """Get the current weather conditions for a city

   Args:
     city: The name of the city

   Returns:
     The current weather conditions for the city
   """
   conditions = {
     "New York": "Partly cloudy",
     "London": "Rainy",
     "Tokyo": "Sunny"
   }
   return conditions.get(city, "Unknown")


 messages = [{'role': 'user', 'content': 'What are the current weather conditions and temperature in New York and London?'}]

 # The python client automatically parses functions as a tool schema so we can pass them directly
 # Schemas can be passed directly in the tools list as well
 response = chat(model='qwen3', messages=messages, tools=[get_temperature, get_conditions], think=True)

 # add the assistant message to the messages
 messages.append(response.message)
 if response.message.tool_calls:
   # process each tool call
   for call in response.message.tool_calls:
     # execute the appropriate tool
     if call.function.name == 'get_temperature':
       result = get_temperature(**call.function.arguments)
     elif call.function.name == 'get_conditions':
       result = get_conditions(**call.function.arguments)
     else:
       result = 'Unknown tool'
     # add the tool result to the messages
     messages.append({'role': 'tool',  'tool_name': call.function.name, 'content': str(result)})

   # generate the final response
   final_response = chat(model='qwen3', messages=messages, tools=[get_temperature, get_conditions], think=True)
   print(final_response.message.content)
 ```
  </Tab>

  <Tab title="JavaScript">
 ```typescript  theme={"system"}
 import ollama from 'ollama'

 function getTemperature(city: string): string {
   const temperatures: { [key: string]: string } = {
     "New York": "22°C",
     "London": "15°C",
     "Tokyo": "18°C"
   }
   return temperatures[city] || "Unknown"
 }

 function getConditions(city: string): string {
   const conditions: { [key: string]: string } = {
     "New York": "Partly cloudy",
     "London": "Rainy",
     "Tokyo": "Sunny"
   }
   return conditions[city] || "Unknown"
 }

 const tools = [
   {
     type: 'function',
     function: {
       name: 'get_temperature',
       description: 'Get the current temperature for a city',
       parameters: {
         type: 'object',
         required: ['city'],
         properties: {
           city: { type: 'string', description: 'The name of the city' },
         },
       },
     },
   },
   {
     type: 'function',
     function: {
       name: 'get_conditions',
       description: 'Get the current weather conditions for a city',
       parameters: {
         type: 'object',
         required: ['city'],
         properties: {
           city: { type: 'string', description: 'The name of the city' },
         },
       },
     },
   }
 ]

 const messages = [{ role: 'user', content: 'What are the current weather conditions and temperature in New York and London?' }]

 const response = await ollama.chat({
   model: 'qwen3',
   messages,
   tools,
   think: true
 })

 // add the assistant message to the messages
 messages.push(response.message)
 if (response.message.tool_calls) {
   // process each tool call
   for (const call of response.message.tool_calls) {
     // execute the appropriate tool
     let result: string
     if (call.function.name === 'get_temperature') {
       const args = call.function.arguments as { city: string }
       result = getTemperature(args.city)
     } else if (call.function.name === 'get_conditions') {
       const args = call.function.arguments as { city: string }
       result = getConditions(args.city)
     } else {
       result = 'Unknown tool'
     }
     // add the tool result to the messages
     messages.push({ role: 'tool', tool_name: call.function.name, content: result })
   }

   // generate the final response
   const finalResponse = await ollama.chat({ model: 'qwen3', messages, tools, think: true })
   console.log(finalResponse.message.content)
 }
 ```
  </Tab>
</Tabs>

## Multi-turn tool calling (Agent loop)

An agent loop allows the model to decide when to invoke tools and incorporate their results into its replies.

It also might help to tell the model that it is in a loop and can make multiple tool calls.

<Tabs>
  <Tab title="Python"
 ```python  theme={"system"}
 from ollama import chat, ChatResponse
 def add(a: int, b: int) -> int:
   """Add two numbers"""
   """
   Args:
     a: The first number
     b: The second number

   Returns:
     The sum of the two numbers
   """
   return a + b


 def multiply(a: int, b: int) -> int:
   """Multiply two numbers"""
   """
   Args:
     a: The first number
     b: The second number

   Returns:
     The product of the two numbers
   """
   return a * b


 available_functions = {
   'add': add,
   'multiply': multiply,
 }

 messages = [{'role': 'user', 'content': 'What is (11434+12341)*412?'}]
 while True:
     response: ChatResponse = chat(
         model='qwen3',
         messages=messages,
         tools=[add, multiply],
         think=True,
     )
     messages.append(response.message)
     print("Thinking: ", response.message.thinking)
     print("Content: ", response.message.content)
     if response.message.tool_calls:
         for tc in response.message.tool_calls:
             if tc.function.name in available_functions:
                 print(f"Calling {tc.function.name} with arguments {tc.function.arguments}")
                 result = available_functions[tc.function.name](**tc.function.arguments)
                 print(f"Result: {result}")
                 # add the tool result to the messages
                 messages.append({'role': 'tool', 'tool_name': tc.function.name, 'content': str(result)})
     else:
         # end the loop when there are no more tool calls
         break
   # continue the loop with the updated messages
 ```
  </Tab>

  <Tab title="JavaScript">
 ```typescript  theme={"system"}
 import ollama from 'ollama'

 type ToolName = 'add' | 'multiply'

 function add(a: number, b: number): number {
   return a + b
 }

 function multiply(a: number, b: number): number {
   return a * b
 }

 const availableFunctions: Record<ToolName, (a: number, b: number) => number> = {
   add,
   multiply,
 }

 const tools = [
   {
     type: 'function',
     function: {
       name: 'add',
       description: 'Add two numbers',
       parameters: {
         type: 'object',
         required: ['a', 'b'],
         properties: {
           a: { type: 'integer', description: 'The first number' },
           b: { type: 'integer', description: 'The second number' },
         },
       },
     },
   },
   {
     type: 'function',
     function: {
       name: 'multiply',
       description: 'Multiply two numbers',
       parameters: {
         type: 'object',
         required: ['a', 'b'],
         properties: {
           a: { type: 'integer', description: 'The first number' },
           b: { type: 'integer', description: 'The second number' },
         },
       },
     },
   },
 ]

 async function agentLoop() {
   const messages = [{ role: 'user', content: 'What is (11434+12341)*412?' }]

   while (true) {
     const response = await ollama.chat({
       model: 'qwen3',
       messages,
       tools,
       think: true,
     })

     messages.push(response.message)
     console.log('Thinking:', response.message.thinking)
     console.log('Content:', response.message.content)

     const toolCalls = response.message.tool_calls ?? []
     if (toolCalls.length) {
       for (const call of toolCalls) {
         const fn = availableFunctions[call.function.name as ToolName]
         if (!fn) {
           continue
         }

         const args = call.function.arguments as { a: number; b: number }
         console.log(`Calling ${call.function.name} with arguments`, args)
         const result = fn(args.a, args.b)
         console.log(`Result: ${result}`)
         messages.push({ role: 'tool', tool_name: call.function.name, content: String(result) })
       }
     } else {
       break
     }
   }
 }

 agentLoop().catch(console.error)
 ```
  </Tab>
</Tabs>

## Tool calling with streaming

When streaming, gather every chunk of `thinking`, `content`, and `tool_calls`, then return those fields together with any tool results in the follow-up request.

<Tabs>
  <Tab title="Python">

 ```python  theme={"system"}
 from ollama import chat
 def get_temperature(city: str) -> str:
   """Get the current temperature for a city

   Args:
     city: The name of the city

   Returns:
     The current temperature for the city
   """
   temperatures = {
     'New York': '22°C',
     'London': '15°C',
   }
   return temperatures.get(city, 'Unknown')


 messages = [{'role': 'user', 'content': "What is the temperature in New York?"}]

 while True:
   stream = chat(
     model='qwen3',
     messages=messages,
     tools=[get_temperature],
     stream=True,
     think=True,
   )

   thinking = ''
   content = ''
   tool_calls = []

   done_thinking = False
   # accumulate the partial fields
   for chunk in stream:
     if chunk.message.thinking:
       thinking += chunk.message.thinking
       print(chunk.message.thinking, end='', flush=True)
     if chunk.message.content:
       if not done_thinking:
         done_thinking = True
         print('\n')
       content += chunk.message.content
       print(chunk.message.content, end='', flush=True)
     if chunk.message.tool_calls:
       tool_calls.extend(chunk.message.tool_calls)
       print(chunk.message.tool_calls)

   # append accumulated fields to the messages
   if thinking or content or tool_calls:
     messages.append({'role': 'assistant', 'thinking': thinking, 'content': content, 'tool_calls': tool_calls})

   if not tool_calls:
     break

   for call in tool_calls:
     if call.function.name == 'get_temperature':
       result = get_temperature(**call.function.arguments)
     else:
       result = 'Unknown tool'
     messages.append({'role': 'tool', 'tool_name': call.function.name, 'content': result})
 ```
  </Tab>

  <Tab title="JavaScript">

 ```typescript  theme={"system"}
 import ollama from 'ollama'

 function getTemperature(city: string): string {
   const temperatures: Record<string, string> = {
     'New York': '22°C',
     'London': '15°C',
   }
   return temperatures[city] ?? 'Unknown'
 }

 const getTemperatureTool = {
   type: 'function',
   function: {
     name: 'get_temperature',
     description: 'Get the current temperature for a city',
     parameters: {
       type: 'object',
       required: ['city'],
       properties: {
         city: { type: 'string', description: 'The name of the city' },
       },
     },
   },
 }

 async function agentLoop() {
   const messages = [{ role: 'user', content: "What is the temperature in New York?" }]

   while (true) {
     const stream = await ollama.chat({
       model: 'qwen3',
       messages,
       tools: [getTemperatureTool],
       stream: true,
       think: true,
     })

     let thinking = ''
     let content = ''
     const toolCalls: any[] = []
     let doneThinking = false

     for await (const chunk of stream) {
       if (chunk.message.thinking) {
         thinking += chunk.message.thinking
         process.stdout.write(chunk.message.thinking)
       }
       if (chunk.message.content) {
         if (!doneThinking) {
           doneThinking = true
           process.stdout.write('\n')
         }
         content += chunk.message.content
         process.stdout.write(chunk.message.content)
       }
       if (chunk.message.tool_calls?.length) {
         toolCalls.push(...chunk.message.tool_calls)
         console.log(chunk.message.tool_calls)
       }
     }

     if (thinking || content || toolCalls.length) {
       messages.push({ role: 'assistant', thinking, content, tool_calls: toolCalls } as any)
     }

     if (!toolCalls.length) {
       break
     }

     for (const call of toolCalls) {
       if (call.function.name === 'get_temperature') {
         const args = call.function.arguments as { city: string }
         const result = getTemperature(args.city)
         messages.push({ role: 'tool', tool_name: call.function.name, content: result } )
       } else {
         messages.push({ role: 'tool', tool_name: call.function.name, content: 'Unknown tool' } )
       }
     }
   }
 }

 agentLoop().catch(console.error)
 ```
  </Tab>
</Tabs>

This loop streams the assistant response, accumulates partial fields, passes them back together, and appends the tool results so the model can complete its answer.

## Using functions as tools with Ollama Python SDK

The Python SDK automatically parses functions as a tool schema so we can pass them directly.
Schemas can still be passed if needed.

````pyx  theme={"system"}
from ollama import chat

def get_temperature(city: str) -> str:
  """Get the current temperature for a city

  Args:
 city: The name of the city

  Returns:
 The current temperature for the city
  """
  temperatures = {
 'New York': '22°C',
 'London': '15°C',
  }
  return temperatures.get(city, 'Unknown')

available_functions = {
  'get_temperature': get_temperature,
}
# directly pass the function as part of the tools list
response = chat(model='qwen3', messages=messages, tools=available_functions.values(), think=True)
``
---
Start Ollama:
ollama serve
In another terminal, verify that Ollama is running:
ollama -v
AMD GPU install
If you have an AMD GPU, also download and extract the additional ROCm package:
curl -fsSL https://ollama.com/download/ollama-linux-amd64-rocm.tar.zst \
    | sudo tar x -C /usr
ARM64 install
Download and extract the ARM64-specific package:
curl -fsSL https://ollama.com/download/ollama-linux-arm64.tar.zst \
    | sudo tar x -C /usr
Adding Ollama as a startup service (recommended)
Create a user and group for Ollama:
sudo useradd -r -s /bin/false -U -m -d /usr/share/ollama ollama
sudo usermod -a -G ollama $(whoami)
Create a service file in /etc/systemd/system/ollama.service:
[Unit]
Description=Ollama Service
After=network-online.target

[Service]
ExecStart=/usr/bin/ollama serve
User=ollama
Group=ollama
Restart=always
RestartSec=3
Environment="PATH=$PATH"

[Install]
WantedBy=multi-user.target
Documentation Index
Fetch the complete documentation index at: https://docs.ollama.com/llms.txt Use this file to discover all available pages before exploring further.
Embeddings
Generate text embeddings for semantic search, retrieval, and RAG.
Embeddings turn text into numeric vectors you can store in a vector database, search with cosine similarity, or use in RAG pipelines. The vector length depends on the model (typically 384–1024 dimensions).
Recommended models
Generate embeddings
Generate embeddings directly from the command line:```shell theme={"system"}
ollama run embeddinggemma "Hello world"
```
You can also pipe text to generate embeddings:
```shell theme={"system"}
echo "Hello world" | ollama run embeddinggemma
```
Output is a JSON array.
single = ollama.embed(
  model='embeddinggemma',
  input='The quick brown fox jumps over the lazy dog.'
)
print(len(single['embeddings'][0]))  # vector length
```
```javascript  theme={"system"}
import ollama from 'ollama'

const single = await ollama.embed({
  model: 'embeddinggemma',
  input: 'The quick brown fox jumps over the lazy dog.',
})
console.log(single.embeddings[0].length) // vector length
```
Generate a batch of embeddings
Pass an array of strings to input.
batch = ollama.embed(
  model='embeddinggemma',
  input=[
    'The quick brown fox jumps over the lazy dog.',
    'The five boxing wizards jump quickly.',
    'Jackdaws love my big sphinx of quartz.',
  ]
)
print(len(batch['embeddings']))  # number of vectors
```
Tips
- Use cosine similarity for most semantic search use cases.
- Use the same embedding model for both indexing and querying.
Then start the service:
sudo systemctl daemon-reload
sudo systemctl enable ollama
Install CUDA drivers (optional)
Download and install CUDA.
Verify that the drivers are installed by running the following command, which should print details about your GPU:
nvidia-smi
Install AMD ROCm drivers (optional)
Download and Install ROCm v7.
Start Ollama
Start Ollama and verify it is running:
sudo systemctl start ollama
sudo systemctl status ollama
Customizing
To customize the installation of Ollama, you can edit the systemd service file or the environment variables by running:
sudo systemctl edit ollama
Alternatively, create an override file manually in /etc/systemd/system/ollama.service.d/override.conf:
[Service]
Environment="OLLAMA_DEBUG=1"
Updating
Update Ollama by running the install script again:
curl -fsSL https://ollama.com/install.sh | sh
Or by re-downloading Ollama:
curl -fsSL https://ollama.com/download/ollama-linux-amd64.tar.zst \
    | sudo tar x -C /usr
Installing specific versions
Use OLLAMA_VERSION environment variable with the install script to install a specific version of Ollama, including pre-releases. You can find the version numbers in the releases page.
For example:
curl -fsSL https://ollama.com/install.sh | OLLAMA_VERSION=0.5.7 sh
Viewing logs
To view logs of Ollama running as a startup service, run:
journalctl -e -u ollama
Documentation Index
Fetch the complete documentation index at: https://docs.ollama.com/llms.txt Use this file to discover all available pages before exploring further.
Modelfile Reference
A Modelfile is the blueprint to create and share customized models using Ollama.
Table of Contents
Format
The format of the Modelfile:
# comment
INSTRUCTION arguments
| Instruction | Description |
|---|---|
FROM (required) |
Defines the base model to use. |
PARAMETER |
Sets the parameters for how Ollama will run the model. |
TEMPLATE |
The full prompt template to be sent to the model. |
SYSTEM |
Specifies the system message that will be set in the template. |
ADAPTER |
Defines the (Q)LoRA adapters to apply to the model. |
LICENSE |
Specifies the legal license. |
MESSAGE |
Specify message history. |
REQUIRES |
Specify the minimum version of Ollama required by the model. |
Examples
Basic Modelfile
An example of a Modelfile creating a mario blueprint:
FROM llama3.2
# sets the temperature to 1 [higher is more creative, lower is more coherent]
PARAMETER temperature 1
# sets the context window size to 4096, this controls how many tokens the LLM can use as context to generate the next token
PARAMETER num_ctx 4096

# sets a custom system message to specify the behavior of the chat assistant
SYSTEM You are Mario from super mario bros, acting as an assistant.
To use this:
- Save it as a file (e.g.
Modelfile) ollama create choose-a-model-name -f <location of the file e.g. ./Modelfile>ollama run choose-a-model-name- Start using the model!
To view the Modelfile of a given model, use the ollama show --modelfile command.
ollama show --modelfile llama3.2
# Modelfile generated by "ollama show"
# To build a new Modelfile based on this one, replace the FROM line with:
# FROM llama3.2:latest
FROM /Users/pdevine/.ollama/models/blobs/sha256-00e1317cbf74d901080d7100f57580ba8dd8de57203072dc6f668324ba545f29
TEMPLATE """{{ if .System }}<|start_header_id|>system<|end_header_id|>

{{ .System }}<|eot_id|>{{ end }}{{ if .Prompt }}<|start_header_id|>user<|end_header_id|>

{{ .Prompt }}<|eot_id|>{{ end }}<|start_header_id|>assistant<|end_header_id|>

{{ .Response }}<|eot_id|>"""
PARAMETER stop "<|start_header_id|>"
PARAMETER stop "<|end_header_id|>"
PARAMETER stop "<|eot_id|>"
PARAMETER stop "<|reserved_special_token"
Instructions
FROM (Required)
The FROM instruction defines the base model to use when creating a model.
FROM <model name>:<tag>
Build from existing model
FROM llama3.2
Build from a Safetensors model
FROM <model directory>
The model directory should contain the Safetensors weights for a supported architecture.
Currently supported model architectures:
- Llama (including Llama 2, Llama 3, Llama 3.1, and Llama 3.2)
- Mistral (including Mistral 1, Mistral 2, and Mixtral)
- Gemma (including Gemma 1 and Gemma 2)
- Phi3
Build from a GGUF file
FROM ./ollama-model.gguf
The GGUF file location should be specified as an absolute path or relative to the Modelfile location.
PARAMETER
The PARAMETER instruction defines a parameter that can be set when the model is run.
PARAMETER <parameter> <parametervalue>
Valid Parameters and Values
| Parameter | Description | Value Type | Example Usage |
|---|---|---|---|
| num_ctx | Sets the size of the context window used to generate the next token. (Default: 2048) | int | num_ctx 4096 |
| repeat_last_n | Sets how far back for the model to look back to prevent repetition. (Default: 64, 0 = disabled, -1 = num_ctx) | int | repeat_last_n 64 |
| repeat_penalty | Sets how strongly to penalize repetitions. A higher value (e.g., 1.5) will penalize repetitions more strongly, while a lower value (e.g., 0.9) will be more lenient. (Default: 1.1) | float | repeat_penalty 1.1 |
| temperature | The temperature of the model. Increasing the temperature will make the model answer more creatively. (Default: 0.8) | float | temperature 0.7 |
| seed | Sets the random number seed to use for generation. Setting this to a specific number will make the model generate the same text for the same prompt. (Default: 0) | int | seed 42 |
| stop | Sets the stop sequences to use. When this pattern is encountered the LLM will stop generating text and return. Multiple stop patterns may be set by specifying multiple separate stop parameters in a modelfile. |
string | stop "AI assistant:" |
| num_predict | Maximum number of tokens to predict when generating text. (Default: -1, infinite generation) | int | num_predict 42 |
| top_k | Reduces the probability of generating nonsense. A higher value (e.g. 100) will give more diverse answers, while a lower value (e.g. 10) will be more conservative. (Default: 40) | int | top_k 40 |
| top_p | Works together with top-k. A higher value (e.g., 0.95) will lead to more diverse text, while a lower value (e.g., 0.5) will generate more focused and conservative text. (Default: 0.9) | float | top_p 0.9 |
| min_p | Alternative to the topp, and aims to ensure a balance of quality and variety. The parameter _p represents the minimum probability for a token to be considered, relative to the probability of the most likely token. For example, with p=0.05 and the most likely token having a probability of 0.9, logits with a value less than 0.045 are filtered out. (Default: 0.0) | float | min_p 0.05 |
TEMPLATE
TEMPLATE of the full prompt template to be passed into the model. It may include (optionally) a system message, a user's message and the response from the model. Note: syntax may be model specific. Templates use Go template syntax.
Template Variables
| Variable | Description |
|---|---|
{{ .System }} |
The system message used to specify custom behavior. |
{{ .Prompt }} |
The user prompt message. |
{{ .Response }} |
The response from the model. When generating a response, text after this variable is omitted. |
TEMPLATE """{{ if .System }}<|im_start|>system
{{ .System }}<|im_end|>
{{ end }}{{ if .Prompt }}<|im_start|>user
{{ .Prompt }}<|im_end|>
{{ end }}<|im_start|>assistant
"""
SYSTEM
The SYSTEM instruction specifies the system message to be used in the template, if applicable.
SYSTEM """<system message>"""
ADAPTER
The ADAPTER instruction specifies a fine tuned LoRA adapter that should apply to the base model. The value of the adapter should be an absolute path or a path relative to the Modelfile. The base model should be specified with a FROM instruction. If the base model is not the same as the base model that the adapter was tuned from the behaviour will be erratic.
Safetensor adapter
ADAPTER <path to safetensor adapter>
Currently supported Safetensor adapters:
- Llama (including Llama 2, Llama 3, and Llama 3.1)
- Mistral (including Mistral 1, Mistral 2, and Mixtral)
- Gemma (including Gemma 1 and Gemma 2)
GGUF adapter
ADAPTER ./ollama-lora.gguf
LICENSE
The LICENSE instruction allows you to specify the legal license under which the model used with this Modelfile is shared or distributed.
LICENSE """
<license text>
"""
MESSAGE
The MESSAGE instruction allows you to specify a message history for the model to use when responding. Use multiple iterations of the MESSAGE command to build up a conversation which will guide the model to answer in a similar way.
MESSAGE <role> <message>
Valid roles
| Role | Description |
|---|---|
| system | Alternate way of providing the SYSTEM message for the model. |
| user | An example message of what the user could have asked. |
| assistant | An example message of how the model should respond. |
Example conversation
MESSAGE user Is Toronto in Canada?
MESSAGE assistant yes
MESSAGE user Is Sacramento in Canada?
MESSAGE assistant no
MESSAGE user Is Ontario in Canada?
MESSAGE assistant yes
REQUIRES
The REQUIRES instruction allows you to specify the minimum version of Ollama required by the model.
REQUIRES <version>
``

The version should be a valid Ollama version (e.g. 0.14.0).

## Notes

* the **`Modelfile` is not case sensitive**. In the examples, uppercase instructions are used to make it easier to distinguish it from arguments.
* Instructions can be in any order. In the examples, the `FROM` instruction is first to keep it easily readable.

[1]: https://ollama.com/library


Remove the ollama service:

```shell  theme={"system"}
sudo systemctl stop ollama
sudo systemctl disable ollama
sudo rm /etc/systemd/system/ollama.service
Remove ollama libraries from your lib directory (either /usr/local/lib, /usr/lib, or /lib):
sudo rm -r $(which ollama | tr 'bin' 'lib')
Remove the ollama binary from your bin directory (either /usr/local/bin, /usr/bin, or /bin):
sudo rm $(which ollama)
Remove the downloaded models and Ollama service user and group:
sudo userdel ollama
sudo groupdel ollama
sudo rm -r /usr/share/ollama
Documentation Index
Fetch the complete documentation index at: https://docs.ollama.com/llms.txt Use this file to discover all available pages before exploring further.
Structured Outputs
Structured outputs let you enforce a JSON schema on model responses so you can reliably extract structured data, describe images, or keep every reply consistent.
Generating structured JSON
```shell theme={"system"} curl -X POST http://localhost:11434/api/chat -H "Content-Type: application/json" -d '{ "model": "gpt-oss", "messages": [{"role": "user", "content": "Tell me about Canada in one line"}], "stream": false, "format": "json" }' ``` ```python theme={"system"} from ollama import chatresponse = chat(
model='gpt-oss',
messages=[{'role': 'user', 'content': 'Tell me about Canada.'}],
format='json'
)
print(response.message.content)
```
const response = await ollama.chat({
  model: 'gpt-oss',
  messages: [{ role: 'user', content: 'Tell me about Canada.' }],
  format: 'json'
})
console.log(response.message.content)
```
Docker
CPU only
docker run -d -v ollama:/root/.ollama -p 11434:11434 --name ollama ollama/ollama
``

## Nvidia GPU

Install the [NVIDIA Container Toolkit](https://docs.nvidia.com/datacenter/cloud-native/container-toolkit/latest/install-guide.html#installation).

### Install with Apt

1. Configure the repository

   ```shell  theme={"system"}
   curl -fsSL https://nvidia.github.io/libnvidia-container/gpgkey \
       | sudo gpg --dearmor -o /usr/share/keyrings/nvidia-container-toolkit-keyring.gpg
   curl -fsSL https://nvidia.github.io/libnvidia-container/stable/deb/nvidia-container-toolkit.list \
       | sed 's#deb https://#deb [signed-by=/usr/share/keyrings/nvidia-container-toolkit-keyring.gpg] https://#g' \
       | sudo tee /etc/apt/sources.list.d/nvidia-container-toolkit.list
   sudo apt-get update
Install the NVIDIA Container Toolkit packages
sudo apt-get install -y nvidia-container-toolkit
Install with Yum or Dnf
Configure the repository
curl -fsSL https://nvidia.github.io/libnvidia-container/stable/rpm/nvidia-container-toolkit.repo \
    | sudo tee /etc/yum.repos.d/nvidia-container-toolkit.repo
Install the NVIDIA Container Toolkit packages
sudo yum install -y nvidia-container-toolkit
Configure Docker to use Nvidia driver
sudo nvidia-ctk runtime configure --runtime=docker
sudo systemctl restart docker
Start the container
docker run -d --gpus=all -v ollama:/root/.ollama -p 11434:11434 --name ollama ollama/ollama
``

<Note>
  If you're running on an NVIDIA JetPack system, Ollama can't automatically discover the correct JetPack version.
  Pass the environment variable `JETSON_JETPACK=5` or `JETSON_JETPACK=6` to the container to select version 5 or 6.
</Note>

## AMD GPU

To run Ollama using Docker with AMD GPUs, use the `rocm` tag and the following command:

```shell  theme={"system"}
docker run -d --device /dev/kfd --device /dev/dri -v ollama:/root/.ollama -p 11434:11434 --name ollama ollama/ollama:rocm
Vulkan Support
Vulkan is bundled into the ollama/ollama image.
docker run -d --device /dev/kfd --device /dev/dri -v ollama:/root/.ollama -p 11434:11434 -e OLLAMA_VULKAN=1 --name ollama ollama/ollama
Run model locally
Now you can run a model:
docker exec -it ollama ollama run llama3.2
Try different models
More models can be found on the Ollama library.
Generating structured JSON with a schema
Provide a JSON schema to the format field.
```python  theme={"system"}
from ollama import chat
from pydantic import BaseModel

class Country(BaseModel):
  name: str
  capital: str
  languages: list[str]

response = chat(
  model='gpt-oss',
  messages=[{'role': 'user', 'content': 'Tell me about Canada.'}],
  format=Country.model_json_schema(),
)

country = Country.model_validate_json(response.message.content)
print(country)
```
```javascript  theme={"system"}
import ollama from 'ollama'
import { z } from 'zod'
import { zodToJsonSchema } from 'zod-to-json-schema'

const Country = z.object({
  name: z.string(),
  capital: z.string(),
  languages: z.array(z.string()),
})

const response = await ollama.chat({
  model: 'gpt-oss',
  messages: [{ role: 'user', content: 'Tell me about Canada.' }],
  format: zodToJsonSchema(Country),
})

const country = Country.parse(JSON.parse(response.message.content))
console.log(country)
``
Example: Extract structured data
Define the objects you want returned and let the model populate the fields:
from ollama import chat
from pydantic import BaseModel

class Pet(BaseModel):
  name: str
  animal: str
  age: int
  color: str | None
  favorite_toy: str | None

class PetList(BaseModel):
  pets: list[Pet]

response = chat(
  model='gpt-oss',
  messages=[{'role': 'user', 'content': 'I have two cats named Luna and Loki...'}],
  format=PetList.model_json_schema(),
)

pets = PetList.model_validate_json(response.message.content)
print(pets)
Example: Vision with structured outputs
Vision models accept the same format parameter, enabling deterministic descriptions of images:
from ollama import chat
from pydantic import BaseModel
from typing import Literal, Optional

class Object(BaseModel):
  name: str
  confidence: float
  attributes: str

class ImageDescription(BaseModel):
  summary: str
  objects: list[Object]
  scene: str
  colors: list[str]
  time_of_day: Literal['Morning', 'Afternoon', 'Evening', 'Night']
  setting: Literal['Indoor', 'Outdoor', 'Unknown']
  text_content: Optional[str] = None

response = chat(
  model='gemma3',
  messages=[{
    'role': 'user',
    'content': 'Describe this photo and list the objects you detect.',
    'images': ['path/to/image.jpg'],
  }],
  format=ImageDescription.model_json_schema(),
  options={'temperature': 0},
)

image_description = ImageDescription.model_validate_json(response.message.content)
print(image_description)
``

## Tips for reliable structured outputs

* Define schemas with Pydantic (Python) or Zod (JavaScript) so they can be reused for validation.
* Lower the temperature (e.g., set it to `0`) for more deterministic completions.
* Structured outputs work through the OpenAI-compatible API via `response_format`
> ## Documentation Index
> Fetch the complete documentation index at: https://docs.ollama.com/llms.txt
> Use this file to discover all available pages before exploring further.

# Quickstart

Ollama is available on macOS, Windows, and Linux.

<a href="https://ollama.com/download" target="_blank" className="inline-block px-6 py-2 bg-black rounded-full dark:bg-neutral-700 text-white font-normal border-none">
  Download Ollama
</a>

## Get Started

Run `ollama` in your terminal to open the interactive menu:

```sh  theme={"system"}
ollama
Navigate with ↑/↓, press enter to launch, → to change model, and esc to quit.
The menu provides quick access to:
- Run a model - Start an interactive chat
- Launch tools - Claude Code, Codex, OpenClaw, and more
- Additional integrations - Available under "More..."
Assistants
Launch OpenClaw, a personal AI with 100+ skills:
ollama launch openclaw
Coding
Launch Claude Code and other coding tools with Ollama models:
ollama launch claude
ollama launch codex
ollama launch opencode
See integrations for all supported tools.
API
Use the API to integrate Ollama into your applications:
curl http://localhost:11434/api/chat -d '{
  "model": "gemma3",
  "messages": [{ "role": "user", "content": "Hello!" }]
}'
See the API documentation for Python, JavaScript, and other integrations.
Documentation Index
Fetch the complete documentation index at: https://docs.ollama.com/llms.txt Use this file to discover all available pages before exploring further.
Ollama's documentation

Ollama is the easiest way to get up and running with large language models such as gpt-oss, Gemma 3, DeepSeek-R1, Qwen3 and more.
Get up and running with your first model or integrate Ollama with your favorite tools Download Ollama on macOS, Windows or Linux Ollama's cloud models offer larger models with better performance. View Ollama's API referenceLibraries
The official library for using Ollama with Python The official library for using Ollama with JavaScript or TypeScript. View a list of 20+ community-supported libraries for OllamaCommunity
Join our Discord community Join our Reddit community > ## Documentation Index > Fetch the complete documentation index at: https://docs.ollama.com/llms.txt > Use this file to discover all available pages before exploring further.Importing a Model
Table of Contents
- Importing a Safetensors adapter
- Importing a Safetensors model
- Importing a GGUF file
- Sharing models on ollama.com
Importing a fine tuned adapter from Safetensors weights
First, create a Modelfile with a FROM command pointing at the base model you used for fine tuning, and an ADAPTER command which points to the directory with your Safetensors adapter:
FROM <base model name>
ADAPTER /path/to/safetensors/adapter/directory
Make sure that you use the same base model in the FROM command as you used to create the adapter otherwise you will get erratic results. Most frameworks use different quantization methods, so it's best to use non-quantized (i.e. non-QLoRA) adapters. If your adapter is in the same directory as your Modelfile, use ADAPTER . to specify the adapter path.
Now run ollama create from the directory where the Modelfile was created:
ollama create my-model
Lastly, test the model:
ollama run my-model
Ollama supports importing adapters based on several different model architectures including:
- Llama (including Llama 2, Llama 3, Llama 3.1, and Llama 3.2);
- Mistral (including Mistral 1, Mistral 2, and Mixtral); and
- Gemma (including Gemma 1 and Gemma 2)
You can create the adapter using a fine tuning framework or tool which can output adapters in the Safetensors format, such as:
- Hugging Face fine tuning framework
- Unsloth
- MLX
Importing a model from Safetensors weights
First, create a Modelfile with a FROM command which points to the directory containing your Safetensors weights:
FROM /path/to/safetensors/directory
If you create the Modelfile in the same directory as the weights, you can use the command FROM ..
Now run the ollama create command from the directory where you created the Modelfile:
ollama create my-model
Lastly, test the model:
ollama run my-model
Ollama supports importing models for several different architectures including:
- Llama (including Llama 2, Llama 3, Llama 3.1, and Llama 3.2);
- Mistral (including Mistral 1, Mistral 2, and Mixtral);
- Gemma (including Gemma 1 and Gemma 2); and
- Phi3
This includes importing foundation models as well as any fine tuned models which have been fused with a foundation model.
Importing a GGUF based model or adapter
If you have a GGUF based model or adapter it is possible to import it into Ollama. You can obtain a GGUF model or adapter by:
- converting a Safetensors model with the
convert_hf_to_gguf.pyfrom Llama.cpp; - converting a Safetensors adapter with the
convert_lora_to_gguf.pyfrom Llama.cpp; or - downloading a model or adapter from a place such as HuggingFace
To import a GGUF model, create a Modelfile containing:
FROM /path/to/file.gguf
For a GGUF adapter, create the Modelfile with:
FROM <model name>
ADAPTER /path/to/file.gguf
When importing a GGUF adapter, it's important to use the same base model as the base model that the adapter was created with. You can use:
- a model from Ollama
- a GGUF file
- a Safetensors based model
Once you have created your Modelfile, use the ollama create command to build the model.
ollama create my-model
Quantizing a Model
Quantizing a model allows you to run models faster and with less memory consumption but at reduced accuracy. This allows you to run a model on more modest hardware.
Ollama can quantize FP16 and FP32 based models into different quantization levels using the -q/--quantize flag with the ollama create command.
First, create a Modelfile with the FP16 or FP32 based model you wish to quantize.
FROM /path/to/my/gemma/f16/model
Use ollama create to then create the quantized model.
$ ollama create --quantize q4_K_M mymodel
transferring model data
quantizing F16 model to Q4_K_M
creating new layer sha256:735e246cc1abfd06e9cdcf95504d6789a6cd1ad7577108a70d9902fef503c1bd
creating new layer sha256:0853f0ad24e5865173bbf9ffcc7b0f5d56b66fd690ab1009867e45e7d2c4db0f
writing manifest
success
Supported Quantizations
q8_0
K-means Quantizations
q4_K_Sq4_K_M
ollama pull llama3.2
echo "FROM llama3.2" >> Modelfile
echo "SYSTEM You are a friendly assistant." >> Modelfile
ollama create -f Modelfile lmlm/Lmkm
ollama push lmlm/Lmkm
Sharing your model on ollama.com
You can share any model you have created by pushing it to ollama.com so that other users can try it out.
First, use your browser to go to the Ollama Sign-Up page. If you already have an account, you can skip this step.
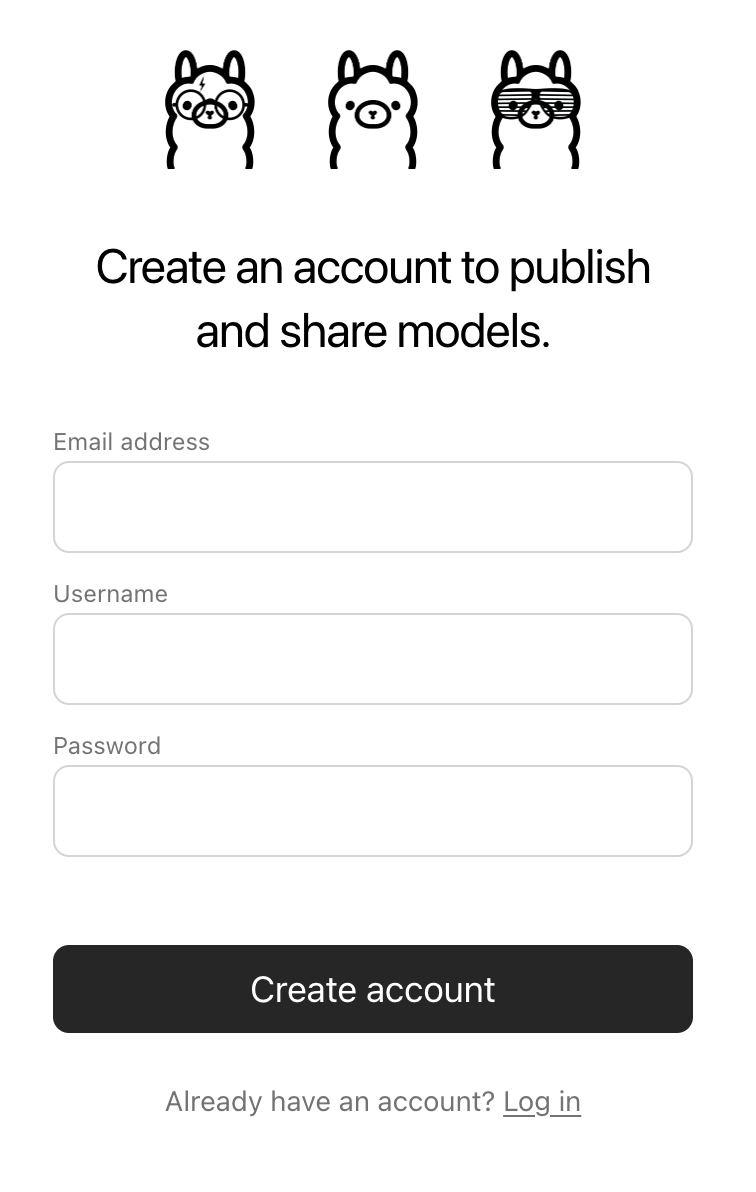
The Username field will be used as part of your model's name (e.g. jmorganca/mymodel), so make sure you are comfortable with the username that you have selected.
Now that you have created an account and are signed-in, go to the Ollama Keys Settings page.
Follow the directions on the page to determine where your Ollama Public Key is located.
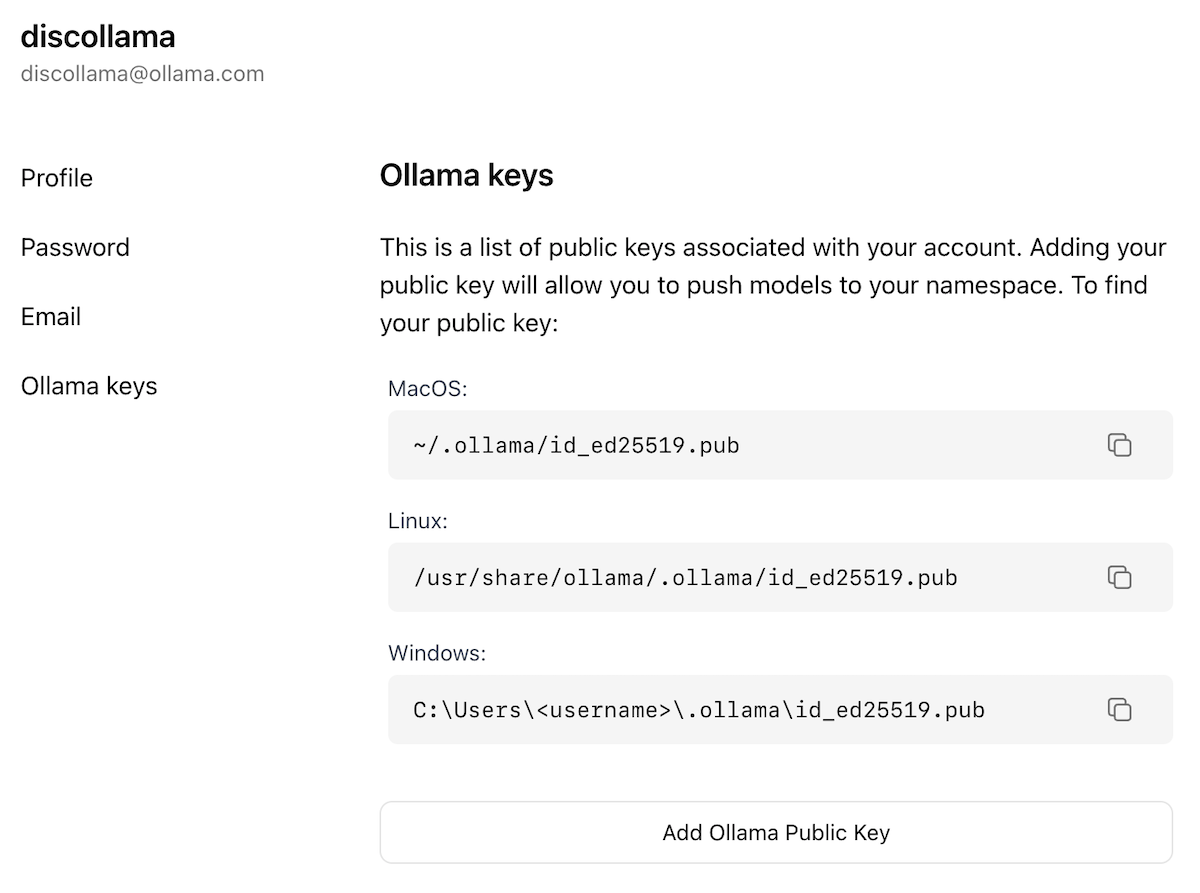
Click on the Add Ollama Public Key button, and copy and paste the contents of your Ollama Public Key into the text field.
To push a model to ollama.com, first make sure that it is named correctly with your username. You may have to use the ollama cp command to copy
your model to give it the correct name. Once you're happy with your model's name, use the ollama push command to push it to ollama.com.
ollama cp mymodel myuser/mymodel
ollama push myuser/mymodel
Once your model has been pushed, other users can pull and run it by using the command:
ollama run myuser/mymodel
Documentation Index
Fetch the complete documentation index at: https://docs.ollama.com/llms.txt Use this file to discover all available pages before exploring further.
Overview
Ollama integrates with a wide range of tools.
Coding Agents
Coding assistants that can read, modify, and execute code in your projects.
Assistants
AI assistants that help with everyday tasks.
IDEs & Editors
Native integrations for popular development environments.
Chat & RAG
Chat interfaces and retrieval-augmented generation platforms.
curl http://localhost:11434/api/chat \
  -d '{
    "model": "lmlm/Lmkm",
    "messages": [{"role": "user", "content": "Hello!"}]
  }'
Automation
Workflow automation platforms with AI integration.
Notebooks
Interactive computing environments with AI capabilities.
Documentation Index
Fetch the complete documentation index at: https://docs.ollama.com/llms.txt Use this file to discover all available pages before exploring further.
Droid
Install
Install the Droid CLI:
curl -fsSL https://app.factory.ai/cli | sh
Droid requires a larger context window. It is recommended to use a context window of at least 64k tokens. See Context length for more information.
Usage with Ollama
Quick setup
ollama launch droid
ollama cp llama3.2 lmlm/Lmkm
ollama push lmlm/Lmkm
To configure without launching:
ollama launch droid --config
Manual setup
Add a local configuration block to ~/.factory/config.json:
{
  "custom_models": [
    {
      "model_display_name": "qwen3-coder [Ollama]",
      "model": "qwen3-coder",
      "base_url": "http://localhost:11434/v1/",
      "api_key": "not-needed",
      "provider": "generic-chat-completion-api",
      "max_tokens": 32000
    }
  ]
}
Cloud Models
qwen3-coder:480b-cloud is the recommended model for use with Droid.
Add the cloud configuration block to ~/.factory/config.json:
{
  "custom_models": [
    {
      "model_display_name": "qwen3-coder [Ollama Cloud]",
      "model": "qwen3-coder:480b-cloud",
      "base_url": "http://localhost:11434/v1/",
      "api_key": "not-needed",
      "provider": "generic-chat-completion-api",
      "max_tokens": 128000
    }
  ]
}
Connecting to ollama.com
Create an API key from ollama.com and export it as
OLLAMA_API_KEY.Add the cloud configuration block to
~/.factory/config.json:{ "custom_models": [ { "model_display_name": "qwen3-coder [Ollama Cloud]", "model": "qwen3-coder:480b", "base_url": "https://ollama.com/v1/", "api_key": "OLLAMA_API_KEY", "provider": "generic-chat-completion-api", "max_tokens": 128000 } ] }
Run droid in a new terminal to load the new settings.