

| # Deploy a Trained RF-DETR Model | |
| You can deploy a fine-tuned RF-DETR model to Roboflow. | |
| Deploying to Roboflow allows you to create multi-step computer vision applications that run both in the cloud and your own hardware. | |
| To deploy your model to Roboflow, run: | |
| === "Object Detection" | |
| ```python | |
| from rfdetr import RFDETRNano | |
| x = RFDETRNano(pretrain_weights="<path/to/pretrain/weights/dir>") | |
| x.deploy_to_roboflow( | |
| workspace="<your-workspace>", | |
| project_id="<your-project-id>", | |
| version=1, | |
| api_key="<YOUR_API_KEY>", | |
| ) | |
| ``` | |
| === "Image Segmentation" | |
| ```python | |
| from rfdetr import RFDETRSegMedium | |
| x = RFDETRSegMedium(pretrain_weights="<path/to/pretrain/weights/dir>") | |
| x.deploy_to_roboflow( | |
| workspace="<your-workspace>", | |
| project_id="<your-project-id>", | |
| version=1, | |
| api_key="<YOUR_API_KEY>", | |
| ) | |
| ``` | |
| Above, set your Roboflow Workspace ID, the ID of the project to which you want to upload your model, and your Roboflow API key. | |
| - [Learn how to find your Workspace and Project ID.](https://docs.roboflow.com/developer/authentication/workspace-and-project-ids) | |
| - [Learn how to find your API key.](https://docs.roboflow.com/developer/authentication/find-your-roboflow-api-key) | |
| You can then run your model with Roboflow Inference: | |
| === "Object Detection" | |
| ```python | |
| import supervision as sv | |
| from inference import get_model | |
| from PIL import Image | |
| from io import BytesIO | |
| import requests | |
| url = "https://media.roboflow.com/dog.jpeg" | |
| image = Image.open(BytesIO(requests.get(url).content)) | |
| model = get_model("rfdetr-large") # replace with your Roboflow model ID | |
| predictions = model.infer(image, confidence=0.5)[0] | |
| detections = sv.Detections.from_inference(predictions) | |
| labels = [prediction.class_name for prediction in predictions.predictions] | |
| annotated_image = image.copy() | |
| annotated_image = sv.BoxAnnotator().annotate(annotated_image, detections) | |
| annotated_image = sv.LabelAnnotator().annotate(annotated_image, detections, labels) | |
| sv.plot_image(annotated_image) | |
| ``` | |
| === "Image Segmentation" | |
| ```python | |
| import supervision as sv | |
| from inference import get_model | |
| from PIL import Image | |
| from io import BytesIO | |
| import requests | |
| url = "https://media.roboflow.com/dog.jpeg" | |
| image = Image.open(BytesIO(requests.get(url).content)) | |
| model = get_model("rfdetr-seg-small") # replace with your Roboflow model ID | |
| predictions = model.infer(image, confidence=0.5)[0] | |
| detections = sv.Detections.from_inference(predictions) | |
| labels = [prediction.class_name for prediction in predictions.predictions] | |
| annotated_image = image.copy() | |
| annotated_image = sv.MaskAnnotator().annotate(annotated_image, detections) | |
| annotated_image = sv.LabelAnnotator().annotate(annotated_image, detections, labels) | |
| sv.plot_image(annotated_image) | |
| ``` | |
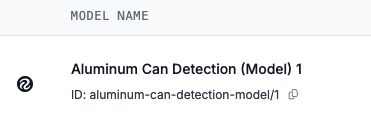
| Above, replace `rfdetr-large` with the your Roboflow model ID. You can find this ID from the "Models" list in your Roboflow dashboard: | |
|  | |
| When you first run this model, your model weights will be cached for local use with Inference. | |
| You will then see the results from your fine-tuned model. | |