Buckets:


| # Build and deploy your own chat application | |
| This tutorial will guide you from end to end on how to deploy your own chat application using Hugging Face Inference Endpoints. We will use Gradio to create a chat interface and an OpenAI client to connect to the Inference Endpoint. | |
| <Tip> | |
| This Tutorial uses Python, but your client can be any language that can make HTTP requests. The model and engine you deploy on Inference Endpoints uses the **OpenAI Chat Completions format**, so you can use any [OpenAI client](https://platform.openai.com/docs/libraries) to connect to them, in languages like JavaScript, Java, and Go. | |
| </Tip> | |
| ## Create your Inference Endpoint | |
| First, we need to create an Inference Endpoint for a model that can chat. | |
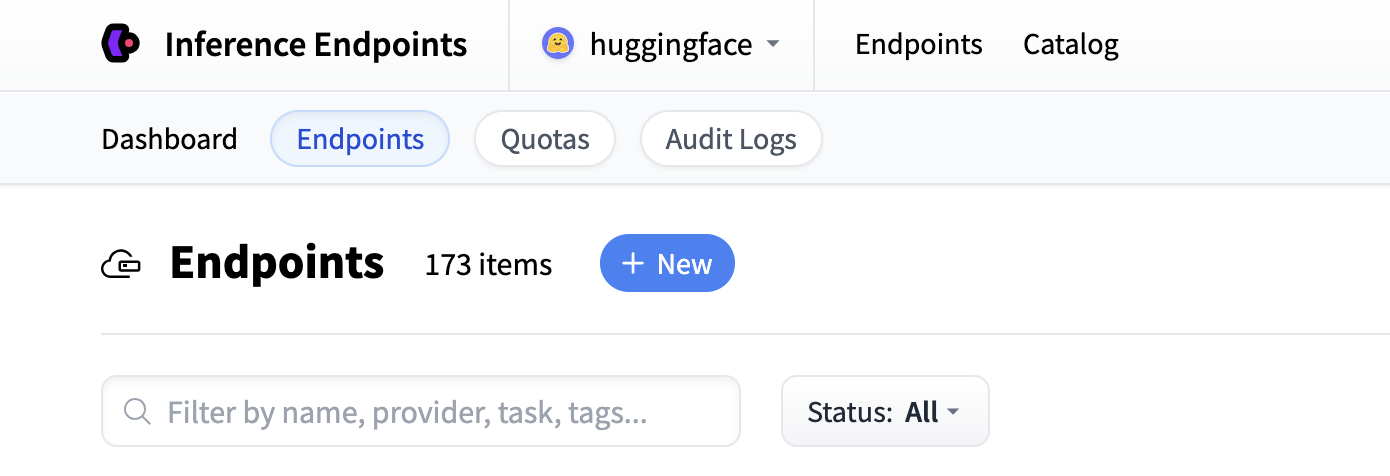
| Start by navigating to the Inference Endpoints UI, and once you have logged in you should see a button for creating a new Inference | |
| Endpoint. Click the "New" button. | |
|  | |
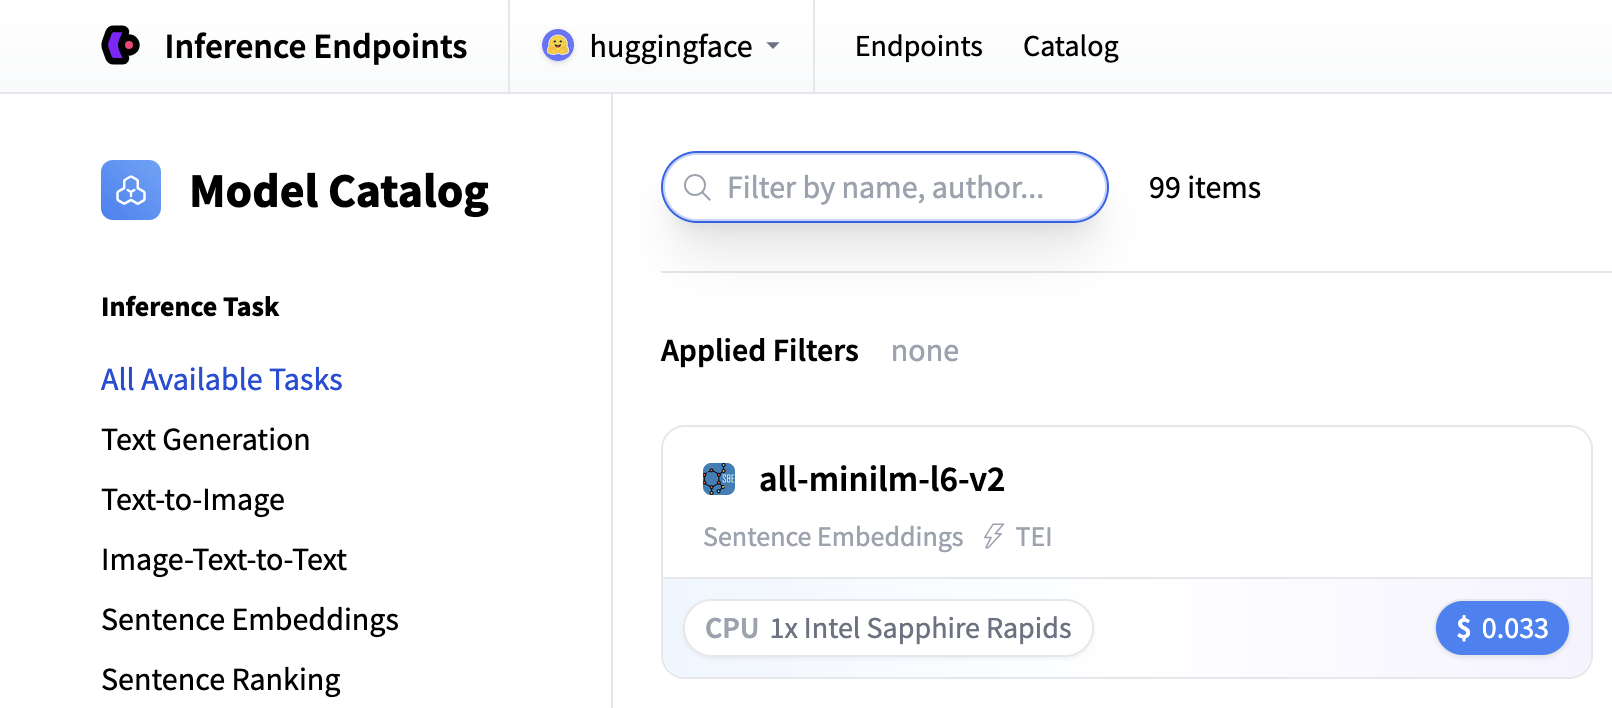
| From there you'll be directed to the catalog. The Model Catalog consists of popular models which have tuned configurations to work just as one-click | |
| deploys. You can filter by name, task, price of the hardware and much more. | |
|  | |
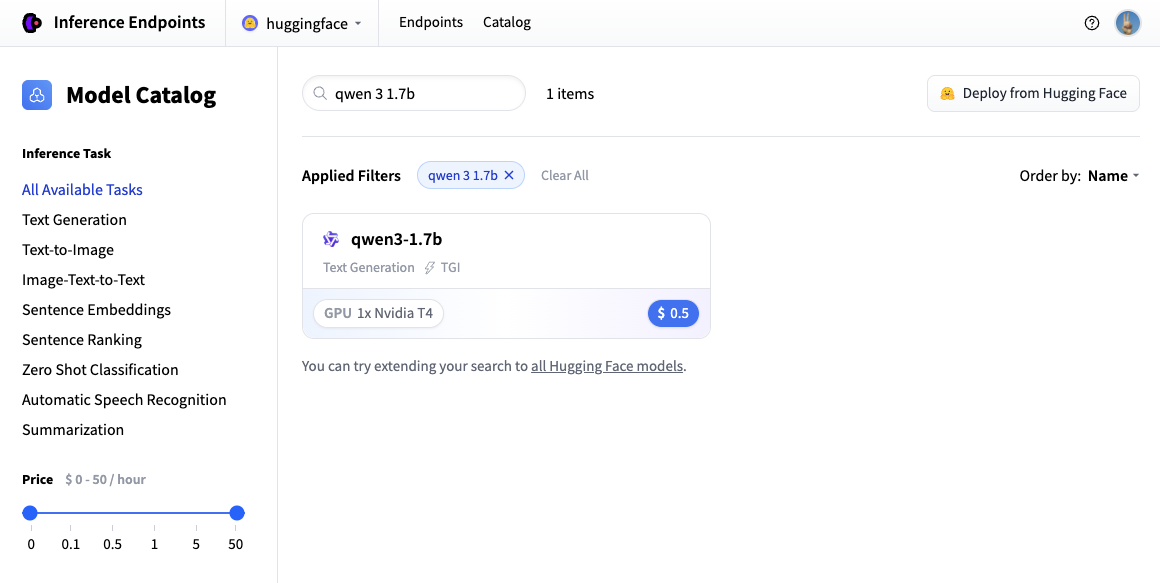
| In this example let's deploy the [Qwen/Qwen3-1.7B](https://huggingface.co/Qwen/Qwen3-1.7B) model. You can find | |
| it by searching for `qwen3 1.7b` in the search field and deploy it by clicking the card. | |
|  | |
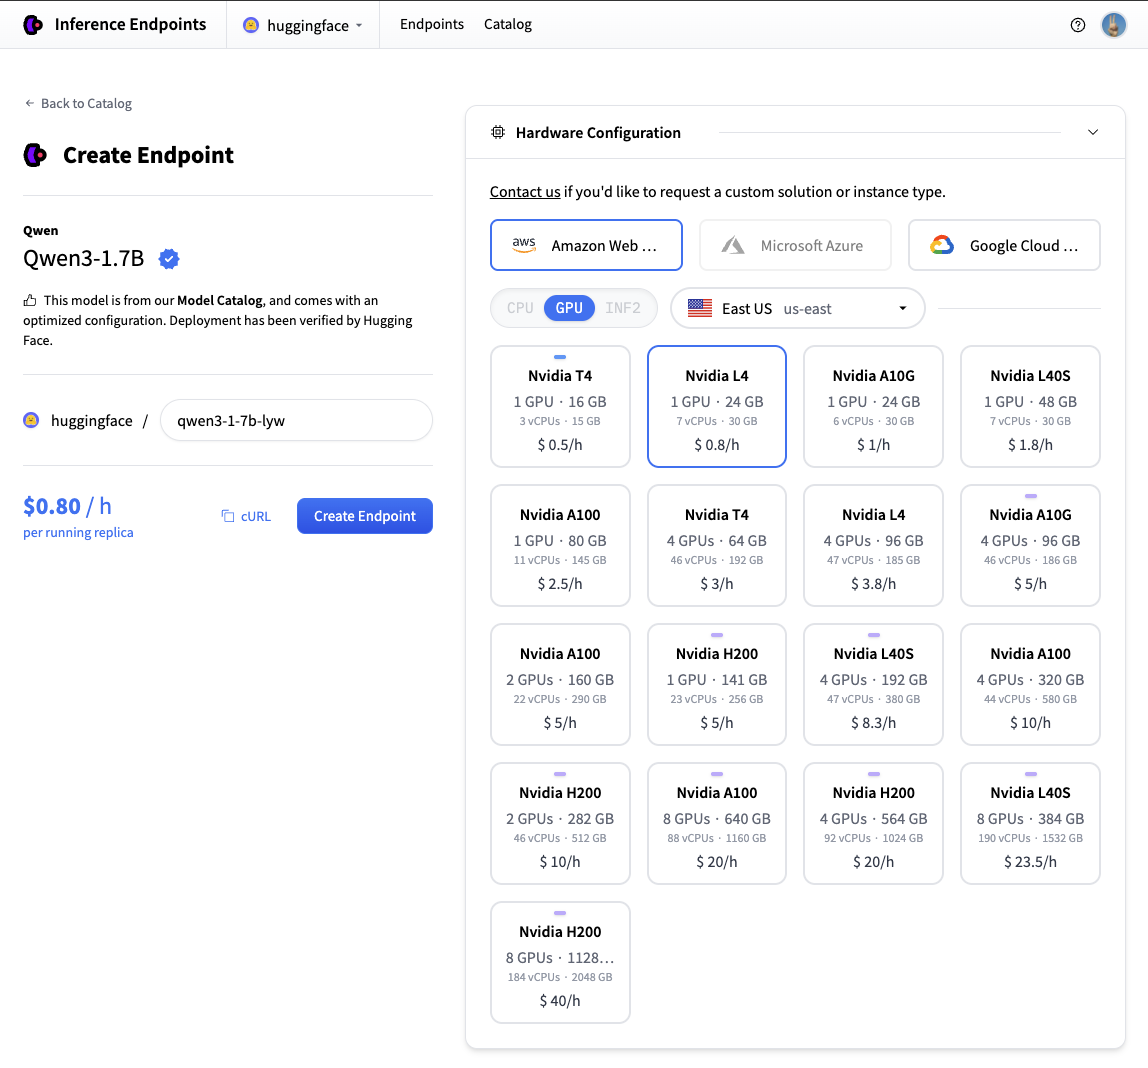
| Next we'll choose which hardware and deployment settings we'll go for. Since this is a catalog model, all of the pre-selected options are very good | |
| defaults. So in this case we don't need to change anything. In case you want a deeper dive on what the different settings mean you can check out | |
| the [configuration guide](./guides/configuration). | |
| For this model the Nvidia L4 is the recommended choice. It will be perfect for our testing. Performant but still reasonably priced. Also note that by | |
| default the endpoint will scale down to zero, meaning it will become idle after 1h of inactivity. | |
| Now all you need to do is click click "Create Endpoint" 🚀 | |
|  | |
| Now our Inference Endpoint is initializing, which usually takes about 3-5 minutes. If you want to can allow browser notifications which will give you a | |
| ping once the endpoint reaches a running state. | |
| 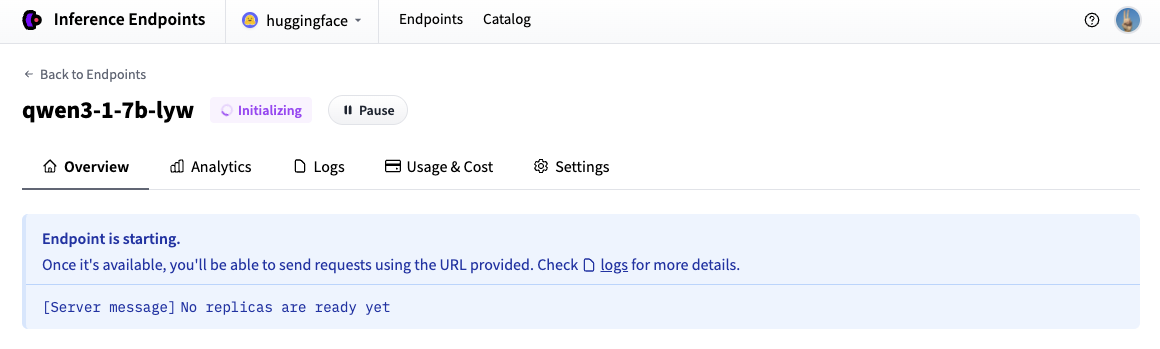 | |
| ## Test your Inference Endpoint in the browser | |
| Now that we've created our Inference Endpoint, we can test it in the playground section. | |
| 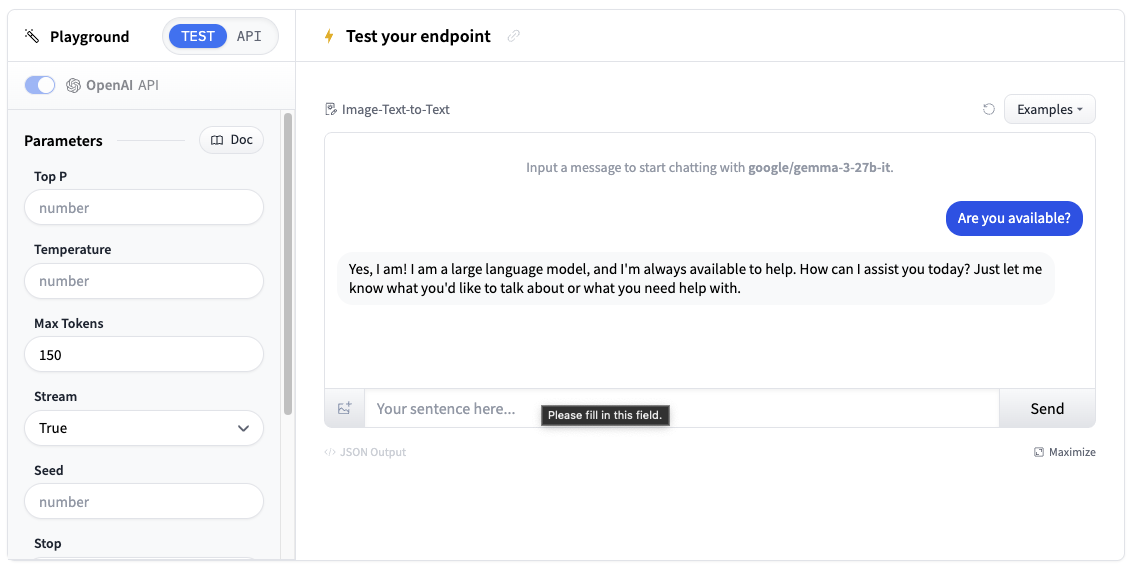 | |
| You can use the model through a chat interface or copy code snippets to use it in your own application. | |
| ## Get your Inference Endpoint details | |
| We need to grab details of our Inference Endpoint, which we can find in the Endpoint's [Overview](https://endpoints.huggingface.co/). We will need the following details: | |
| - The base URL of the endpoint plus the version of the OpenAI API (e.g. `https://<id>.<region>.<cloud>.endpoints.huggingface.cloud/v1/`) | |
| - The name of the endpoint to use (e.g. `qwen3-1-7b-xll`) | |
| - The token to use for authentication (e.g. `hf_<token>`) | |
| 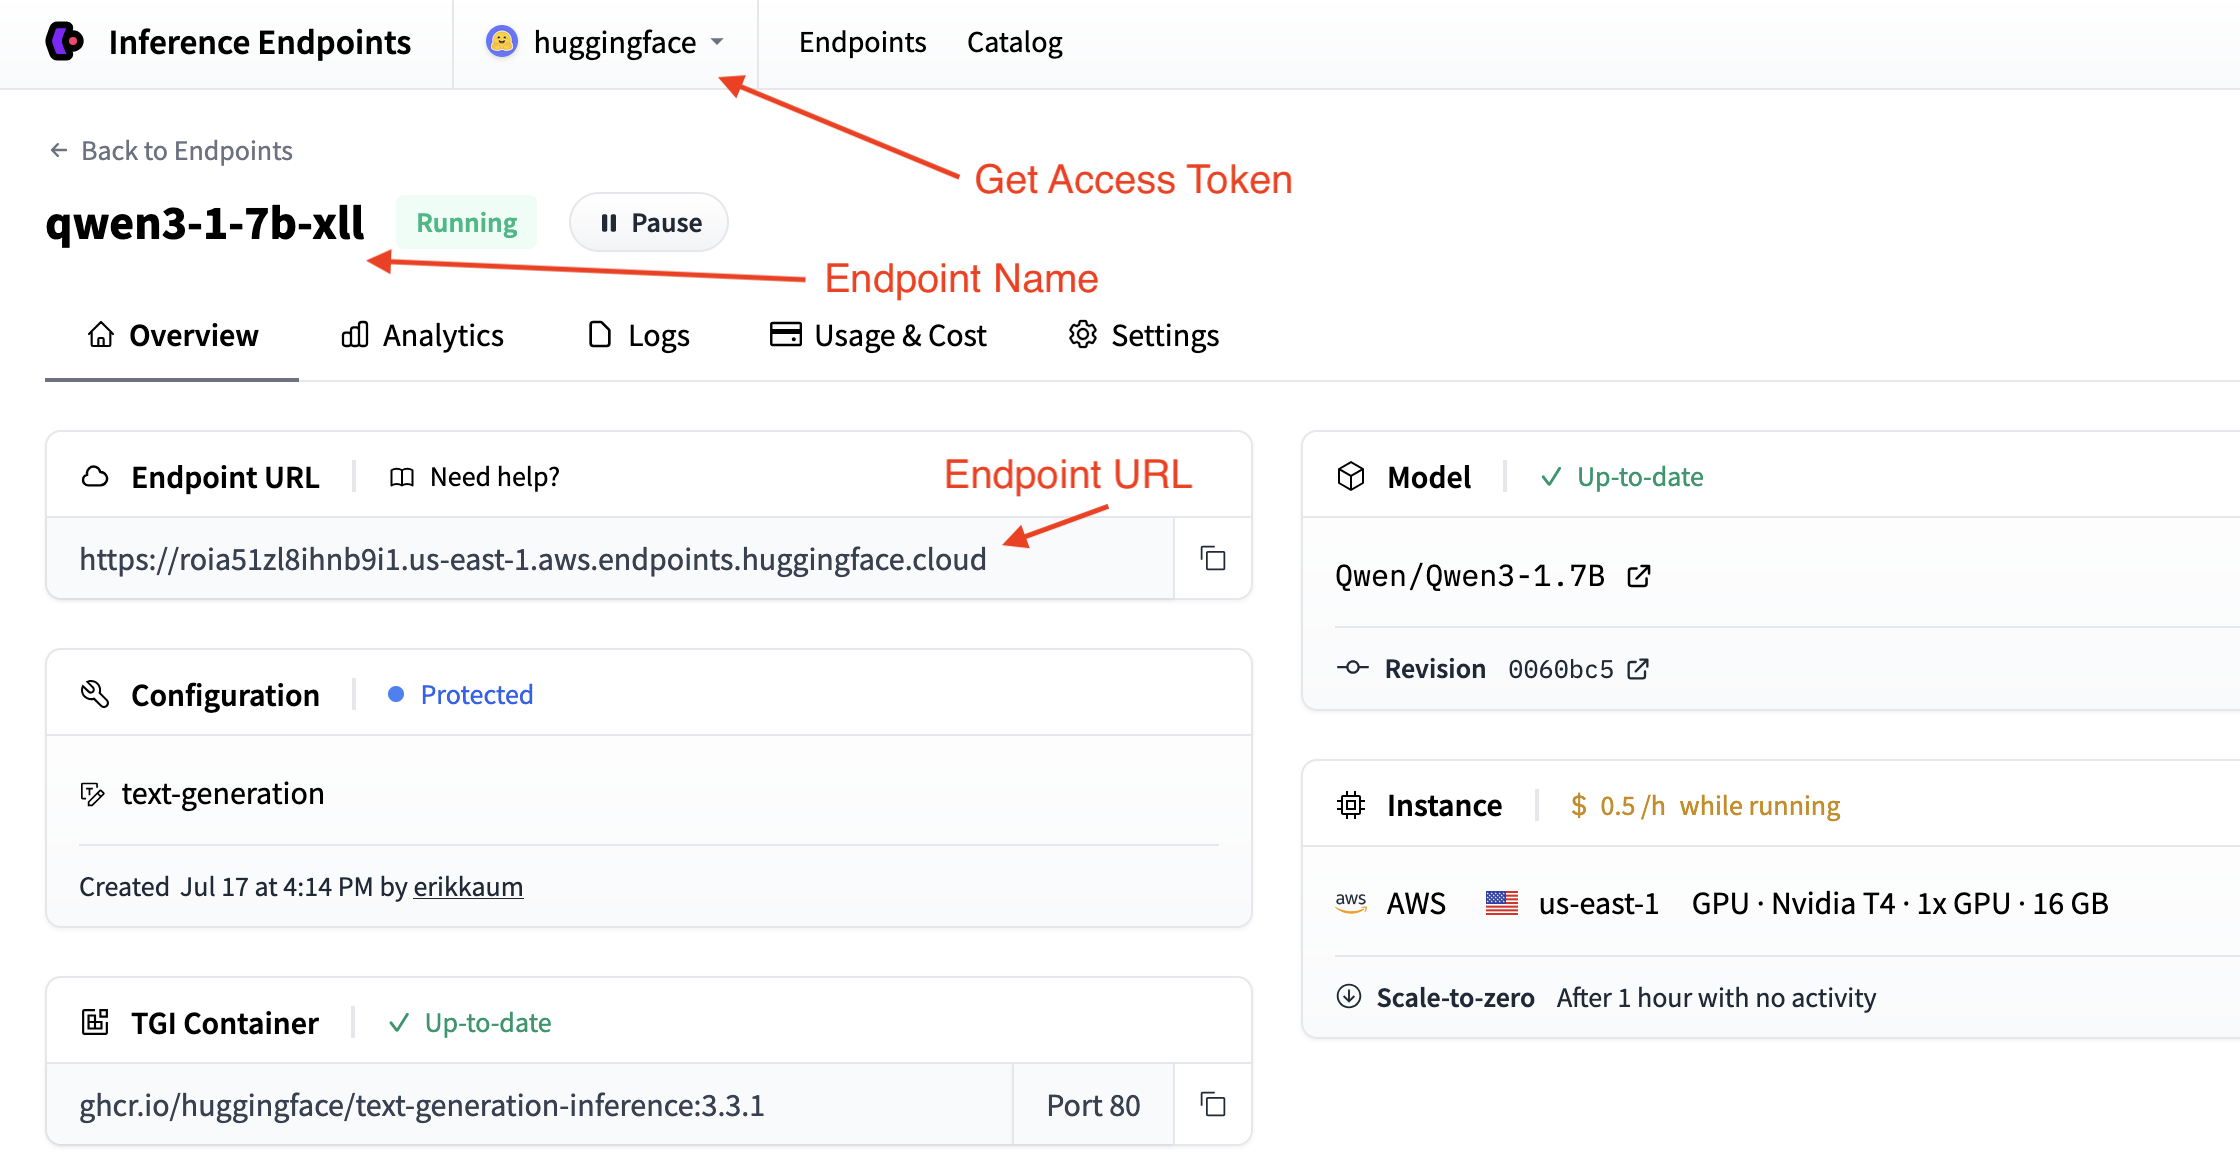 | |
| We can find the token in your [account settings](https://huggingface.co/settings/tokens) which is accessible from the top dropdown and clicking on your account name. | |
| ## Deploy in a few lines of code | |
| The easiest way to deploy a chat application with [Gradio](https://gradio.app/) is to use the convenient `load_chat` method. This abstracts everything away and you can have a working chat application quickly. | |
| ```python | |
| import os | |
| import gradio as gr | |
| gr.load_chat( | |
| base_url="<endpoint-url>/v1/", # Replace with your endpoint URL + version | |
| model="endpoint-name", # Replace with your endpoint name | |
| token=os.getenv("HF_TOKEN"), # Replace with your token | |
| ).launch() | |
| ``` | |
| The `load_chat` method won't cater for your production needs, but it's a great way to get started and test your application. | |
| ## Build your own custom chat application | |
| If you want more control over your chat application, you can build your own custom chat interface with Gradio. This gives you more flexibility to customize the behavior, add features, and handle errors. | |
| Choose your preferred method for connecting to Inference Endpoints: | |
| <hfoptions id="chat-implementation"> | |
| <hfoption id="hf-client"> | |
| **Using Hugging Face InferenceClient** | |
| First, install the required dependencies: | |
| ```bash | |
| pip install gradio huggingface-hub | |
| ``` | |
| The Hugging Face InferenceClient provides a clean interface that's compatible with the OpenAI API format: | |
| ```python | |
| import os | |
| import gradio as gr | |
| from huggingface_hub import InferenceClient | |
| # Initialize the Hugging Face InferenceClient | |
| client = InferenceClient( | |
| base_url="<endpoint-url>/v1/", # Replace with your endpoint URL | |
| token=os.getenv("HF_TOKEN") # Use environment variable for security | |
| ) | |
| def chat_with_hf_client(message, history): | |
| # Convert Gradio history to messages format | |
| messages = [{"role": msg["role"], "content": msg["content"]} for msg in history] | |
| # Add the current message | |
| messages.append({"role": "user", "content": message}) | |
| # Create chat completion | |
| chat_completion = client.chat.completions.create( | |
| model="endpoint-name", # Use the name of your endpoint (i.e. qwen3-1.7b-instruct-xxxx) | |
| messages=messages, | |
| max_tokens=150, | |
| temperature=0.7, | |
| ) | |
| # Return the response | |
| return chat_completion.choices[0].message.content | |
| # Create the Gradio interface | |
| demo = gr.ChatInterface( | |
| fn=chat_with_hf_client, | |
| type="messages", | |
| title="Custom Chat with Inference Endpoints", | |
| examples=["What is deep learning?", "Explain neural networks", "How does AI work?"] | |
| ) | |
| if __name__ == "__main__": | |
| demo.launch() | |
| ``` | |
| </hfoption> | |
| <hfoption id="openai-client"> | |
| **Using OpenAI Client** | |
| First, install the required dependencies: | |
| ```bash | |
| pip install gradio openai | |
| ``` | |
| Here's a basic chat function using the OpenAI client: | |
| ```python | |
| import os | |
| import gradio as gr | |
| from openai import OpenAI | |
| # Initialize the OpenAI client with your Inference Endpoint | |
| client = OpenAI( | |
| base_url="<endpoint-url>/v1/", # Replace with your endpoint URL | |
| api_key=os.getenv("HF_TOKEN") # Use environment variable for security | |
| ) | |
| def chat_with_openai(message, history): | |
| # Convert Gradio history to OpenAI format | |
| messages = [{"role": msg["role"], "content": msg["content"]} for msg in history] | |
| # Add the current message | |
| messages.append({"role": "user", "content": message}) | |
| # Create chat completion | |
| chat_completion = client.chat.completions.create( | |
| model="endpoint-name", # Use the name of your endpoint (i.e. qwen3-1.7b-xxxx) | |
| messages=messages, | |
| max_tokens=150, | |
| temperature=0.7, | |
| ) | |
| # return the response | |
| return chat_completion.choices[0].message.content | |
| # Create the Gradio interface | |
| demo = gr.ChatInterface( | |
| fn=chat_with_openai, | |
| type="messages", | |
| title="Custom Chat with Inference Endpoints", | |
| examples=["What is deep learning?", "Explain neural networks", "How does AI work?"] | |
| ) | |
| if __name__ == "__main__": | |
| demo.launch() | |
| ``` | |
| </hfoption> | |
| <hfoption id="requests"> | |
| **Using Requests Library** | |
| First, install the required dependencies: | |
| ```bash | |
| pip install gradio requests | |
| ``` | |
| Here's a basic chat function using the requests library with the Messages API: | |
| ```python | |
| import os | |
| import gradio as gr | |
| import requests | |
| # Configure your Inference Endpoint | |
| API_URL = "<endpoint-url>/v1/chat/completions" # Use the chat completions endpoint | |
| headers = { | |
| "Accept": "application/json", | |
| "Content-Type": "application/json", | |
| "Authorization": f"Bearer {os.getenv('HF_TOKEN')}" # Use environment variable for security | |
| } | |
| def chat_with_requests(message, history): | |
| # Convert Gradio history to messages format | |
| messages = [{"role": msg["role"], "content": msg["content"]} for msg in history] | |
| # Add the current message | |
| messages.append({"role": "user", "content": message}) | |
| # Prepare the payload using the Messages API format | |
| payload = { | |
| "model": "endpoint-name", # Use the name of your endpoint (i.e. qwen3-1.7b-xxxx) | |
| "messages": messages, | |
| "max_tokens": 150, | |
| "temperature": 0.7, | |
| "stream": False | |
| } | |
| # Make the request | |
| response = requests.post(API_URL, headers=headers, json=payload) | |
| response.raise_for_status() | |
| # Parse the response | |
| result = response.json() | |
| return result["choices"][0]["message"]["content"] | |
| # Create the Gradio interface | |
| demo = gr.ChatInterface( | |
| fn=chat_with_requests, | |
| type="messages", | |
| title="Custom Chat with Inference Endpoints", | |
| examples=["What is deep learning?", "Explain neural networks", "How does AI work?"] | |
| ) | |
| if __name__ == "__main__": | |
| demo.launch() | |
| ``` | |
| </hfoption> | |
| </hfoptions> | |
| ## Adding Streaming Support | |
| For a better user experience, you can implement streaming responses. This will require us to handle the messages and `yield` them to the client. | |
| Here's how to add streaming to each client: | |
| <hfoptions id="streaming-implementation"> | |
| <hfoption id="hf-client"> | |
| ### Hugging Face InferenceClient Streaming | |
| The Hugging Face InferenceClient supports streaming similar to the OpenAI client: | |
| ```python | |
| import os | |
| import gradio as gr | |
| from huggingface_hub import InferenceClient | |
| client = InferenceClient( | |
| base_url="<endpoint-url>/v1/", | |
| token=os.getenv("HF_TOKEN") | |
| ) | |
| def chat_with_hf_streaming(message, history): | |
| # Convert history to messages format | |
| messages = [{"role": msg["role"], "content": msg["content"]} for msg in history] | |
| messages.append({"role": "user", "content": message}) | |
| # Create streaming chat completion | |
| chat_completion = client.chat.completions.create( | |
| model="endpoint-name", | |
| messages=messages, | |
| max_tokens=150, | |
| temperature=0.7, | |
| stream=True # Enable streaming | |
| ) | |
| response = "" | |
| for chunk in chat_completion: | |
| if chunk.choices[0].delta.content: | |
| response += chunk.choices[0].delta.content | |
| yield response # Yield partial response for streaming | |
| # Create streaming interface | |
| demo = gr.ChatInterface( | |
| fn=chat_with_hf_streaming, | |
| type="messages", | |
| title="Streaming Chat with Inference Endpoints" | |
| ) | |
| demo.launch() | |
| ``` | |
| </hfoption> | |
| <hfoption id="openai-client"> | |
| ### OpenAI Client Streaming | |
| To use streaming with the OpenAI client, we need to set `stream=True` and yield the response as it builds: | |
| ```python | |
| import os | |
| import gradio as gr | |
| from openai import OpenAI | |
| client = OpenAI(base_url="<endpoint-url>/v1/", api_key=os.getenv("HF_TOKEN")) | |
| def chat_with_streaming(message, history): | |
| # Convert history to OpenAI format | |
| messages = [{"role": msg["role"], "content": msg["content"]} for msg in history] | |
| messages.append({"role": "user", "content": message}) | |
| chat_completion = client.chat.completions.create( | |
| model="endpoint-name", # Use the name of your endpoint (i.e. qwen3-1.7b-xxxx) | |
| messages=messages, | |
| max_tokens=150, | |
| temperature=0.7, | |
| stream=True, # Enable streaming | |
| ) | |
| response = "" | |
| for chunk in chat_completion: | |
| if chunk.choices[0].delta.content: | |
| response += chunk.choices[0].delta.content | |
| yield response # Yield partial response for streaming | |
| # Create streaming interface | |
| demo = gr.ChatInterface( | |
| fn=chat_with_streaming, | |
| type="messages", | |
| title="Streaming Chat with Inference Endpoints", | |
| ) | |
| demo.launch() | |
| ``` | |
| </hfoption> | |
| <hfoption id="requests"> | |
| ### Requests Library Streaming | |
| For requests, you can use the streaming approach with the Messages API by setting `stream=True`: | |
| ```python | |
| import os | |
| import gradio as gr | |
| import requests | |
| import json | |
| API_URL = "https://<id>.<region>.<cloud>.endpoints.huggingface.cloud/v1/chat/completions" | |
| headers = { | |
| "Accept": "application/json", | |
| "Content-Type": "application/json", | |
| "Authorization": f"Bearer {os.getenv('HF_TOKEN')}", | |
| } | |
| def chat_with_requests_streaming(message, history): | |
| # Convert Gradio history to messages format | |
| messages = [{"role": msg["role"], "content": msg["content"]} for msg in history] | |
| messages.append({"role": "user", "content": message}) | |
| # Prepare payload using Messages API format | |
| payload = { | |
| "model": "smollm2-1-7b-instruct-ljn", | |
| "messages": messages, | |
| "max_tokens": 150, | |
| "temperature": 0.7, | |
| "stream": True, # Enable streaming | |
| } | |
| response = requests.post(API_URL, headers=headers, json=payload, stream=True) | |
| content = "" | |
| for line in response.iter_lines(): | |
| line = line.decode("utf-8") | |
| if line.startswith("data: ") and not line.endswith("[DONE]"): | |
| data = json.loads(line[len("data: ") :]) | |
| chunk = data["choices"][0]["delta"].get("content", "") | |
| content += chunk | |
| yield content | |
| # Create streaming interface | |
| demo = gr.ChatInterface( | |
| fn=chat_with_requests_streaming, | |
| type="messages", | |
| title="Streaming Chat with Inference Endpoints", | |
| ) | |
| demo.launch() | |
| ``` | |
| </hfoption> | |
| </hfoptions> | |
| ## Deploy your chat application | |
| Our app will run on port 7860 and look like this: | |
| 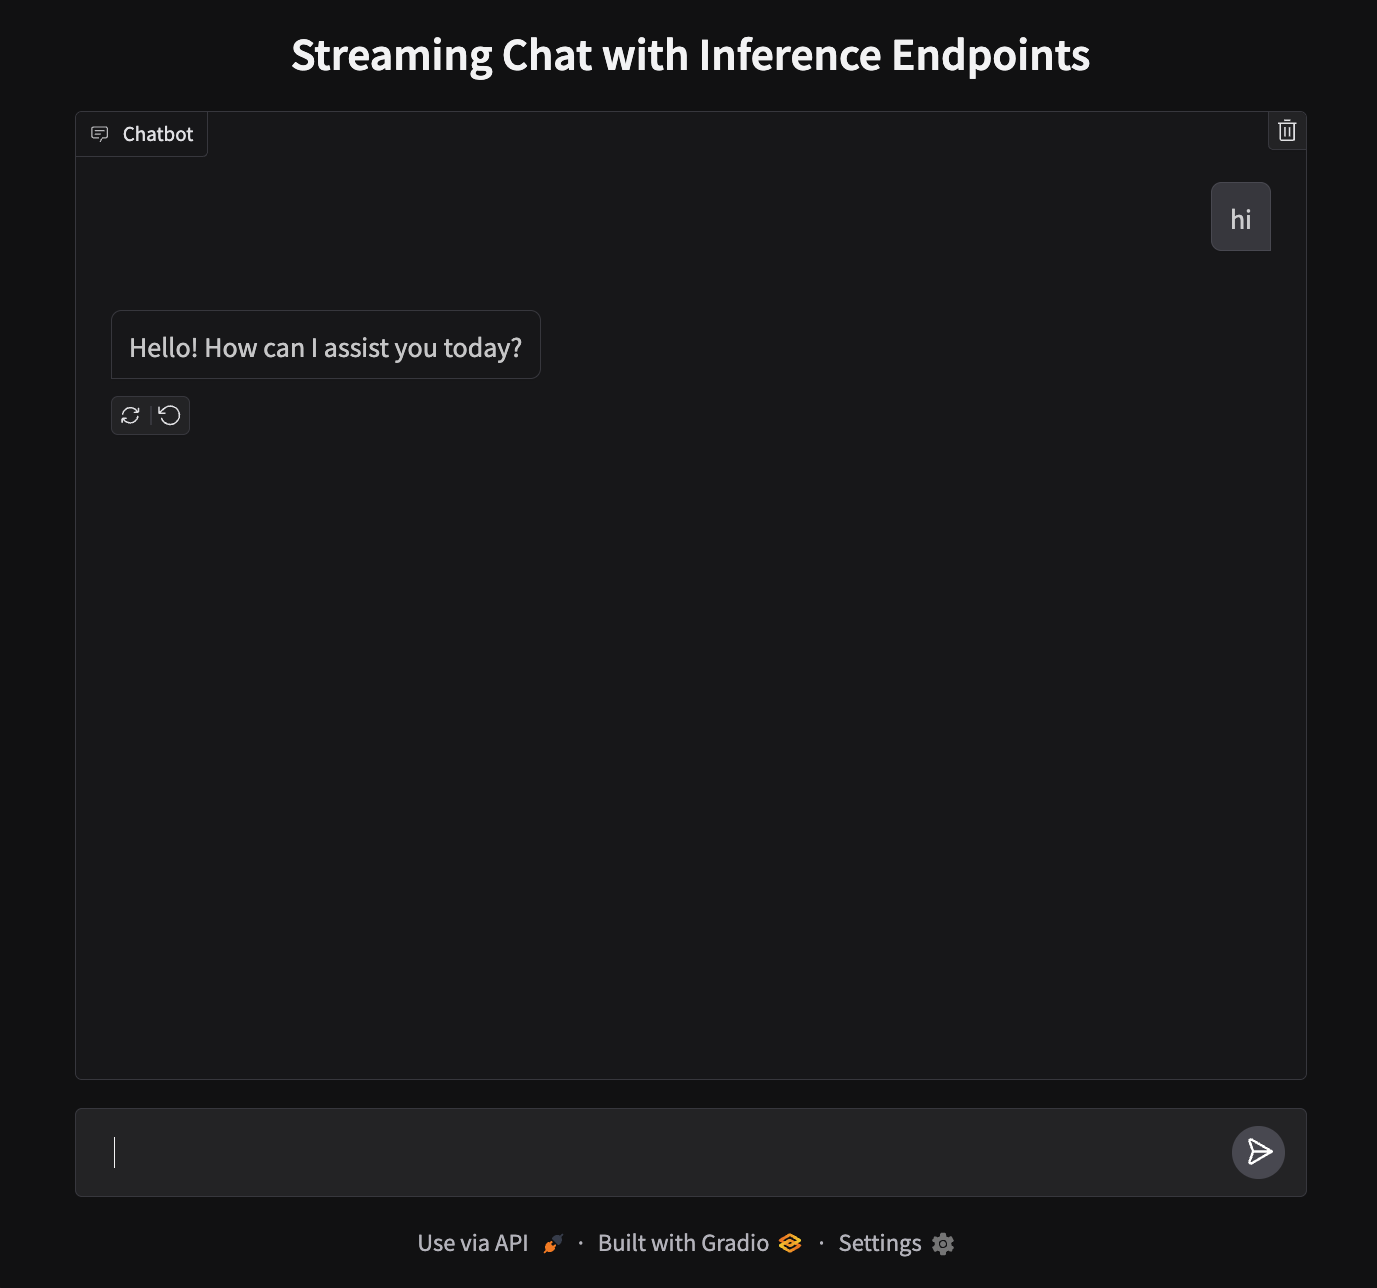 | |
| To deploy, we'll need to create a new Space and upload our files. | |
| 1. **Create a new Space**: Go to [huggingface.co/new-space](https://huggingface.co/new-space) | |
| 2. **Choose Gradio SDK** and make it public | |
| 3. **Upload your files**: Upload `app.py` | |
| 4. **Add your token**: In Space settings, add `HF_TOKEN` as a secret (get it from [your settings](https://huggingface.co/settings/tokens)) | |
| 5. **Launch**: Your app will be live at `https://huggingface.co/spaces/your-username/your-space-name` | |
| > **Note**: While we used CLI authentication locally, Spaces requires the token as a secret for the deployment environment. | |
| ## Next steps | |
| That's it! You now have a chat application running on Hugging Face Spaces powered by Inference Endpoints. | |
| Why not level up and try out the [next guide](./transcription) to build a Text-to-Speech application? | |
| <EditOnGithub source="https://github.com/huggingface/hf-endpoints-documentation/blob/main/docs/source/tutorials/chat_bot.md" /> |
Xet Storage Details
- Size:
- 15 kB
- Xet hash:
- 6d0ab6e07ba6bc505f2c2d050dd099b45930371149cf702b02ad766bdf032d75
·
Xet efficiently stores files, intelligently splitting them into unique chunks and accelerating uploads and downloads. More info.