| <!--Copyright 2025 The HuggingFace Team. All rights reserved. |
|
|
| 根据 Apache License 2.0 版本("许可证")授权,除非符合许可证要求,否则不得使用本文件。 |
| 您可以在以下网址获取许可证副本: |
|
|
| http://www.apache.org/licenses/LICENSE-2.0 |
|
|
| 除非适用法律要求或书面同意,本软件按"原样"分发,不附带任何明示或暗示的担保或条件。详见许可证中规定的特定语言权限和限制。 |
| --> |
|
|
| # Diffusion模型评估指南 |
|
|
| <a target="_blank" href="https://colab.research.google.com/github/huggingface/notebooks/blob/main/diffusers/evaluation.ipynb"> |
| <img src="https://colab.research.google.com/assets/colab-badge.svg" alt="在 Colab 中打开"/> |
| </a> |
| |
| > [!TIP] |
| > 鉴于当前已出现针对图像生成Diffusion模型的成熟评估框架(如[HEIM](https://crfm.stanford.edu/helm/heim/latest/)、[T2I-Compbench](https://huggingface.co/papers/2307.06350)、[GenEval](https://huggingface.co/papers/2310.11513)),本文档部分内容已过时。 |
|
|
| 像 [Stable Diffusion](https://huggingface.co/docs/diffusers/stable_diffusion) 这类生成模型的评估本质上是主观的。但作为开发者和研究者,我们经常需要在众多可能性中做出审慎选择。那么当面对不同生成模型(如 GANs、Diffusion 等)时,该如何决策? |
|
|
| 定性评估容易产生偏差,可能导致错误结论;而定量指标又未必能准确反映图像质量。因此,通常需要结合定性与定量评估来获得更可靠的模型选择依据。 |
|
|
| 本文档将系统介绍扩散模型的定性与定量评估方法(非穷尽列举)。对于定量方法,我们将重点演示如何结合 `diffusers` 库实现这些评估。 |
|
|
| 文档所示方法同样适用于评估不同[噪声调度器](https://huggingface.co/docs/diffusers/main/en/api/schedulers/overview)在固定生成模型下的表现差异。 |
|
|
| ## 评估场景 |
|
|
| 我们涵盖以下Diffusion模型管线的评估: |
|
|
| - 文本引导图像生成(如 [`StableDiffusionPipeline`](https://huggingface.co/docs/diffusers/main/en/api/pipelines/stable_diffusion/text2img)) |
| - 基于文本和输入图像的引导生成(如 [`StableDiffusionImg2ImgPipeline`](https://huggingface.co/docs/diffusers/main/en/api/pipelines/stable_diffusion/img2img) 和 [`StableDiffusionInstructPix2PixPipeline`](https://huggingface.co/docs/diffusers/main/en/api/pipelines/pix2pix)) |
| - 类别条件图像生成模型(如 [`DiTPipeline`](https://huggingface.co/docs/diffusers/main/en/api/pipe)) |
|
|
| ## 定性评估 |
|
|
| 定性评估通常涉及对生成图像的人工评判。评估维度包括构图质量、图文对齐度和空间关系等方面。标准化的提示词能为这些主观指标提供统一基准。DrawBench和PartiPrompts是常用的定性评估提示词数据集,分别由[Imagen](https://imagen.research.google/)和[Parti](https://parti.research.google/)团队提出。 |
|
|
| 根据[Parti官方网站](https://parti.research.google/)说明: |
|
|
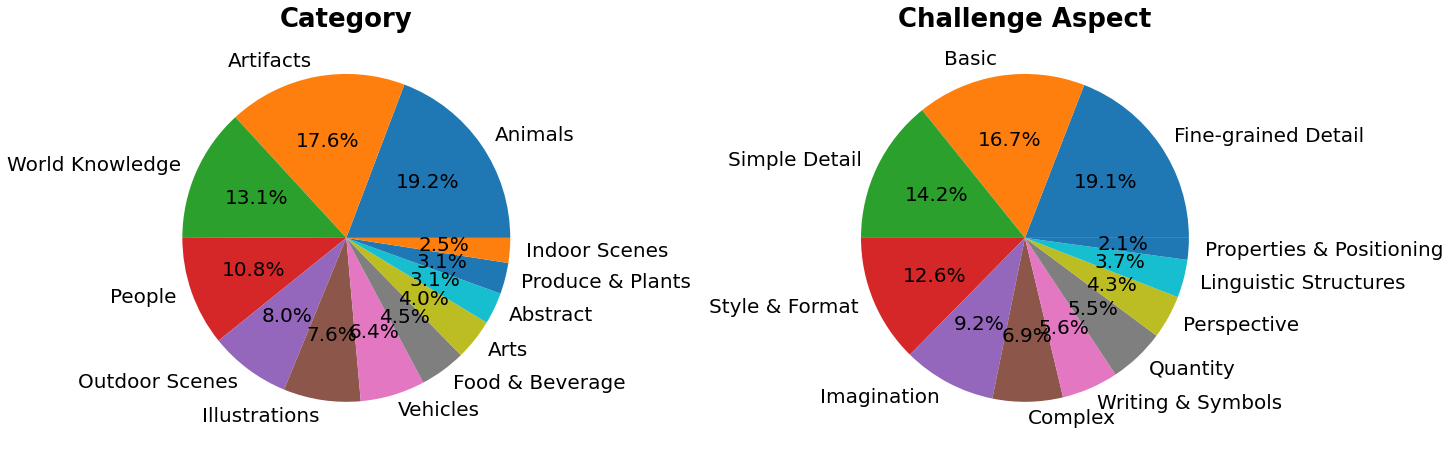
| > PartiPrompts (P2)是我们发布的包含1600多个英文提示词的丰富集合,可用于测量模型在不同类别和挑战维度上的能力。 |
|
|
|  |
|
|
| PartiPrompts包含以下字段: |
| - Prompt(提示词) |
| - Category(类别,如"抽象"、"世界知识"等) |
| - Challenge(难度等级,如"基础"、"复杂"、"文字与符号"等) |
|
|
| 这些基准测试支持对不同图像生成模型进行并排人工对比评估。为此,🧨 Diffusers团队构建了**Open Parti Prompts**——一个基于Parti Prompts的社区驱动型定性评估基准,用于比较顶尖开源diffusion模型: |
| - [Open Parti Prompts游戏](https://huggingface.co/spaces/OpenGenAI/open-parti-prompts):展示10个parti提示词对应的4张生成图像,用户选择最符合提示的图片 |
| - [Open Parti Prompts排行榜](https://huggingface.co/spaces/OpenGenAI/parti-prompts-leaderboard):对比当前最优开源diffusion模型的性能榜单 |
|
|
| 为进行手动图像对比,我们演示如何使用`diffusers`处理部分PartiPrompts提示词。 |
|
|
| 以下是从不同挑战维度(基础、复杂、语言结构、想象力、文字与符号)采样的提示词示例(使用[PartiPrompts作为数据集](https://huggingface.co/datasets/nateraw/parti-prompts)): |
|
|
| ```python |
| from datasets import load_dataset |
| |
| # prompts = load_dataset("nateraw/parti-prompts", split="train") |
| # prompts = prompts.shuffle() |
| # sample_prompts = [prompts[i]["Prompt"] for i in range(5)] |
| |
| # Fixing these sample prompts in the interest of reproducibility. |
| sample_prompts = [ |
| "a corgi", |
| "a hot air balloon with a yin-yang symbol, with the moon visible in the daytime sky", |
| "a car with no windows", |
| "a cube made of porcupine", |
| 'The saying "BE EXCELLENT TO EACH OTHER" written on a red brick wall with a graffiti image of a green alien wearing a tuxedo. A yellow fire hydrant is on a sidewalk in the foreground.', |
| ] |
| ``` |
|
|
| 现在我们可以使用Stable Diffusion([v1-4 checkpoint](https://huggingface.co/CompVis/stable-diffusion-v1-4))生成这些提示词对应的图像: |
|
|
| ```python |
| import torch |
| |
| seed = 0 |
| generator = torch.manual_seed(seed) |
| |
| images = sd_pipeline(sample_prompts, num_images_per_prompt=1, generator=generator).images |
| ``` |
|
|
|  |
|
|
| 我们也可以通过设置`num_images_per_prompt`参数来比较同一提示词生成的不同图像。使用不同检查点([v1-5](https://huggingface.co/stable-diffusion-v1-5/stable-diffusion-v1-5))运行相同流程后,结果如下: |
|
|
|  |
|
|
| 当使用多个待评估模型为所有提示词生成若干图像后,这些结果将提交给人类评估员进行打分。有关DrawBench和PartiPrompts基准测试的更多细节,请参阅各自的论文。 |
|
|
| > [!TIP] |
| > 在模型训练过程中查看推理样本有助于评估训练进度。我们的[训练脚本](https://github.com/huggingface/diffusers/tree/main/examples/)支持此功能,并额外提供TensorBoard和Weights & Biases日志记录功能。 |
|
|
| ## 定量评估 |
|
|
| 本节将指导您如何评估三种不同的扩散流程,使用以下指标: |
| - CLIP分数 |
| - CLIP方向相似度 |
| - FID(弗雷歇起始距离) |
|
|
| ### 文本引导图像生成 |
|
|
| [CLIP分数](https://huggingface.co/papers/2104.08718)用于衡量图像-标题对的匹配程度。CLIP分数越高表明匹配度越高🔼。该分数是对"匹配度"这一定性概念的量化测量,也可以理解为图像与标题之间的语义相似度。研究发现CLIP分数与人类判断具有高度相关性。 |
|
|
| 首先加载[`StableDiffusionPipeline`]: |
|
|
| ```python |
| from diffusers import StableDiffusionPipeline |
| import torch |
| |
| model_ckpt = "CompVis/stable-diffusion-v1-4" |
| sd_pipeline = StableDiffusionPipeline.from_pretrained(model_ckpt, torch_dtype=torch.float16).to("cuda") |
| ``` |
|
|
| 使用多个提示词生成图像: |
|
|
| ```python |
| prompts = [ |
| "a photo of an astronaut riding a horse on mars", |
| "A high tech solarpunk utopia in the Amazon rainforest", |
| "A pikachu fine dining with a view to the Eiffel Tower", |
| "A mecha robot in a favela in expressionist style", |
| "an insect robot preparing a delicious meal", |
| "A small cabin on top of a snowy mountain in the style of Disney, artstation", |
| ] |
| |
| images = sd_pipeline(prompts, num_images_per_prompt=1, output_type="np").images |
| |
| print(images.shape) |
| # (6, 512, 512, 3) |
| ``` |
|
|
| 然后计算CLIP分数: |
|
|
| ```python |
| from torchmetrics.functional.multimodal import clip_score |
| from functools import partial |
| |
| clip_score_fn = partial(clip_score, model_name_or_path="openai/clip-vit-base-patch16") |
| |
| def calculate_clip_score(images, prompts): |
| images_int = (images * 255).astype("uint8") |
| clip_score = clip_score_fn(torch.from_numpy(images_int).permute(0, 3, 1, 2), prompts).detach() |
| return round(float(clip_score), 4) |
| |
| sd_clip_score = calculate_clip_score(images, prompts) |
| print(f"CLIP分数: {sd_clip_score}") |
| # CLIP分数: 35.7038 |
| ``` |
|
|
| 上述示例中,我们为每个提示生成一张图像。如果为每个提示生成多张图像,则需要计算每个提示生成图像的平均分数。 |
|
|
| 当需要比较两个兼容[`StableDiffusionPipeline`]的检查点时,应在调用管道时传入生成器。首先使用[v1-4 Stable Diffusion检查点](https://huggingface.co/CompVis/stable-diffusion-v1-4)以固定种子生成图像: |
|
|
| ```python |
| seed = 0 |
| generator = torch.manual_seed(seed) |
| |
| images = sd_pipeline(prompts, num_images_per_prompt=1, generator=generator, output_type="np").images |
| ``` |
|
|
| 然后加载[v1-5检查点](https://huggingface.co/stable-diffusion-v1-5/stable-diffusion-v1-5)生成图像: |
|
|
| ```python |
| model_ckpt_1_5 = "stable-diffusion-v1-5/stable-diffusion-v1-5" |
| sd_pipeline_1_5 = StableDiffusionPipeline.from_pretrained(model_ckpt_1_5, torch_dtype=torch.float16).to("cuda") |
| |
| images_1_5 = sd_pipeline_1_5(prompts, num_images_per_prompt=1, generator=generator, output_type="np").images |
| ``` |
|
|
| 最后比较两者的CLIP分数: |
|
|
| ```python |
| sd_clip_score_1_4 = calculate_clip_score(images, prompts) |
| print(f"v-1-4版本的CLIP分数: {sd_clip_score_1_4}") |
| # v-1-4版本的CLIP分数: 34.9102 |
| |
| sd_clip_score_1_5 = calculate_clip_score(images_1_5, prompts) |
| print(f"v-1-5版本的CLIP分数: {sd_clip_score_1_5}") |
| # v-1-5版本的CLIP分数: 36.2137 |
| ``` |
|
|
| 结果表明[v1-5](https://huggingface.co/stable-diffusion-v1-5/stable-diffusion-v1-5)检查点性能优于前代。但需注意,我们用于计算CLIP分数的提示词数量较少。实际评估时应使用更多样化且数量更大的提示词集。 |
|
|
| > [!WARNING] |
| > 该分数存在固有局限性:训练数据中的标题是从网络爬取,并提取自图片关联的`alt`等标签。这些描述未必符合人类描述图像的方式,因此我们需要人工"设计"部分提示词。 |
|
|
| ### 图像条件式文本生成图像 |
|
|
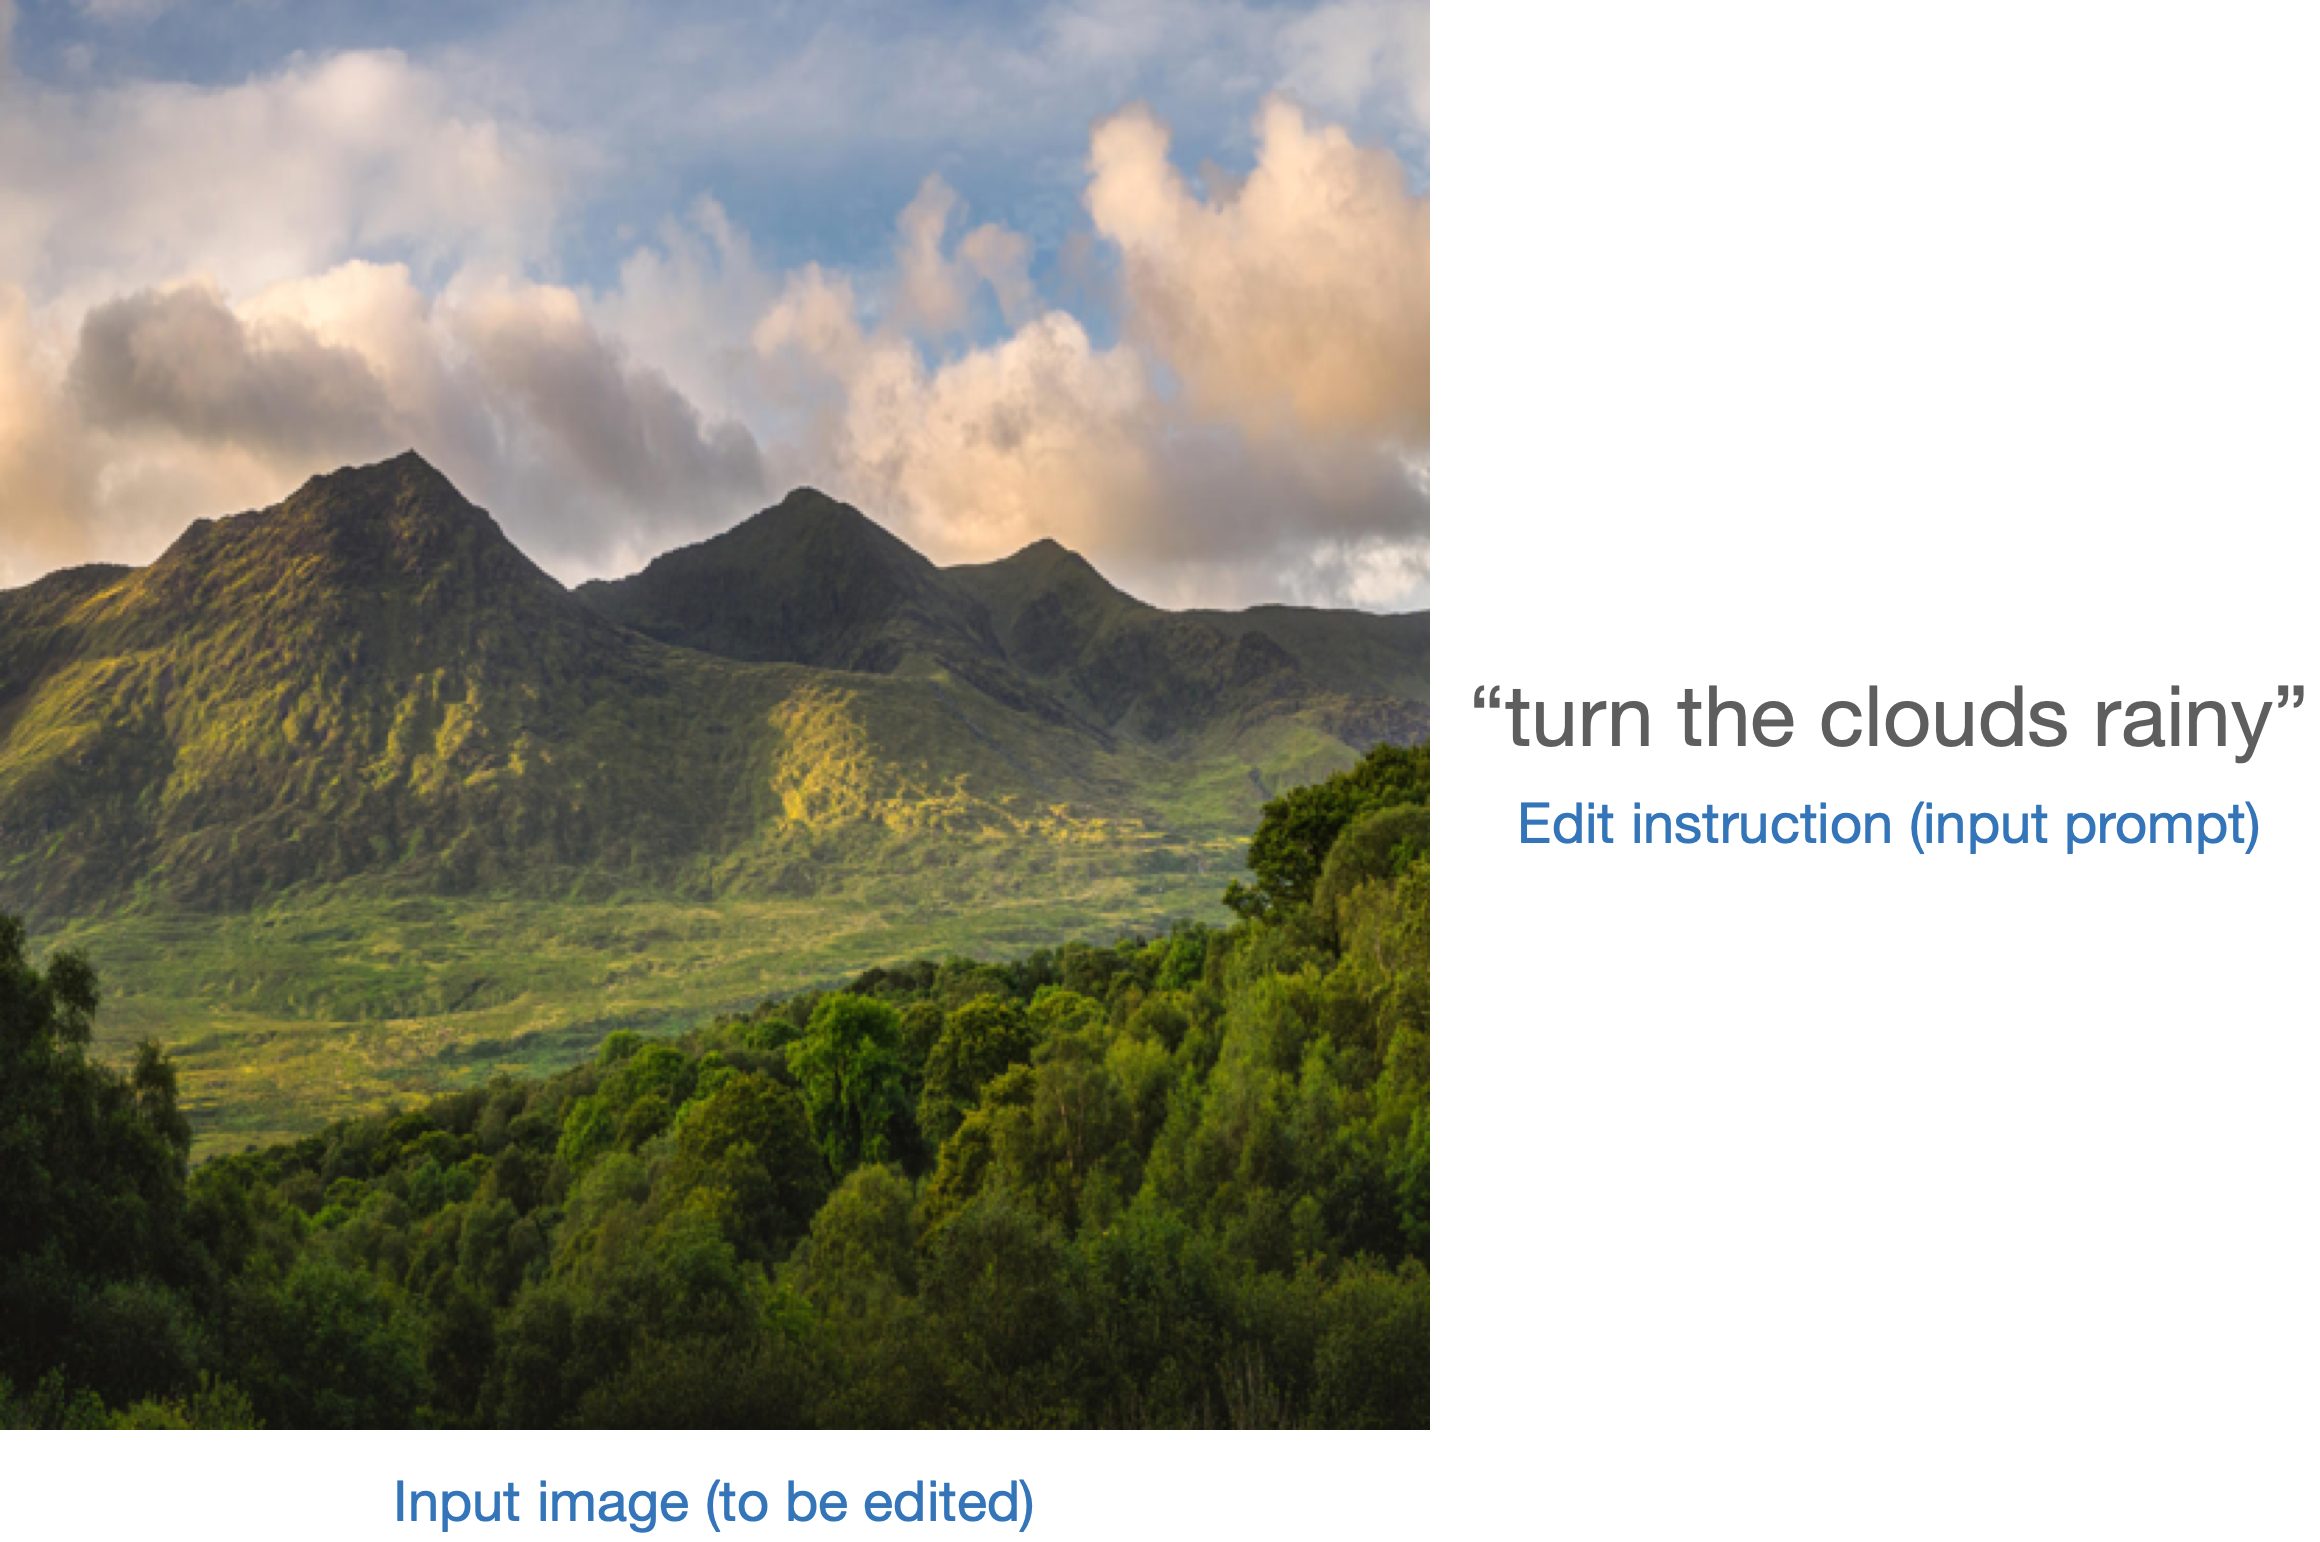
| 这种情况下,生成管道同时接受输入图像和文本提示作为条件。以[`StableDiffusionInstructPix2PixPipeline`]为例,该管道接收编辑指令作为输入提示,并接受待编辑的输入图像。 |
|
|
| 示例图示: |
|
|
|  |
|
|
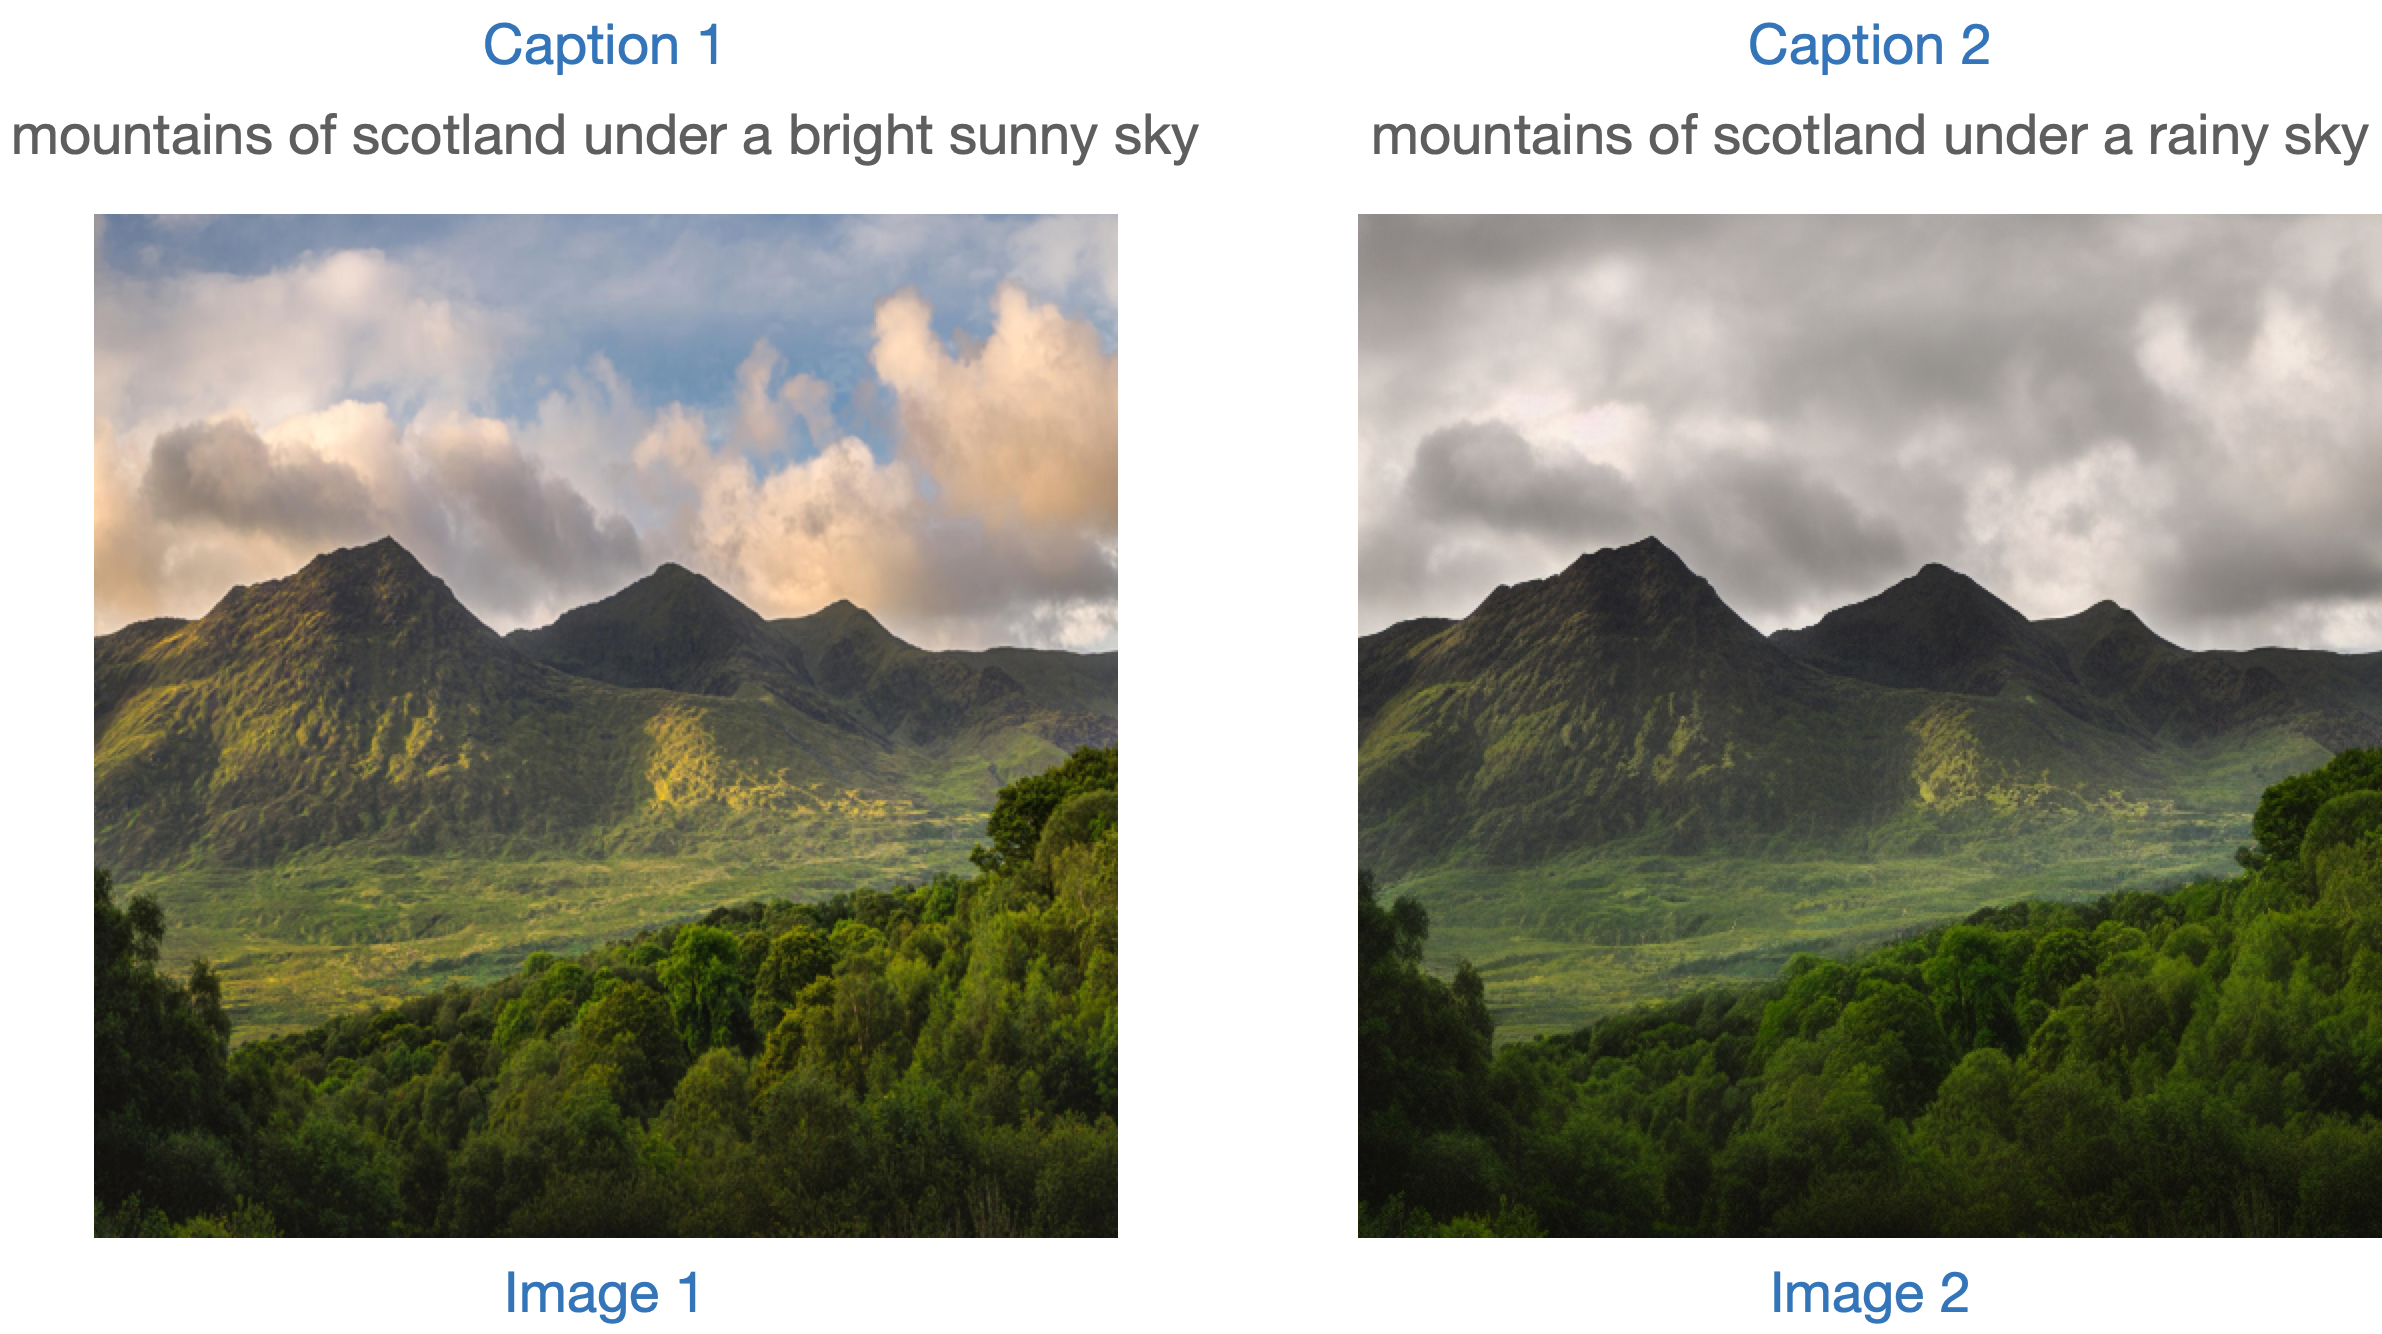
| 评估此类模型的策略之一是测量两幅图像间变化的连贯性(通过[CLIP](https://huggingface.co/docs/transformers/model_doc/clip)定义)中两个图像之间的变化与两个图像描述之间的变化的一致性(如论文[《CLIP-Guided Domain Adaptation of Image Generators》](https://huggingface.co/papers/2108.00946)所示)。这被称为“**CLIP方向相似度**”。 |
|
|
| - **描述1**对应输入图像(图像1),即待编辑的图像。 |
| - **描述2**对应编辑后的图像(图像2),应反映编辑指令。 |
|
|
| 以下是示意图: |
|
|
|  |
|
|
| 我们准备了一个小型数据集来实现该指标。首先加载数据集: |
|
|
| ```python |
| from datasets import load_dataset |
| |
| dataset = load_dataset("sayakpaul/instructpix2pix-demo", split="train") |
| dataset.features |
| ``` |
|
|
| ```bash |
| {'input': Value(dtype='string', id=None), |
| 'edit': Value(dtype='string', id=None), |
| 'output': Value(dtype='string', id=None), |
| 'image': Image(decode=True, id=None)} |
| ``` |
|
|
| 数据字段说明: |
|
|
| - `input`:与`image`对应的原始描述。 |
| - `edit`:编辑指令。 |
| - `output`:反映`edit`指令的修改后描述。 |
|
|
| 查看一个样本: |
|
|
| ```python |
| idx = 0 |
| print(f"Original caption: {dataset[idx]['input']}") |
| print(f"Edit instruction: {dataset[idx]['edit']}") |
| print(f"Modified caption: {dataset[idx]['output']}") |
| ``` |
|
|
| ```bash |
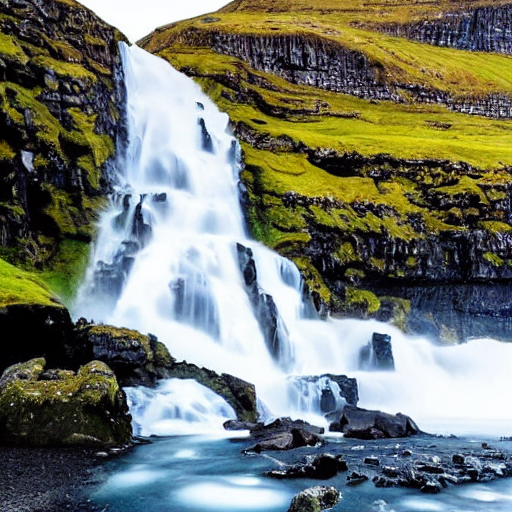
| Original caption: 2. FAROE ISLANDS: An archipelago of 18 mountainous isles in the North Atlantic Ocean between Norway and Iceland, the Faroe Islands has 'everything you could hope for', according to Big 7 Travel. It boasts 'crystal clear waterfalls, rocky cliffs that seem to jut out of nowhere and velvety green hills' |
| Edit instruction: make the isles all white marble |
| Modified caption: 2. WHITE MARBLE ISLANDS: An archipelago of 18 mountainous white marble isles in the North Atlantic Ocean between Norway and Iceland, the White Marble Islands has 'everything you could hope for', according to Big 7 Travel. It boasts 'crystal clear waterfalls, rocky cliffs that seem to jut out of nowhere and velvety green hills' |
| ``` |
|
|
| 对应的图像: |
|
|
| ```python |
| dataset[idx]["image"] |
| ``` |
|
|
|  |
|
|
| 我们将根据编辑指令修改数据集中的图像,并计算方向相似度。 |
|
|
| 首先加载[`StableDiffusionInstructPix2PixPipeline`]: |
|
|
| ```python |
| from diffusers import StableDiffusionInstructPix2PixPipeline |
| |
| instruct_pix2pix_pipeline = StableDiffusionInstructPix2PixPipeline.from_pretrained( |
| "timbrooks/instruct-pix2pix", torch_dtype=torch.float16 |
| ).to("cuda") |
| ``` |
|
|
| 执行编辑操作: |
|
|
| ```python |
| import numpy as np |
| |
| |
| def edit_image(input_image, instruction): |
| image = instruct_pix2pix_pipeline( |
| instruction, |
| image=input_image, |
| output_type="np", |
| generator=generator, |
| ).images[0] |
| return image |
| |
| input_images = [] |
| original_captions = [] |
| modified_captions = [] |
| edited_images = [] |
| |
| for idx in range(len(dataset)): |
| input_image = dataset[idx]["image"] |
| edit_instruction = dataset[idx]["edit"] |
| edited_image = edit_image(input_image, edit_instruction) |
| |
| input_images.append(np.array(input_image)) |
| original_captions.append(dataset[idx]["input"]) |
| modified_captions.append(dataset[idx]["output"]) |
| edited_images.append(edited_image) |
| ``` |
|
|
| 为测量方向相似度,我们首先加载CLIP的图像和文本编码器: |
|
|
| ```python |
| from transformers import ( |
| CLIPTokenizer, |
| CLIPTextModelWithProjection, |
| CLIPVisionModelWithProjection, |
| CLIPImageProcessor, |
| ) |
| |
| clip_id = "openai/clip-vit-large-patch14" |
| tokenizer = CLIPTokenizer.from_pretrained(clip_id) |
| text_encoder = CLIPTextModelWithProjection.from_pretrained(clip_id).to("cuda") |
| image_processor = CLIPImageProcessor.from_pretrained(clip_id) |
| image_encoder = CLIPVisionModelWithProjection.from_pretrained(clip_id).to("cuda") |
| ``` |
|
|
| 注意我们使用的是特定CLIP检查点——`openai/clip-vit-large-patch14`,因为Stable Diffusion预训练正是基于此CLIP变体。详见[文档](https://huggingface.co/docs/transformers/model_doc/clip)。 |
|
|
| 接着准备计算方向相似度的PyTorch `nn.Module`: |
|
|
| ```python |
| import torch.nn as nn |
| import torch.nn.functional as F |
| |
| |
| class DirectionalSimilarity(nn.Module): |
| def __init__(self, tokenizer, text_encoder, image_processor, image_encoder): |
| super().__init__() |
| self.tokenizer = tokenizer |
| self.text_encoder = text_encoder |
| self.image_processor = image_processor |
| self.image_encoder = image_encoder |
| |
| def preprocess_image(self, image): |
| image = self.image_processor(image, return_tensors="pt")["pixel_values"] |
| return {"pixel_values": image.to("cuda")} |
| |
| def tokenize_text(self, text): |
| inputs = self.tokenizer( |
| text, |
| max_length=self.tokenizer.model_max_length, |
| padding="max_length", |
| truncation=True, |
| return_tensors="pt", |
| ) |
| return {"input_ids": inputs.input_ids.to("cuda")} |
| |
| def encode_image(self, image): |
| preprocessed_image = self.preprocess_image(image) |
| image_features = self.image_encoder(**preprocessed_image).image_embeds |
| image_features = image_features / image_features.norm(dim=1, keepdim=True) |
| return image_features |
| |
| def encode_text(self, text): |
| tokenized_text = self.tokenize_text(text) |
| text_features = self.text_encoder(**tokenized_text).text_embeds |
| text_features = text_features / text_features.norm(dim=1, keepdim=True) |
| return text_features |
| |
| def compute_directional_similarity(self, img_feat_one, img_feat_two, text_feat_one, text_feat_two): |
| sim_direction = F.cosine_similarity(img_feat_two - img_feat_one, text_feat_two - text_feat_one) |
| return sim_direction |
| |
| def forward(self, image_one, image_two, caption_one, caption_two): |
| img_feat_one = self.encode_image(image_one) |
| img_feat_two = self.encode_image(image_two) |
| text_feat_one = self.encode_text(caption_one) |
| text_feat_two = self.encode_text(caption_two) |
| directional_similarity = self.compute_directional_similarity( |
| img_feat_one, img_feat_two, text_feat_one, text_feat_two |
| ) |
| return directional_similarity |
| ``` |
|
|
| 现在让我们使用`DirectionalSimilarity`模块: |
|
|
| ```python |
| dir_similarity = DirectionalSimilarity(tokenizer, text_encoder, image_processor, image_encoder) |
| scores = [] |
| |
| for i in range(len(input_images)): |
| original_image = input_images[i] |
| original_caption = original_captions[i] |
| edited_image = edited_images[i] |
| modified_caption = modified_captions[i] |
| |
| similarity_score = dir_similarity(original_image, edited_image, original_caption, modified_caption) |
| scores.append(float(similarity_score.detach().cpu())) |
| |
| print(f"CLIP方向相似度: {np.mean(scores)}") |
| # CLIP方向相似度: 0.0797976553440094 |
| ``` |
|
|
| 与CLIP分数类似,CLIP方向相似度数值越高越好。 |
|
|
| 需要注意的是,`StableDiffusionInstructPix2PixPipeline`提供了两个控制参数`image_guidance_scale`和`guidance_scale`来调节最终编辑图像的质量。建议您尝试调整这两个参数,观察它们对方向相似度的影响。 |
|
|
| 我们可以扩展这个度量标准来评估原始图像与编辑版本的相似度,只需计算`F.cosine_similarity(img_feat_two, img_feat_one)`。对于这类编辑任务,我们仍希望尽可能保留图像的主要语义特征(即保持较高的相似度分数)。 |
|
|
| 该度量方法同样适用于类似流程,例如[`StableDiffusionPix2PixZeroPipeline`](https://huggingface.co/docs/diffusers/main/en/api/pipelines/pix2pix_zero#diffusers.StableDiffusionPix2PixZeroPipeline)。 |
|
|
| > [!TIP] |
| > CLIP分数和CLIP方向相似度都依赖CLIP模型,可能导致评估结果存在偏差。 |
|
|
| ***扩展IS、FID(后文讨论)或KID等指标存在困难***,当被评估模型是在大型图文数据集(如[LAION-5B数据集](https://laion.ai/blog/laion-5b/))上预训练时。因为这些指标的底层都使用了在ImageNet-1k数据集上预训练的InceptionNet来提取图像特征。Stable Diffusion的预训练数据集与InceptionNet的预训练数据集可能重叠有限,因此不适合作为特征提取器。 |
|
|
| ***上述指标更适合评估类别条件模型***,例如[DiT](https://huggingface.co/docs/diffusers/main/en/api/pipelines/dit)。该模型是在ImageNet-1k类别条件下预训练的。 |
| 这是9篇文档中的第8部分。 |
|
|
| ### 基于类别的图像生成 |
|
|
| 基于类别的生成模型通常是在带有类别标签的数据集(如[ImageNet-1k](https://huggingface.co/datasets/imagenet-1k))上进行预训练的。评估这些模型的常用指标包括Fréchet Inception Distance(FID)、Kernel Inception Distance(KID)和Inception Score(IS)。本文档重点介绍FID([Heusel等人](https://huggingface.co/papers/1706.08500)),并展示如何使用[`DiTPipeline`](https://huggingface.co/docs/diffusers/api/pipelines/dit)计算该指标,该管道底层使用了[DiT模型](https://huggingface.co/papers/2212.09748)。 |
|
|
| FID旨在衡量两组图像数据集的相似程度。根据[此资源](https://mmgeneration.readthedocs.io/en/latest/quick_run.html#fid): |
|
|
| > Fréchet Inception Distance是衡量两组图像数据集相似度的指标。研究表明其与人类对视觉质量的主观判断高度相关,因此最常用于评估生成对抗网络(GAN)生成样本的质量。FID通过计算Inception网络特征表示所拟合的两个高斯分布之间的Fréchet距离来实现。 |
|
|
| 这两个数据集本质上是真实图像数据集和生成图像数据集(本例中为人工生成的图像)。FID通常基于两个大型数据集计算,但本文档将使用两个小型数据集进行演示。 |
|
|
| 首先下载ImageNet-1k训练集中的部分图像: |
|
|
| ```python |
| from zipfile import ZipFile |
| import requests |
| |
| |
| def download(url, local_filepath): |
| r = requests.get(url) |
| with open(local_filepath, "wb") as f: |
| f.write(r.content) |
| return local_filepath |
| |
| dummy_dataset_url = "https://hf.co/datasets/sayakpaul/sample-datasets/resolve/main/sample-imagenet-images.zip" |
| local_filepath = download(dummy_dataset_url, dummy_dataset_url.split("/")[-1]) |
| |
| with ZipFile(local_filepath, "r") as zipper: |
| zipper.extractall(".") |
| ``` |
|
|
| ```python |
| from PIL import Image |
| import os |
| import numpy as np |
| |
| dataset_path = "sample-imagenet-images" |
| image_paths = sorted([os.path.join(dataset_path, x) for x in os.listdir(dataset_path)]) |
| |
| real_images = [np.array(Image.open(path).convert("RGB")) for path in image_paths] |
| ``` |
|
|
| 这些是来自以下ImageNet-1k类别的10张图像:"cassette_player"、"chain_saw"(2张)、"church"、"gas_pump"(3张)、"parachute"(2张)和"tench"。 |
| |
| <p align="center"> |
| <img src="https://huggingface.co/datasets/diffusers/docs-images/resolve/main/evaluation_diffusion_models/real-images.png" alt="真实图像"><br> |
| <em>真实图像</em> |
| </p> |
| |
| 加载图像后,我们对其进行轻量级预处理以便用于FID计算: |
| |
| ```python |
| from torchvision.transforms import functional as F |
| import torch |
| |
| |
| def preprocess_image(image): |
| image = torch.tensor(image).unsqueeze(0) |
| image = image.permute(0, 3, 1, 2) / 255.0 |
| return F.center_crop(image, (256, 256)) |
| |
| real_images = torch.stack([dit_pipeline.preprocess_image(image) for image in real_images]) |
| print(real_images.shape) |
| # torch.Size([10, 3, 256, 256]) |
| ``` |
| |
| 我们现在加载[`DiTPipeline`](https://huggingface.co/docs/diffusers/api/pipelines/dit)来生成基于上述类别的条件图像。 |
| |
| ```python |
| from diffusers import DiTPipeline, DPMSolverMultistepScheduler |
| |
| dit_pipeline = DiTPipeline.from_pretrained("facebook/DiT-XL-2-256", torch_dtype=torch.float16) |
| dit_pipeline.scheduler = DPMSolverMultistepScheduler.from_config(dit_pipeline.scheduler.config) |
| dit_pipeline = dit_pipeline.to("cuda") |
| |
| seed = 0 |
| generator = torch.manual_seed(seed) |
|
|
|
|
| words = [ |
| "cassette player", |
| "chainsaw", |
| "chainsaw", |
| "church", |
| "gas pump", |
| "gas pump", |
| "gas pump", |
| "parachute", |
| "parachute", |
| "tench", |
| ] |
| |
| class_ids = dit_pipeline.get_label_ids(words) |
| output = dit_pipeline(class_labels=class_ids, generator=generator, output_type="np") |
|
|
| fake_images = output.images |
| fake_images = torch.tensor(fake_images) |
| fake_images = fake_images.permute(0, 3, 1, 2) |
| print(fake_images.shape) |
| # torch.Size([10, 3, 256, 256]) |
| ``` |
| |
| 现在,我们可以使用[`torchmetrics`](https://torchmetrics.readthedocs.io/)计算FID分数。 |
| |
| ```python |
| from torchmetrics.image.fid import FrechetInceptionDistance |
|
|
| fid = FrechetInceptionDistance(normalize=True) |
| fid.update(real_images, real=True) |
| fid.update(fake_images, real=False) |
|
|
| print(f"FID分数: {float(fid.compute())}") |
| # FID分数: 177.7147216796875 |
| ``` |
| |
| FID分数越低越好。以下因素会影响FID结果: |
| |
| - 图像数量(包括真实图像和生成图像) |
| - 扩散过程中引入的随机性 |
| - 扩散过程的推理步数 |
| - 扩散过程中使用的调度器 |
| |
| 对于最后两点,最佳实践是使用不同的随机种子和推理步数进行多次评估,然后报告平均结果。 |
| |
| > [!WARNING] |
| > FID结果往往具有脆弱性,因为它依赖于许多因素: |
| > |
| > * 计算过程中使用的特定Inception模型 |
| > * 计算实现的准确性 |
| > * 图像格式(PNG和JPG的起点不同) |
| > |
| > 需要注意的是,FID通常在比较相似实验时最有用,但除非作者仔细公开FID测量代码,否则很难复现论文结果。 |
| > |
| > 这些注意事项同样适用于其他相关指标,如KID和IS。 |
| |
| 最后,让我们可视化检查这些`fake_images`。 |
| |
| <p align="center"> |
| <img src="https://huggingface.co/datasets/diffusers/docs-images/resolve/main/evaluation_diffusion_models/fake-images.png" alt="生成图像"><br> |
| <em>生成图像示例</em> |
| </p> |
| |

