

| <!--Copyright 2024 The HuggingFace Team. All rights reserved. | |
| Licensed under the Apache License, Version 2.0 (the "License"); you may not use this file except in compliance with | |
| the License. You may obtain a copy of the License at | |
| http://www.apache.org/licenses/LICENSE-2.0 | |
| Unless required by applicable law or agreed to in writing, software distributed under the License is distributed on | |
| an "AS IS" BASIS, WITHOUT WARRANTIES OR CONDITIONS OF ANY KIND, either express or implied. See the License for the | |
| specific language governing permissions and limitations under the License. | |
| --> | |
| # Diffusion 모델 평가하기[[evaluating-diffusion-models]] | |
| <a target="_blank" href="https://colab.research.google.com/github/huggingface/notebooks/blob/main/diffusers/evaluation.ipynb"> | |
| <img src="https://colab.research.google.com/assets/colab-badge.svg" alt="Open In Colab"/> | |
| </a> | |
| [Stable Diffusion](https://huggingface.co/docs/diffusers/stable_diffusion)와 같은 생성 모델의 평가는 주관적인 성격을 가지고 있습니다. 그러나 실무자와 연구자로서 우리는 종종 다양한 가능성 중에서 신중한 선택을 해야 합니다. 그래서 다양한 생성 모델 (GAN, Diffusion 등)을 사용할 때 어떻게 선택해야 할까요? | |
| 정성적인 평가는 모델의 이미지 품질에 대한 주관적인 평가이므로 오류가 발생할 수 있고 결정에 잘못된 영향을 미칠 수 있습니다. 반면, 정량적인 평가는 이미지 품질과 직접적인 상관관계를 갖지 않을 수 있습니다. 따라서 일반적으로 정성적 평가와 정량적 평가를 모두 고려하는 것이 더 강력한 신호를 제공하여 모델 선택에 도움이 됩니다. | |
| 이 문서에서는 Diffusion 모델을 평가하기 위한 정성적 및 정량적 방법에 대해 상세히 설명합니다. 정량적 방법에 대해서는 특히 `diffusers`와 함께 구현하는 방법에 초점을 맞추었습니다. | |
| 이 문서에서 보여진 방법들은 기반 생성 모델을 고정시키고 다양한 [노이즈 스케줄러](https://huggingface.co/docs/diffusers/main/en/api/schedulers/overview)를 평가하는 데에도 사용할 수 있습니다. | |
| ## 시나리오[[scenarios]] | |
| 다음과 같은 파이프라인을 사용하여 Diffusion 모델을 다룹니다: | |
| - 텍스트로 안내된 이미지 생성 (예: [`StableDiffusionPipeline`](https://huggingface.co/docs/diffusers/main/en/api/pipelines/stable_diffusion/text2img)). | |
| - 입력 이미지에 추가로 조건을 건 텍스트로 안내된 이미지 생성 (예: [`StableDiffusionImg2ImgPipeline`](https://huggingface.co/docs/diffusers/main/en/api/pipelines/stable_diffusion/img2img) 및 [`StableDiffusionInstructPix2PixPipeline`](https://huggingface.co/docs/diffusers/main/en/api/pipelines/pix2pix)). | |
| - 클래스 조건화된 이미지 생성 모델 (예: [`DiTPipeline`](https://huggingface.co/docs/diffusers/main/en/api/pipelines/dit)). | |
| ## 정성적 평가[[qualitative-evaluation]] | |
| 정성적 평가는 일반적으로 생성된 이미지의 인간 평가를 포함합니다. 품질은 구성성, 이미지-텍스트 일치, 공간 관계 등과 같은 측면에서 측정됩니다. 일반적인 프롬프트는 주관적인 지표에 대한 일정한 기준을 제공합니다. | |
| DrawBench와 PartiPrompts는 정성적인 벤치마킹에 사용되는 프롬프트 데이터셋입니다. DrawBench와 PartiPrompts는 각각 [Imagen](https://imagen.research.google/)과 [Parti](https://parti.research.google/)에서 소개되었습니다. | |
| [Parti 공식 웹사이트](https://parti.research.google/)에서 다음과 같이 설명하고 있습니다: | |
| > PartiPrompts (P2)는 이 작업의 일부로 공개되는 영어로 된 1600개 이상의 다양한 프롬프트 세트입니다. P2는 다양한 범주와 도전 측면에서 모델의 능력을 측정하는 데 사용할 수 있습니다. | |
| 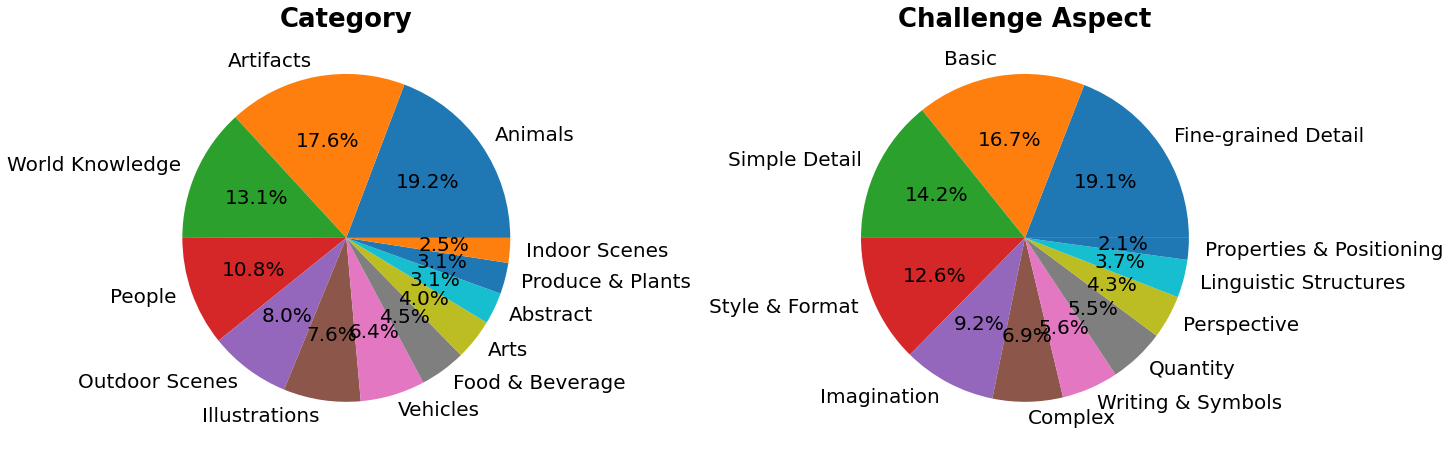 | |
| PartiPrompts는 다음과 같은 열을 가지고 있습니다: | |
| - 프롬프트 (Prompt) | |
| - 프롬프트의 카테고리 (예: "Abstract", "World Knowledge" 등) | |
| - 난이도를 반영한 챌린지 (예: "Basic", "Complex", "Writing & Symbols" 등) | |
| 이러한 벤치마크는 서로 다른 이미지 생성 모델을 인간 평가로 비교할 수 있도록 합니다. | |
| 이를 위해 🧨 Diffusers 팀은 **Open Parti Prompts**를 구축했습니다. 이는 Parti Prompts를 기반으로 한 커뮤니티 기반의 질적 벤치마크로, 최첨단 오픈 소스 확산 모델을 비교하는 데 사용됩니다: | |
| - [Open Parti Prompts 게임](https://huggingface.co/spaces/OpenGenAI/open-parti-prompts): 10개의 parti prompt에 대해 4개의 생성된 이미지가 제시되며, 사용자는 프롬프트에 가장 적합한 이미지를 선택합니다. | |
| - [Open Parti Prompts 리더보드](https://huggingface.co/spaces/OpenGenAI/parti-prompts-leaderboard): 현재 최고의 오픈 소스 diffusion 모델들을 서로 비교하는 리더보드입니다. | |
| 이미지를 수동으로 비교하려면, `diffusers`를 사용하여 몇가지 PartiPrompts를 어떻게 활용할 수 있는지 알아봅시다. | |
| 다음은 몇 가지 다른 도전에서 샘플링한 프롬프트를 보여줍니다: Basic, Complex, Linguistic Structures, Imagination, Writing & Symbols. 여기서는 PartiPrompts를 [데이터셋](https://huggingface.co/datasets/nateraw/parti-prompts)으로 사용합니다. | |
| ```python | |
| from datasets import load_dataset | |
| # prompts = load_dataset("nateraw/parti-prompts", split="train") | |
| # prompts = prompts.shuffle() | |
| # sample_prompts = [prompts[i]["Prompt"] for i in range(5)] | |
| # Fixing these sample prompts in the interest of reproducibility. | |
| sample_prompts = [ | |
| "a corgi", | |
| "a hot air balloon with a yin-yang symbol, with the moon visible in the daytime sky", | |
| "a car with no windows", | |
| "a cube made of porcupine", | |
| 'The saying "BE EXCELLENT TO EACH OTHER" written on a red brick wall with a graffiti image of a green alien wearing a tuxedo. A yellow fire hydrant is on a sidewalk in the foreground.', | |
| ] | |
| ``` | |
| 이제 이런 프롬프트를 사용하여 Stable Diffusion ([v1-4 checkpoint](https://huggingface.co/CompVis/stable-diffusion-v1-4))를 사용한 이미지 생성을 할 수 있습니다 : | |
| ```python | |
| import torch | |
| seed = 0 | |
| generator = torch.manual_seed(seed) | |
| images = sd_pipeline(sample_prompts, num_images_per_prompt=1, generator=generator).images | |
| ``` | |
|  | |
| `num_images_per_prompt`를 설정하여 동일한 프롬프트에 대해 다른 이미지를 비교할 수도 있습니다. 다른 체크포인트([v1-5](https://huggingface.co/stable-diffusion-v1-5/stable-diffusion-v1-5))로 동일한 파이프라인을 실행하면 다음과 같은 결과가 나옵니다: | |
|  | |
| 다양한 모델을 사용하여 모든 프롬프트에서 생성된 여러 이미지들이 생성되면 (평가 과정에서) 이러한 결과물들은 사람 평가자들에게 점수를 매기기 위해 제시됩니다. DrawBench와 PartiPrompts 벤치마크에 대한 자세한 내용은 각각의 논문을 참조하십시오. | |
| <Tip> | |
| 모델이 훈련 중일 때 추론 샘플을 살펴보는 것은 훈련 진행 상황을 측정하는 데 유용합니다. [훈련 스크립트](https://github.com/huggingface/diffusers/tree/main/examples/)에서는 TensorBoard와 Weights & Biases에 대한 추가 지원과 함께 이 유틸리티를 지원합니다. | |
| </Tip> | |
| ## 정량적 평가[[quantitative-evaluation]] | |
| 이 섹션에서는 세 가지 다른 확산 파이프라인을 평가하는 방법을 안내합니다: | |
| - CLIP 점수 | |
| - CLIP 방향성 유사도 | |
| - FID | |
| ### 텍스트 안내 이미지 생성[[text-guided-image-generation]] | |
| [CLIP 점수](https://arxiv.org/abs/2104.08718)는 이미지-캡션 쌍의 호환성을 측정합니다. 높은 CLIP 점수는 높은 호환성🔼을 나타냅니다. CLIP 점수는 이미지와 캡션 사이의 의미적 유사성으로 생각할 수도 있습니다. CLIP 점수는 인간 판단과 높은 상관관계를 가지고 있습니다. | |
| [`StableDiffusionPipeline`]을 일단 로드해봅시다: | |
| ```python | |
| from diffusers import StableDiffusionPipeline | |
| import torch | |
| model_ckpt = "CompVis/stable-diffusion-v1-4" | |
| sd_pipeline = StableDiffusionPipeline.from_pretrained(model_ckpt, torch_dtype=torch.float16).to("cuda") | |
| ``` | |
| 여러 개의 프롬프트를 사용하여 이미지를 생성합니다: | |
| ```python | |
| prompts = [ | |
| "a photo of an astronaut riding a horse on mars", | |
| "A high tech solarpunk utopia in the Amazon rainforest", | |
| "A pikachu fine dining with a view to the Eiffel Tower", | |
| "A mecha robot in a favela in expressionist style", | |
| "an insect robot preparing a delicious meal", | |
| "A small cabin on top of a snowy mountain in the style of Disney, artstation", | |
| ] | |
| images = sd_pipeline(prompts, num_images_per_prompt=1, output_type="np").images | |
| print(images.shape) | |
| # (6, 512, 512, 3) | |
| ``` | |
| 그러고 나서 CLIP 점수를 계산합니다. | |
| ```python | |
| from torchmetrics.functional.multimodal import clip_score | |
| from functools import partial | |
| clip_score_fn = partial(clip_score, model_name_or_path="openai/clip-vit-base-patch16") | |
| def calculate_clip_score(images, prompts): | |
| images_int = (images * 255).astype("uint8") | |
| clip_score = clip_score_fn(torch.from_numpy(images_int).permute(0, 3, 1, 2), prompts).detach() | |
| return round(float(clip_score), 4) | |
| sd_clip_score = calculate_clip_score(images, prompts) | |
| print(f"CLIP score: {sd_clip_score}") | |
| # CLIP score: 35.7038 | |
| ``` | |
| 위의 예제에서는 각 프롬프트 당 하나의 이미지를 생성했습니다. 만약 프롬프트 당 여러 이미지를 생성한다면, 프롬프트 당 생성된 이미지의 평균 점수를 사용해야 합니다. | |
| 이제 [`StableDiffusionPipeline`]과 호환되는 두 개의 체크포인트를 비교하려면, 파이프라인을 호출할 때 generator를 전달해야 합니다. 먼저, 고정된 시드로 [v1-4 Stable Diffusion 체크포인트](https://huggingface.co/CompVis/stable-diffusion-v1-4)를 사용하여 이미지를 생성합니다: | |
| ```python | |
| seed = 0 | |
| generator = torch.manual_seed(seed) | |
| images = sd_pipeline(prompts, num_images_per_prompt=1, generator=generator, output_type="np").images | |
| ``` | |
| 그런 다음 [v1-5 checkpoint](https://huggingface.co/stable-diffusion-v1-5/stable-diffusion-v1-5)를 로드하여 이미지를 생성합니다: | |
| ```python | |
| model_ckpt_1_5 = "stable-diffusion-v1-5/stable-diffusion-v1-5" | |
| sd_pipeline_1_5 = StableDiffusionPipeline.from_pretrained(model_ckpt_1_5, torch_dtype=weight_dtype).to(device) | |
| images_1_5 = sd_pipeline_1_5(prompts, num_images_per_prompt=1, generator=generator, output_type="np").images | |
| ``` | |
| 그리고 마지막으로 CLIP 점수를 비교합니다: | |
| ```python | |
| sd_clip_score_1_4 = calculate_clip_score(images, prompts) | |
| print(f"CLIP Score with v-1-4: {sd_clip_score_1_4}") | |
| # CLIP Score with v-1-4: 34.9102 | |
| sd_clip_score_1_5 = calculate_clip_score(images_1_5, prompts) | |
| print(f"CLIP Score with v-1-5: {sd_clip_score_1_5}") | |
| # CLIP Score with v-1-5: 36.2137 | |
| ``` | |
| [v1-5](https://huggingface.co/stable-diffusion-v1-5/stable-diffusion-v1-5) 체크포인트가 이전 버전보다 더 나은 성능을 보이는 것 같습니다. 그러나 CLIP 점수를 계산하기 위해 사용한 프롬프트의 수가 상당히 적습니다. 보다 실용적인 평가를 위해서는 이 수를 훨씬 높게 설정하고, 프롬프트를 다양하게 사용해야 합니다. | |
| <Tip warning={true}> | |
| 이 점수에는 몇 가지 제한 사항이 있습니다. 훈련 데이터셋의 캡션은 웹에서 크롤링되어 이미지와 관련된 `alt` 및 유사한 태그에서 추출되었습니다. 이들은 인간이 이미지를 설명하는 데 사용할 수 있는 것과 일치하지 않을 수 있습니다. 따라서 여기서는 몇 가지 프롬프트를 "엔지니어링"해야 했습니다. | |
| </Tip> | |
| ### 이미지 조건화된 텍스트-이미지 생성[[image-conditioned-text-to-image-generation]] | |
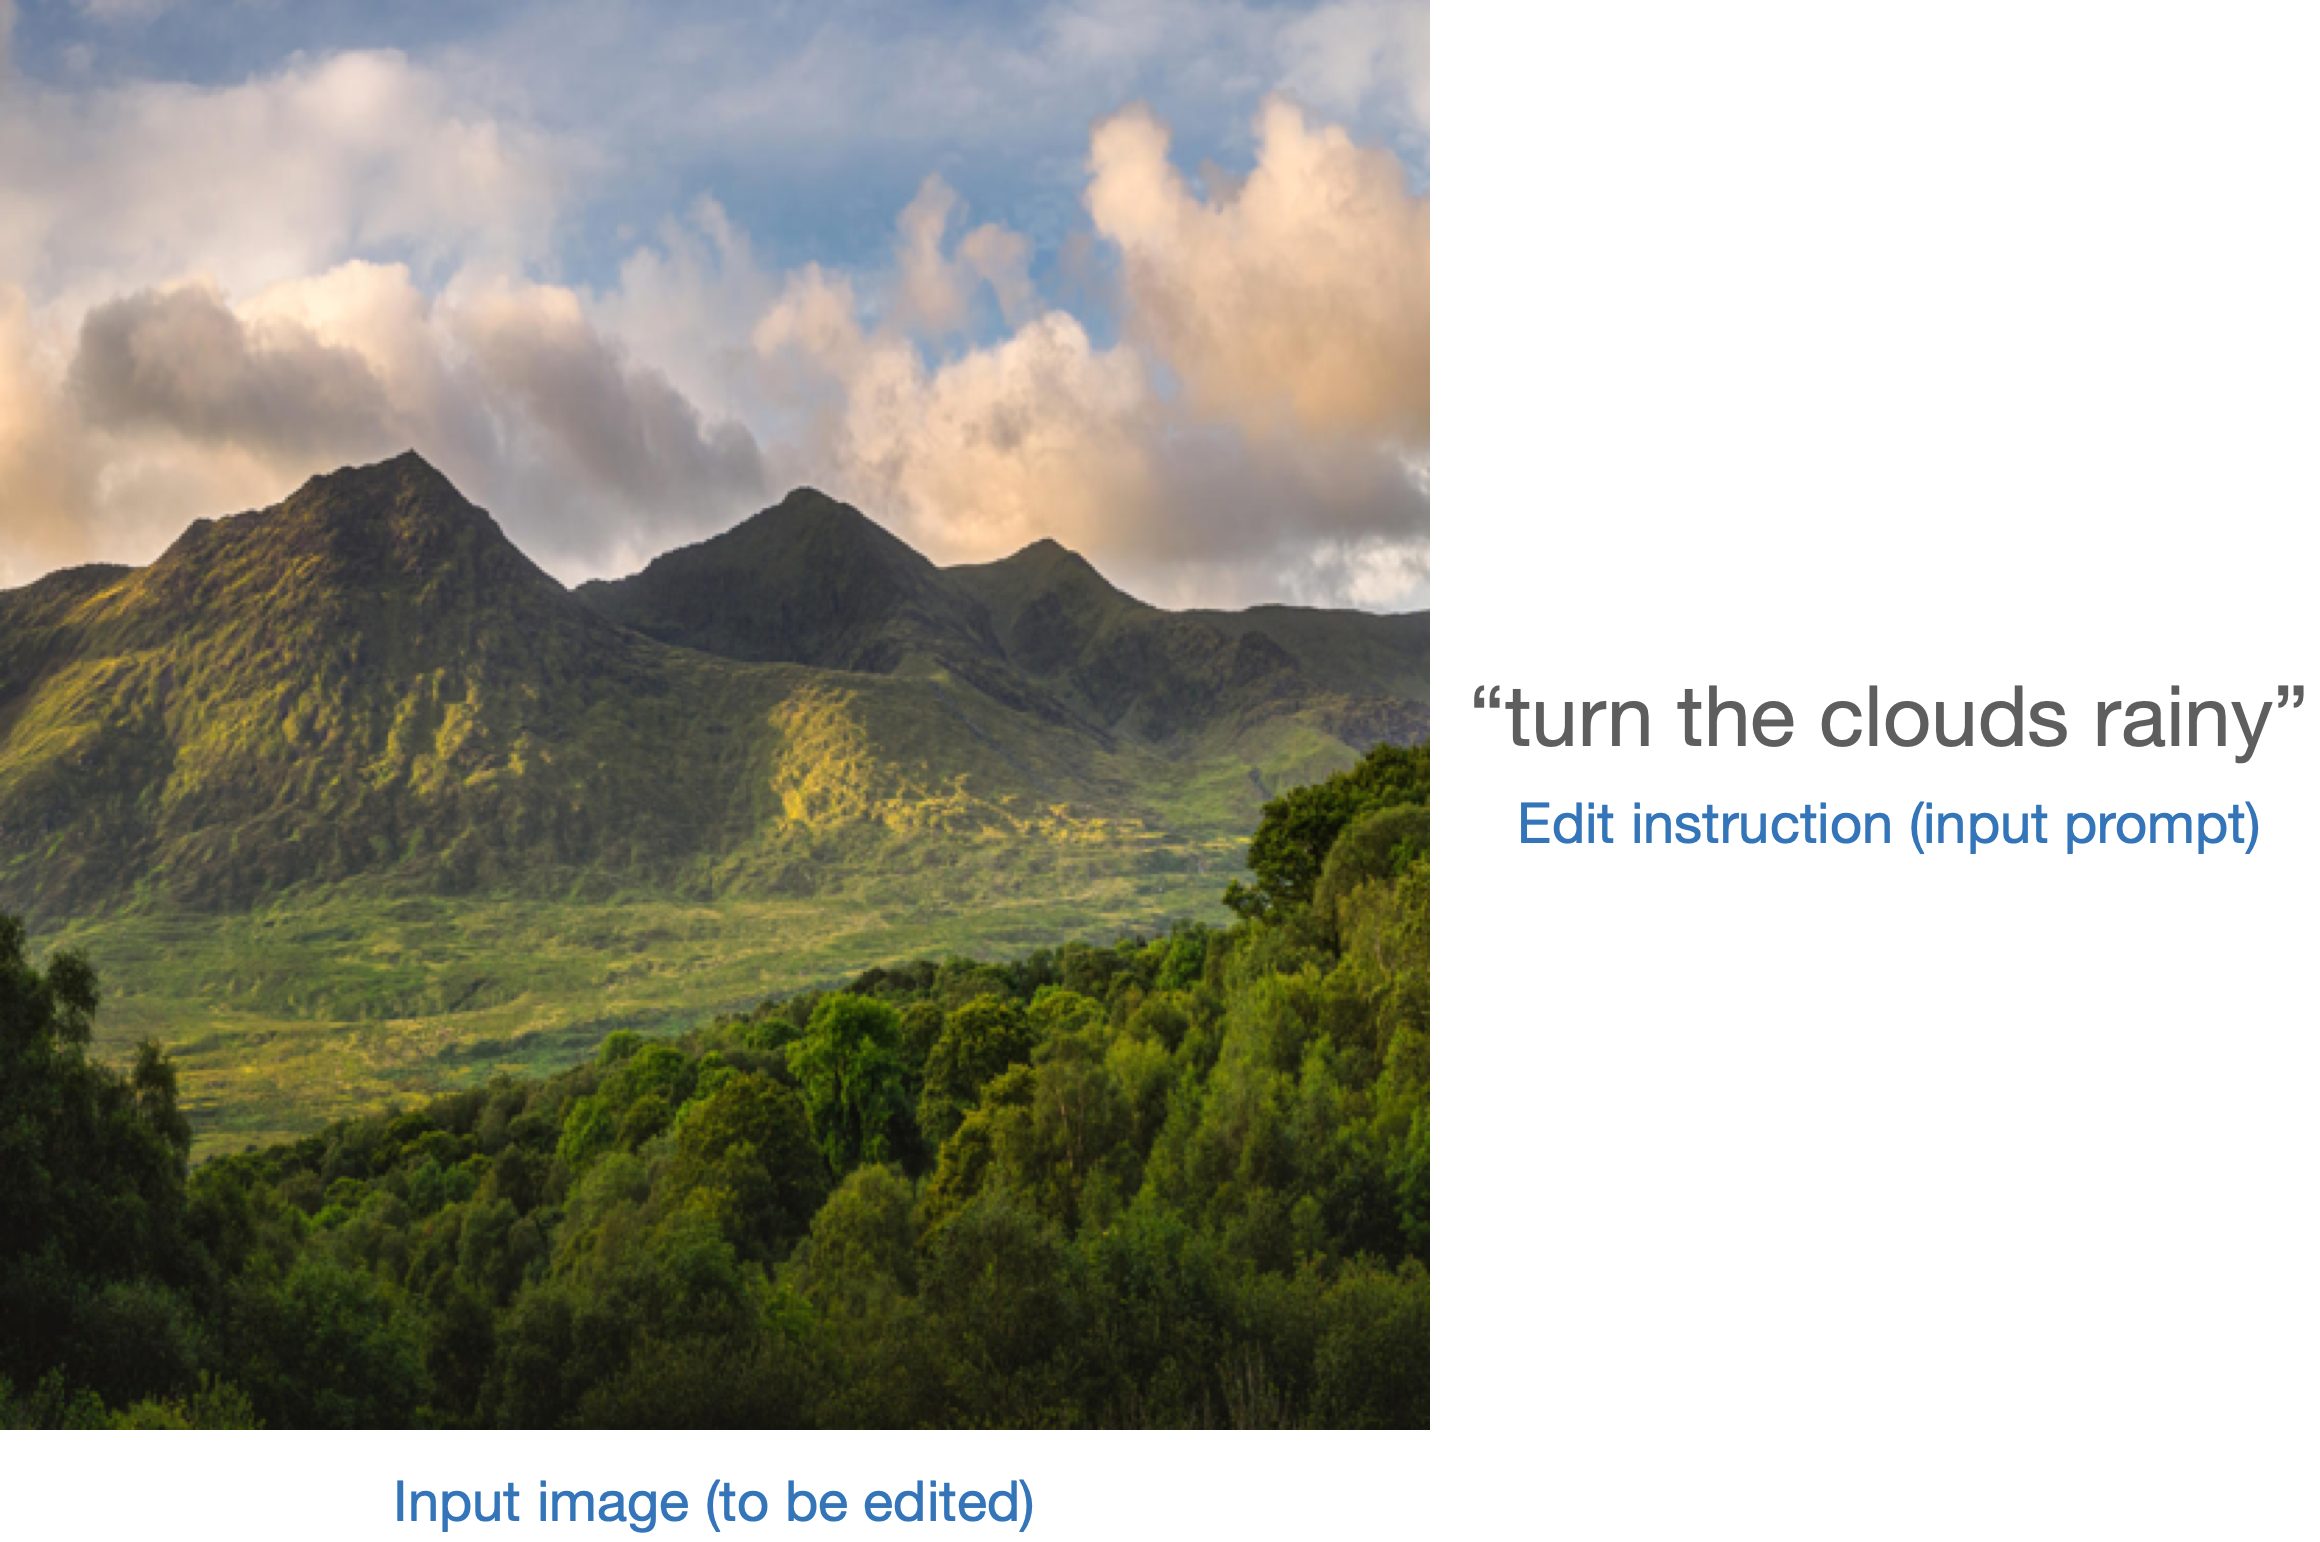
| 이 경우, 생성 파이프라인을 입력 이미지와 텍스트 프롬프트로 조건화합니다. [`StableDiffusionInstructPix2PixPipeline`]을 예로 들어보겠습니다. 이는 편집 지시문을 입력 프롬프트로 사용하고 편집할 입력 이미지를 사용합니다. | |
| 다음은 하나의 예시입니다: | |
|  | |
| 모델을 평가하는 한 가지 전략은 두 이미지 캡션 간의 변경과([CLIP-Guided Domain Adaptation of Image Generators](https://arxiv.org/abs/2108.00946)에서 보여줍니다) 함께 두 이미지 사이의 변경의 일관성을 측정하는 것입니다 ([CLIP](https://huggingface.co/docs/transformers/model_doc/clip) 공간에서). 이를 "**CLIP 방향성 유사성**"이라고 합니다. | |
| - 캡션 1은 편집할 이미지 (이미지 1)에 해당합니다. | |
| - 캡션 2는 편집된 이미지 (이미지 2)에 해당합니다. 편집 지시를 반영해야 합니다. | |
| 다음은 그림으로 된 개요입니다: | |
| 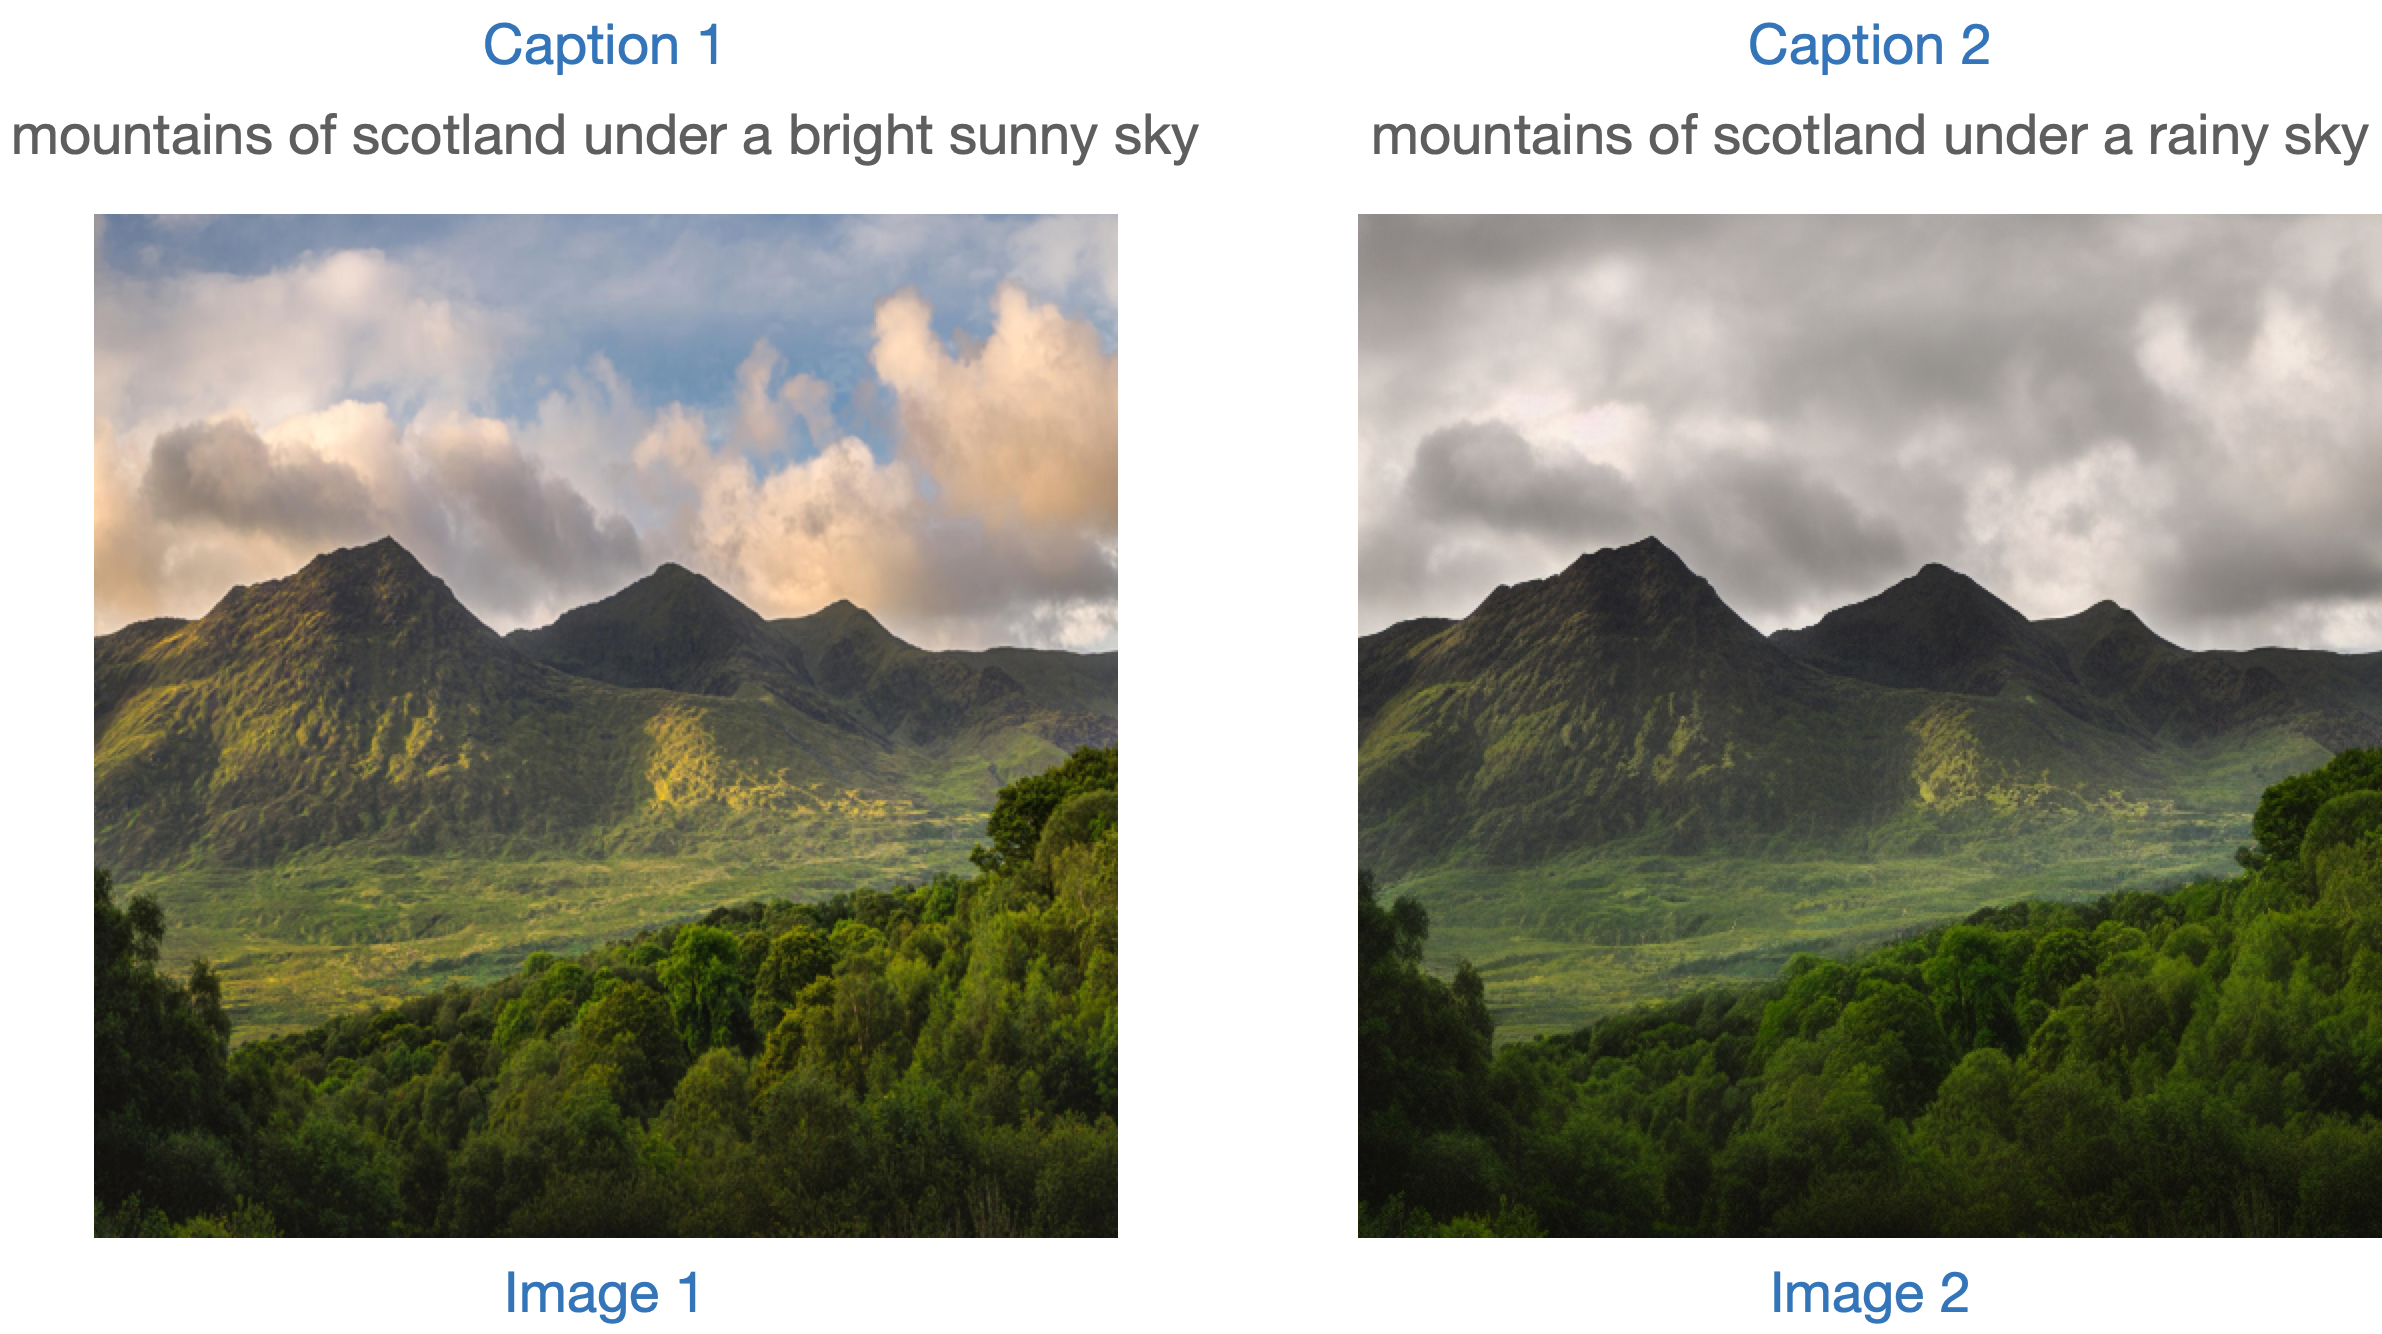 | |
| 우리는 이 측정 항목을 구현하기 위해 미니 데이터 세트를 준비했습니다. 먼저 데이터 세트를 로드해 보겠습니다. | |
| ```python | |
| from datasets import load_dataset | |
| dataset = load_dataset("sayakpaul/instructpix2pix-demo", split="train") | |
| dataset.features | |
| ``` | |
| ```bash | |
| {'input': Value(dtype='string', id=None), | |
| 'edit': Value(dtype='string', id=None), | |
| 'output': Value(dtype='string', id=None), | |
| 'image': Image(decode=True, id=None)} | |
| ``` | |
| 여기에는 다음과 같은 항목이 있습니다: | |
| - `input`은 `image`에 해당하는 캡션입니다. | |
| - `edit`은 편집 지시사항을 나타냅니다. | |
| - `output`은 `edit` 지시사항을 반영한 수정된 캡션입니다. | |
| 샘플을 살펴보겠습니다. | |
| ```python | |
| idx = 0 | |
| print(f"Original caption: {dataset[idx]['input']}") | |
| print(f"Edit instruction: {dataset[idx]['edit']}") | |
| print(f"Modified caption: {dataset[idx]['output']}") | |
| ``` | |
| ```bash | |
| Original caption: 2. FAROE ISLANDS: An archipelago of 18 mountainous isles in the North Atlantic Ocean between Norway and Iceland, the Faroe Islands has 'everything you could hope for', according to Big 7 Travel. It boasts 'crystal clear waterfalls, rocky cliffs that seem to jut out of nowhere and velvety green hills' | |
| Edit instruction: make the isles all white marble | |
| Modified caption: 2. WHITE MARBLE ISLANDS: An archipelago of 18 mountainous white marble isles in the North Atlantic Ocean between Norway and Iceland, the White Marble Islands has 'everything you could hope for', according to Big 7 Travel. It boasts 'crystal clear waterfalls, rocky cliffs that seem to jut out of nowhere and velvety green hills' | |
| ``` | |
| 다음은 이미지입니다: | |
| ```python | |
| dataset[idx]["image"] | |
| ``` | |
| 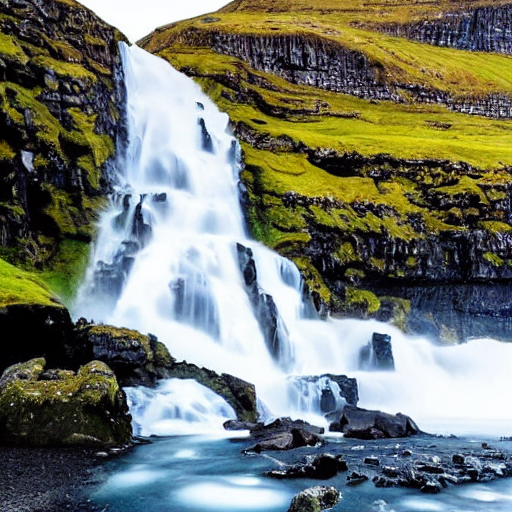 | |
| 먼저 편집 지시사항을 사용하여 데이터 세트의 이미지를 편집하고 방향 유사도를 계산합니다. | |
| [`StableDiffusionInstructPix2PixPipeline`]를 먼저 로드합니다: | |
| ```python | |
| from diffusers import StableDiffusionInstructPix2PixPipeline | |
| instruct_pix2pix_pipeline = StableDiffusionInstructPix2PixPipeline.from_pretrained( | |
| "timbrooks/instruct-pix2pix", torch_dtype=torch.float16 | |
| ).to(device) | |
| ``` | |
| 이제 편집을 수행합니다: | |
| ```python | |
| import numpy as np | |
| def edit_image(input_image, instruction): | |
| image = instruct_pix2pix_pipeline( | |
| instruction, | |
| image=input_image, | |
| output_type="np", | |
| generator=generator, | |
| ).images[0] | |
| return image | |
| input_images = [] | |
| original_captions = [] | |
| modified_captions = [] | |
| edited_images = [] | |
| for idx in range(len(dataset)): | |
| input_image = dataset[idx]["image"] | |
| edit_instruction = dataset[idx]["edit"] | |
| edited_image = edit_image(input_image, edit_instruction) | |
| input_images.append(np.array(input_image)) | |
| original_captions.append(dataset[idx]["input"]) | |
| modified_captions.append(dataset[idx]["output"]) | |
| edited_images.append(edited_image) | |
| ``` | |
| 방향 유사도를 계산하기 위해서는 먼저 CLIP의 이미지와 텍스트 인코더를 로드합니다: | |
| ```python | |
| from transformers import ( | |
| CLIPTokenizer, | |
| CLIPTextModelWithProjection, | |
| CLIPVisionModelWithProjection, | |
| CLIPImageProcessor, | |
| ) | |
| clip_id = "openai/clip-vit-large-patch14" | |
| tokenizer = CLIPTokenizer.from_pretrained(clip_id) | |
| text_encoder = CLIPTextModelWithProjection.from_pretrained(clip_id).to(device) | |
| image_processor = CLIPImageProcessor.from_pretrained(clip_id) | |
| image_encoder = CLIPVisionModelWithProjection.from_pretrained(clip_id).to(device) | |
| ``` | |
| 주목할 점은 특정한 CLIP 체크포인트인 `openai/clip-vit-large-patch14`를 사용하고 있다는 것입니다. 이는 Stable Diffusion 사전 훈련이 이 CLIP 변형체와 함께 수행되었기 때문입니다. 자세한 내용은 [문서](https://huggingface.co/docs/transformers/model_doc/clip)를 참조하세요. | |
| 다음으로, 방향성 유사도를 계산하기 위해 PyTorch의 `nn.Module`을 준비합니다: | |
| ```python | |
| import torch.nn as nn | |
| import torch.nn.functional as F | |
| class DirectionalSimilarity(nn.Module): | |
| def __init__(self, tokenizer, text_encoder, image_processor, image_encoder): | |
| super().__init__() | |
| self.tokenizer = tokenizer | |
| self.text_encoder = text_encoder | |
| self.image_processor = image_processor | |
| self.image_encoder = image_encoder | |
| def preprocess_image(self, image): | |
| image = self.image_processor(image, return_tensors="pt")["pixel_values"] | |
| return {"pixel_values": image.to(device)} | |
| def tokenize_text(self, text): | |
| inputs = self.tokenizer( | |
| text, | |
| max_length=self.tokenizer.model_max_length, | |
| padding="max_length", | |
| truncation=True, | |
| return_tensors="pt", | |
| ) | |
| return {"input_ids": inputs.input_ids.to(device)} | |
| def encode_image(self, image): | |
| preprocessed_image = self.preprocess_image(image) | |
| image_features = self.image_encoder(**preprocessed_image).image_embeds | |
| image_features = image_features / image_features.norm(dim=1, keepdim=True) | |
| return image_features | |
| def encode_text(self, text): | |
| tokenized_text = self.tokenize_text(text) | |
| text_features = self.text_encoder(**tokenized_text).text_embeds | |
| text_features = text_features / text_features.norm(dim=1, keepdim=True) | |
| return text_features | |
| def compute_directional_similarity(self, img_feat_one, img_feat_two, text_feat_one, text_feat_two): | |
| sim_direction = F.cosine_similarity(img_feat_two - img_feat_one, text_feat_two - text_feat_one) | |
| return sim_direction | |
| def forward(self, image_one, image_two, caption_one, caption_two): | |
| img_feat_one = self.encode_image(image_one) | |
| img_feat_two = self.encode_image(image_two) | |
| text_feat_one = self.encode_text(caption_one) | |
| text_feat_two = self.encode_text(caption_two) | |
| directional_similarity = self.compute_directional_similarity( | |
| img_feat_one, img_feat_two, text_feat_one, text_feat_two | |
| ) | |
| return directional_similarity | |
| ``` | |
| 이제 `DirectionalSimilarity`를 사용해 보겠습니다. | |
| ```python | |
| dir_similarity = DirectionalSimilarity(tokenizer, text_encoder, image_processor, image_encoder) | |
| scores = [] | |
| for i in range(len(input_images)): | |
| original_image = input_images[i] | |
| original_caption = original_captions[i] | |
| edited_image = edited_images[i] | |
| modified_caption = modified_captions[i] | |
| similarity_score = dir_similarity(original_image, edited_image, original_caption, modified_caption) | |
| scores.append(float(similarity_score.detach().cpu())) | |
| print(f"CLIP directional similarity: {np.mean(scores)}") | |
| # CLIP directional similarity: 0.0797976553440094 | |
| ``` | |
| CLIP 점수와 마찬가지로, CLIP 방향 유사성이 높을수록 좋습니다. | |
| `StableDiffusionInstructPix2PixPipeline`은 `image_guidance_scale`과 `guidance_scale`이라는 두 가지 인자를 노출시킵니다. 이 두 인자를 조정하여 최종 편집된 이미지의 품질을 제어할 수 있습니다. 이 두 인자의 영향을 실험해보고 방향 유사성에 미치는 영향을 확인해보기를 권장합니다. | |
| 이러한 메트릭의 개념을 확장하여 원본 이미지와 편집된 버전의 유사성을 측정할 수 있습니다. 이를 위해 `F.cosine_similarity(img_feat_two, img_feat_one)`을 사용할 수 있습니다. 이러한 종류의 편집에서는 이미지의 주요 의미가 최대한 보존되어야 합니다. 즉, 높은 유사성 점수를 얻어야 합니다. | |
| [`StableDiffusionPix2PixZeroPipeline`](https://huggingface.co/docs/diffusers/main/en/api/pipelines/pix2pix_zero#diffusers.StableDiffusionPix2PixZeroPipeline)와 같은 유사한 파이프라인에도 이러한 메트릭을 사용할 수 있습니다. | |
| <Tip> | |
| CLIP 점수와 CLIP 방향 유사성 모두 CLIP 모델에 의존하기 때문에 평가가 편향될 수 있습니다 | |
| </Tip> | |
| ***IS, FID (나중에 설명할 예정), 또는 KID와 같은 메트릭을 확장하는 것은 어려울 수 있습니다***. 평가 중인 모델이 대규모 이미지 캡셔닝 데이터셋 (예: [LAION-5B 데이터셋](https://laion.ai/blog/laion-5b/))에서 사전 훈련되었을 때 이는 문제가 될 수 있습니다. 왜냐하면 이러한 메트릭의 기반에는 중간 이미지 특징을 추출하기 위해 ImageNet-1k 데이터셋에서 사전 훈련된 InceptionNet이 사용되기 때문입니다. Stable Diffusion의 사전 훈련 데이터셋은 InceptionNet의 사전 훈련 데이터셋과 겹치는 부분이 제한적일 수 있으므로 따라서 여기에는 좋은 후보가 아닙니다. | |
| ***위의 메트릭을 사용하면 클래스 조건이 있는 모델을 평가할 수 있습니다. 예를 들어, [DiT](https://huggingface.co/docs/diffusers/main/en/api/pipelines/dit). 이는 ImageNet-1k 클래스에 조건을 걸고 사전 훈련되었습니다.*** | |
| ### 클래스 조건화 이미지 생성[[class-conditioned-image-generation]] | |
| 클래스 조건화 생성 모델은 일반적으로 [ImageNet-1k](https://huggingface.co/datasets/imagenet-1k)와 같은 클래스 레이블이 지정된 데이터셋에서 사전 훈련됩니다. 이러한 모델을 평가하는 인기있는 지표에는 Fréchet Inception Distance (FID), Kernel Inception Distance (KID) 및 Inception Score (IS)가 있습니다. 이 문서에서는 FID ([Heusel et al.](https://arxiv.org/abs/1706.08500))에 초점을 맞추고 있습니다. [`DiTPipeline`](https://huggingface.co/docs/diffusers/api/pipelines/dit)을 사용하여 FID를 계산하는 방법을 보여줍니다. 이는 내부적으로 [DiT 모델](https://arxiv.org/abs/2212.09748)을 사용합니다. | |
| FID는 두 개의 이미지 데이터셋이 얼마나 유사한지를 측정하는 것을 목표로 합니다. [이 자료](https://mmgeneration.readthedocs.io/en/latest/quick_run.html#fid)에 따르면: | |
| > Fréchet Inception Distance는 두 개의 이미지 데이터셋 간의 유사성을 측정하는 지표입니다. 시각적 품질에 대한 인간 판단과 잘 상관되는 것으로 나타났으며, 주로 생성적 적대 신경망의 샘플 품질을 평가하는 데 사용됩니다. FID는 Inception 네트워크의 특징 표현에 맞게 적합한 두 개의 가우시안 사이의 Fréchet 거리를 계산하여 구합니다. | |
| 이 두 개의 데이터셋은 실제 이미지 데이터셋과 가짜 이미지 데이터셋(우리의 경우 생성된 이미지)입니다. FID는 일반적으로 두 개의 큰 데이터셋으로 계산됩니다. 그러나 이 문서에서는 두 개의 미니 데이터셋으로 작업할 것입니다. | |
| 먼저 ImageNet-1k 훈련 세트에서 몇 개의 이미지를 다운로드해 봅시다: | |
| ```python | |
| from zipfile import ZipFile | |
| import requests | |
| def download(url, local_filepath): | |
| r = requests.get(url) | |
| with open(local_filepath, "wb") as f: | |
| f.write(r.content) | |
| return local_filepath | |
| dummy_dataset_url = "https://hf.co/datasets/sayakpaul/sample-datasets/resolve/main/sample-imagenet-images.zip" | |
| local_filepath = download(dummy_dataset_url, dummy_dataset_url.split("/")[-1]) | |
| with ZipFile(local_filepath, "r") as zipper: | |
| zipper.extractall(".") | |
| ``` | |
| ```python | |
| from PIL import Image | |
| import os | |
| dataset_path = "sample-imagenet-images" | |
| image_paths = sorted([os.path.join(dataset_path, x) for x in os.listdir(dataset_path)]) | |
| real_images = [np.array(Image.open(path).convert("RGB")) for path in image_paths] | |
| ``` | |
| 다음은 ImageNet-1k classes의 이미지 10개입니다 : "cassette_player", "chain_saw" (x2), "church", "gas_pump" (x3), "parachute" (x2), 그리고 "tench". | |
| <p align="center"> | |
| <img src="https://huggingface.co/datasets/diffusers/docs-images/resolve/main/evaluation_diffusion_models/real-images.png" alt="real-images"><br> | |
| <em>Real images.</em> | |
| </p> | |
| 이제 이미지가 로드되었으므로 이미지에 가벼운 전처리를 적용하여 FID 계산에 사용해 보겠습니다. | |
| ```python | |
| from torchvision.transforms import functional as F | |
| def preprocess_image(image): | |
| image = torch.tensor(image).unsqueeze(0) | |
| image = image.permute(0, 3, 1, 2) / 255.0 | |
| return F.center_crop(image, (256, 256)) | |
| real_images = torch.cat([preprocess_image(image) for image in real_images]) | |
| print(real_images.shape) | |
| # torch.Size([10, 3, 256, 256]) | |
| ``` | |
| 이제 위에서 언급한 클래스에 따라 조건화 된 이미지를 생성하기 위해 [`DiTPipeline`](https://huggingface.co/docs/diffusers/api/pipelines/dit)를 로드합니다. | |
| ```python | |
| from diffusers import DiTPipeline, DPMSolverMultistepScheduler | |
| dit_pipeline = DiTPipeline.from_pretrained("facebook/DiT-XL-2-256", torch_dtype=torch.float16) | |
| dit_pipeline.scheduler = DPMSolverMultistepScheduler.from_config(dit_pipeline.scheduler.config) | |
| dit_pipeline = dit_pipeline.to("cuda") | |
| words = [ | |
| "cassette player", | |
| "chainsaw", | |
| "chainsaw", | |
| "church", | |
| "gas pump", | |
| "gas pump", | |
| "gas pump", | |
| "parachute", | |
| "parachute", | |
| "tench", | |
| ] | |
| class_ids = dit_pipeline.get_label_ids(words) | |
| output = dit_pipeline(class_labels=class_ids, generator=generator, output_type="np") | |
| fake_images = output.images | |
| fake_images = torch.tensor(fake_images) | |
| fake_images = fake_images.permute(0, 3, 1, 2) | |
| print(fake_images.shape) | |
| # torch.Size([10, 3, 256, 256]) | |
| ``` | |
| 이제 [`torchmetrics`](https://torchmetrics.readthedocs.io/)를 사용하여 FID를 계산할 수 있습니다. | |
| ```python | |
| from torchmetrics.image.fid import FrechetInceptionDistance | |
| fid = FrechetInceptionDistance(normalize=True) | |
| fid.update(real_images, real=True) | |
| fid.update(fake_images, real=False) | |
| print(f"FID: {float(fid.compute())}") | |
| # FID: 177.7147216796875 | |
| ``` | |
| FID는 낮을수록 좋습니다. 여러 가지 요소가 FID에 영향을 줄 수 있습니다: | |
| - 이미지의 수 (실제 이미지와 가짜 이미지 모두) | |
| - diffusion 과정에서 발생하는 무작위성 | |
| - diffusion 과정에서의 추론 단계 수 | |
| - diffusion 과정에서 사용되는 스케줄러 | |
| 마지막 두 가지 요소에 대해서는, 다른 시드와 추론 단계에서 평가를 실행하고 평균 결과를 보고하는 것은 좋은 실천 방법입니다 | |
| <Tip warning={true}> | |
| FID 결과는 많은 요소에 의존하기 때문에 취약할 수 있습니다: | |
| * 계산 중 사용되는 특정 Inception 모델. | |
| * 계산의 구현 정확도. | |
| * 이미지 형식 (PNG 또는 JPG에서 시작하는 경우가 다릅니다). | |
| 이러한 사항을 염두에 두면, FID는 유사한 실행을 비교할 때 가장 유용하지만, 저자가 FID 측정 코드를 주의 깊게 공개하지 않는 한 논문 결과를 재현하기는 어렵습니다. | |
| 이러한 사항은 KID 및 IS와 같은 다른 관련 메트릭에도 적용됩니다. | |
| </Tip> | |
| 마지막 단계로, `fake_images`를 시각적으로 검사해 봅시다. | |
| <p align="center"> | |
| <img src="https://huggingface.co/datasets/diffusers/docs-images/resolve/main/evaluation_diffusion_models/fake-images.png" alt="fake-images"><br> | |
| <em>Fake images.</em> | |
| </p> |