Spaces:
Sleeping

Sleeping
| ## Key Features | |
| - **Faster Time to Market**: Build production-ready AI features in minutes through a web-app – no coding required. | |
| - **Interactive Playground**: Test and compare 80+ leading AI models side-by-side in our visual playground. See the difference in responses, costs, and latency. [Try it now](https://workflowai.com/docs/agents/flight-info-extractor/1?versionId=b9cf227a9a2e3c90f02ca98a59cd88cf&showDiffMode=false&show2ColumnLayout=false&taskRunId1=0195ee60-6fda-71c1-5f2f-5713168b43e6&taskRunId3=01961b95-8ac7-718c-e17d-2603af7f3708&taskRunId2=0195ee60-6eac-70cd-7bd5-25fddaf31309). | |
| https://github.com/user-attachments/assets/febf1047-ed85-4af0-b796-5242aef051b4 | |
| - **Model-agnostic**: Works with all major AI models including OpenAI, Anthropic, Claude, Google/Gemini, Mistral, DeepSeek, Grok with a unified interface that makes switching between providers seamless. [View all 80+ supported models](https://workflowai.com/docs/agents/flight-info-extractor/1). | |
|  | |
| - **Open-source and flexible deployment**: WorkflowAI is fully open-source with flexible deployment options. Run it self-hosted on your own infrastructure for maximum data control, or use the managed [WorkflowAI Cloud](https://docs.workflowai.com/workflowai-cloud/introduction) service for hassle-free updates and automatic scaling. | |
| - **Observability integrated**: Built-in monitoring and logging capabilities that provide insights into your AI workflows, making debugging and optimization straightforward. Learn more about [observability features](https://docs.workflowai.com/concepts/runs). | |
| https://github.com/user-attachments/assets/ae260da3-06ed-4ba0-824b-a9cab4fadb6f | |
| - **Cost tracking**: Automatically calculates and tracks the cost of each AI model run, providing transparency and helping you manage your AI budget effectively. Learn more about [cost tracking](https://docs.workflowai.com/features/monitoring). | |
|  | |
| - **Structured output**: WorkflowAI ensures your AI responses always match your defined structure, simplifying integrations, reducing parsing errors, and making your data reliable and ready for use. Learn more about [structured input and output](https://docs.workflowai.com/concepts/schemas). | |
|  | |
| - **Easy integration with SDKs for Python, Typescript and a REST API**. View code examples [here](https://workflowai.com/docs/agents/flight-info-extractor/1/code). | |
| https://github.com/user-attachments/assets/261c3a5a-16ac-4c29-bc30-5ec725a0619d | |
| - **Instant Prompt Updates**: Tired of creating tickets just to tweak a prompt? Update prompts and models with a single click - no code changes or engineering work required. Go from feedback to fix in seconds. | |
| https://github.com/user-attachments/assets/0c81d596-ec70-43bc-80a8-ceddcd26b9d9 | |
| - **Automatic Provider Failover**: [OpenAI experiences 40+ minutes of downtime per month](https://status.openai.com). With WorkflowAI, traffic automatically reroutes to backup providers (like Azure OpenAI for OpenAI, or Amazon Bedrock for Anthropic) during outages - no configuration needed and at no extra cost. Your users won't even notice the switch. | |
|  | |
| - **Streaming supported**: Enables real-time streaming of AI responses for low latency applications, with immediate validation of partial outputs. Learn more about [streaming capabilities](https://docs.workflowai.com/features/code#streaming). | |
| https://github.com/user-attachments/assets/4cf6e65a-a7b4-4b93-a30c-7d28b22e1553 | |
| - **Hosted tools**: Comes with powerful hosted tools like web search and web browsing capabilities, allowing your agents to access real-time information from the internet. These tools enable your AI applications to retrieve up-to-date data, research topics, and interact with web content without requiring complex integrations. Learn more about [hosted tools](https://docs.workflowai.com/concepts/tools#hosted-tools). | |
| https://github.com/user-attachments/assets/9329af26-1222-4d5d-a68d-2bb4675261e2 | |
| - **Multimodality support**: Build agents that can handle multiple modalities, such as images, PDFs, documents, and audio. Try it [here](https://workflowai.com/docs/agents/pdf-answer-bot/1?versionId=db4cf825a65eaab3d3b7f6543a78ece1&showDiffMode=false&show2ColumnLayout=false&taskRunId2=0195d8b6-ed8b-7190-b71d-53bfc9782e6b&taskRunId3=0195d8b6-ed93-736f-c53d-50e284a1038a&taskRunId1=01961b9a-915a-7075-a353-2cebb452aeea). | |
| https://github.com/user-attachments/assets/0cd54e38-6e6d-42f2-aa7d-365970151375 | |
| - **Developer-Friendly**: Need more control? Seamlessly extend functionality with our [Python SDK](https://github.com/workflowai/python-sdk) when you need custom logic. | |
| ```python | |
| import workflowai | |
| from pydantic import BaseModel | |
| from workflowai import Model | |
| class MeetingInput(BaseModel): | |
| meeting_transcript: str | |
| class MeetingOutput(BaseModel): | |
| summary: str | |
| key_items: list[str] | |
| action_items: list[str] | |
| @workflowai.agent() | |
| async def extract_meeting_info(meeting_input: MeetingInput) -> MeetingOutput: | |
| ... | |
| ``` | |
| ## Deploy WorkflowAI | |
| ### WorkflowAI Cloud | |
| <div align="center"> | |
| <a href="https://workflowai.com" target="_blank"> | |
| <img alt="Static Badge" src="https://img.shields.io/badge/»%20Sign%20up%20for%20WorkflowAI%20Cloud-8A2BE2?&color=orange"> | |
| </a> | |
| </div> | |
| Fully managed solution with zero infrastructure setup required. [Pay exactly what you'd pay the model providers](https://docs.workflowai.com/workflowai-cloud/pricing) — billed per token, with no minimums and no per-seat fees. No markups. We make our margin from provider discounts, not by charging you extra. Enterprise-ready with SOC2 compliance and [high-availability infrastructure](https://docs.workflowai.com/workflowai-cloud/reliability). We maintain strict data privacy - your data is never used for training. | |
| ### Self-hosted | |
| #### Quick start | |
| The Docker Compose file is provided as a quick way to spin up a local instance of WorkflowAI. | |
| It is configured to be self contained viable from the start. | |
| ```sh | |
| # Create a base environment file that will be used by the docker compose | |
| # You should likely update the .env file to include some provider keys, see Configuring Provider keys below | |
| cp .env.sample .env | |
| # Build the client and api docker image | |
| # By default the docker compose builds development images, see the `target` keys | |
| docker-compose build | |
| # [Optional] Start the dependencies in the background, this way we can shut down the app while | |
| # keeping the dependencies running | |
| docker-compose up -d clickhouse minio redis mongo | |
| # Start the docker images | |
| docker-compose up | |
| # The WorkflowAI api is also a WorkflowAI user | |
| # Since all the agents the api uses are hosted in WorkflowAI | |
| # So you'll need to create a Workflow AI api key | |
| # Open http://localhost:3000/organization/settings/api-keys and create an api key | |
| # Then update the WORKFLOWAI_API_KEY in your .env file | |
| open http://localhost:3000/organization/settings/api-keys | |
| # The kill the containers (ctrl c) and restart them | |
| docker-compose up | |
| ``` | |
| > Although it is configured for local development via hot reloads and volumes, Docker introduces significant | |
| > latencies for development. Detailed setup for both the [client](./client/README.md) and [api](./api/README.md) | |
| > are provided in their respective READMEs. | |
| #### Configuring Provider keys | |
| WorkflowAI connects to a variety of providers (see [the Provider enum](./api/core/domain/models/providers.py)). There | |
| are two ways to configure providers: | |
| - Globally, using environment variables. The provider [environment sample](./.env.sample) provides information | |
| on requirements for each provider. | |
| - Per tenant, through the UI, by navigating to `../organization/settings/providers` | |
| > Several features of the website rely on providers being configured either globally or for the | |
| > tenant that is used internally. For example, at the time of writing, the | |
| > [agent that allows building agents with natural language](./api/core/agents/chat_task_schema_generation/chat_task_schema_generation_task.py) | |
| > uses Claude 3.7 so either Anthropic or Bedrock should be configured. All the agents that | |
| > WorkflowAI uses are located in the [agents directory](./api/core/agents/) | |
| #### Additional MinIO setup | |
| For now, we rely on public read access to the storage in the frontend. The URLs are not discoverable though so it should be ok until we implement temporary leases for files. | |
| On minio that's possible with the following commands | |
| ```sh | |
| # Run sh inside the running minio container | |
| docker-compose exec minio sh | |
| # Create an alias for the bucket | |
| mc anonymous set download myminio/workflowai-task-runs | |
| # Set download permissions | |
| mc alias set myminio http://minio:9000 minio miniosecret | |
| ``` | |
| ### Structure | |
| #### API | |
| The [api](./api/README.md) provides is the Python backend for WorkflowAI. It is structured | |
| as a [FastAPI](https://fastapi.tiangolo.com/) server and | |
| a [TaskIQ](https://github.com/taskiq-python/taskiq) based worker. | |
| #### Client | |
| The [client](./client/README.md) is a NextJS app that serves as a frontend | |
| #### Dependencies | |
| - **MongoDB**: we use [MongoDB](https://www.mongodb.com/) to store all the internal data | |
| - **Clickhouse**: [Clickhouse](https://clickhouse.com/) is used to store the run data. We | |
| first stored the run data in Mongo but it quickly got out of hand with storage costs | |
| and query duration. | |
| - **Redis**: We use Redis as a broker for messages for taskiq. TaskIQ supports a number | |
| of different message broker. Redis 6.0 and above are supported. | |
| - **Minio** is used to store files but any _S3 compatible storage_ will do. We also have a plugin for _Azure Blob Storage_. | |
| The selected storage depends on the `WORKFLOWAI_STORAGE_CONNECTION_STRING` env variable. A variable starting with | |
| `s3://` will result in the S3 storage being used. | |
| ### Setting up providers | |
| WorkflowAI supports a variety of LLM providers (OpenAI, Anthropic, Amazon Bedrock, Azure OpenAI, Grok, Gemini, FireworksAI, ...). View all supported providers [here](https://github.com/WorkflowAI/WorkflowAI/tree/main/api/core/providers). | |
| Each provider has a different set of credentials and configuration. Providers that have the required environment | |
| variables are loaded by default (see the [sample env](.env.sample) for the available variables). Providers can also be configured per tenant through the UI. | |
| # WorkflowAI Documentation | |
| This is the documentation site for WorkflowAI, built with [Fumadocs](https://github.com/fuma-nama/fumadocs) and Next.js. | |
| # llama.cpp | |
| llama.cpp is a high-performance inference engine written in C/C++, tailored for running Llama and compatible models in the GGUF format. | |
| Core features: | |
| - **GGUF Model Support**: Native compatibility with the GGUF format and all quantization types that comes with it. | |
| - **Multi-Platform**: Optimized for both CPU and GPU execution, with support for AVX, AVX2, AVX512, and CUDA acceleration. | |
| - **OpenAI-Compatible API**: Provides endpoints for chat, completion, embedding, and more, enabling seamless integration with existing tools and workflows. | |
| - **Active Community and Ecosystem**: Rapid development and a rich ecosystem of tools, extensions, and integrations | |
| When you create an endpoint with a [GGUF](https://huggingface.co/docs/hub/en/gguf) model, | |
| a [llama.cpp](https://github.com/ggerganov/llama.cpp) container is automatically selected | |
| using the latest image built from the `master` branch of the llama.cpp repository. | |
| Upon successful deployment, a server with an OpenAI-compatible endpoint becomes available. | |
| llama.cpp supports multiple endpoints like `/tokenize`, `/health`, `/embedding`, and many more. For a comprehensive list of available endpoints, please refer to the [API documentation](https://github.com/ggml-org/llama.cpp/blob/master/tools/server/README.md#api-endpoints). | |
| ## Deployment Steps | |
| To deploy an endpoint with a llama.cpp container, follow these steps: | |
| 1. [Create a new endpoint](./create_endpoint) and select a repository containing a GGUF model. The llama.cpp container will be automatically selected. | |
| 2. Choose the desired GGUF file, noting that memory requirements will vary depending on the selected file. For example, an F16 model requires more memory than a Q4_K_M model. | |
| 3. Select your desired hardware configuration. | |
| 4. Optionally, you can customize the container's configuration settings like `Max Tokens`, `Number of Concurrent Requests`. For more information on those, please refer to the **Configurations** section below. | |
| 5. Click the **Create Endpoint** button to complete the deployment. | |
| Alternatively, you can follow the video tutorial below for a step-by-step guide on deploying an endpoint with a llama.cpp container: | |
| ## Configurations | |
| The llama.cpp container offers several configuration options that can be adjusted. After deployment, you can modify these settings by accessing the **Settings** tab on the endpoint details page. | |
| ### Basic Configurations | |
| - **Max Tokens (per Request)**: The maximum number of tokens that can be sent in a single request. | |
| - **Max Concurrent Requests**: The maximum number of concurrent requests allowed for this deployment. Increasing this limit requires additional memory allocation. | |
| For instance, setting this value to 4 requests with 1024 tokens maximum per request requires memory capacity for 4096 tokens in total. | |
| ### Advanced Configurations | |
| In addition to the basic configurations, you can also modify specific settings by setting environment variables. | |
| A list of available environment variables can be found in the [API documentation](https://github.com/ggerganov/llama.cpp/blob/master/examples/server/README.md#usage). | |
| Please note that the following environment variables are reserved by the system and cannot be modified: | |
| - `LLAMA_ARG_MODEL` | |
| - `LLAMA_ARG_HTTP_THREADS` | |
| - `LLAMA_ARG_N_GPU_LAYERS` | |
| - `LLAMA_ARG_EMBEDDINGS` | |
| - `LLAMA_ARG_HOST` | |
| - `LLAMA_ARG_PORT` | |
| - `LLAMA_ARG_NO_MMAP` | |
| - `LLAMA_ARG_CTX_SIZE` | |
| - `LLAMA_ARG_N_PARALLEL` | |
| - `LLAMA_ARG_ENDPOINT_METRICS` | |
| ## Troubleshooting | |
| In case the deployment fails, please watch the log output for any error messages. | |
| You can access the logs by clicking on the **Logs** tab on the endpoint details page. To learn more, refer to the [Logs](./logs) documentation. | |
| - **Malloc failed: out of memory** | |
| If you see this error message in the log: | |
| ``` | |
| ggml_backend_cuda_buffer_type_alloc_buffer: allocating 67200.00 MiB on device 0: cuda | |
| Malloc failed: out of memory | |
| llama_kv_cache_init: failed to allocate buffer for kv cache | |
| llama_new_context_with_model: llama_kv_cache_init() failed for self-attention cache | |
| ... | |
| ``` | |
| That means the selected hardware configuration does not have enough memory to accommodate the selected GGUF model. You can try to: | |
| - Lower the number of maximum tokens per request | |
| - Lower the number of concurrent requests | |
| - Select a smaller GGUF model | |
| - Select a larger hardware configuration | |
| - **Workload evicted, storage limit exceeded** | |
| This error message indicates that the hardware has too little memory to accommodate the selected GGUF model. Try selecting a smaller model or select a larger hardware configuration. | |
| - **Other problems** | |
| For other problems, please refer to the [llama.cpp issues page](https://github.com/ggerganov/llama.cpp/issues). In case you want to create a new issue, please also include the full log output in your bug report. | |
| ## Development Setup | |
| ### Prerequisites | |
| Before setting up this project, make sure you have the following installed: | |
| - **Node.js** (version 18.0 or later) - [Download here](https://nodejs.org/) | |
| - **Yarn** package manager (this project uses yarn workspaces) | |
| ### Local Development | |
| ⚠️ **Important**: This documentation site is part of a yarn workspace. You must run the development server from the **root directory** of the WorkflowAI project, not from the `docsv2` directory. | |
| 1. **Navigate to the project root** | |
| ```bash | |
| cd /path/to/WorkflowAI # Go to the root directory, not docsv2 | |
| ``` | |
| 2. **Install dependencies** (if not already done) | |
| ```bash | |
| yarn install | |
| ``` | |
| 3. **Start the documentation development server** | |
| ```bash | |
| yarn workspace docs dev | |
| ``` | |
| 4. **Open your browser** | |
| Navigate to [http://localhost:3000](http://localhost:3000) to see the documentation site. | |
| ### Common Issues | |
| **Problem**: Getting `@clerk/nextjs: Missing publishableKey` error | |
| **Solution**: Make sure you're using `yarn workspace docs dev` from the root directory, not `npm run dev` from the docsv2 directory. The workspace command properly isolates the documentation project from the main client application. | |
| **Problem**: `Couldn't find any pages or app directory` error | |
| **Solution**: Ensure you're running the command from the WorkflowAI root directory, not from inside the docsv2 folder. | |
| ## Development | |
| The development server will automatically reload when you make changes to your code. You can start editing the pages and see your changes in real-time. | |
| ### Adding New Documentation | |
| 1. Create `.mdx` files in `content/docs/` | |
| 2. Update the `meta.json` files to include your new pages in the navigation | |
| 3. Use the existing pages as templates for formatting and structure | |
| ## Project Structure | |
| In the project, you can see: | |
| - `lib/source.ts`: Code for content source adapter, [`loader()`](https://fumadocs.dev/docs/headless/source-api) provides the interface to access your content. | |
| - `app/layout.config.tsx`: Shared options for layouts, optional but preferred to keep. | |
| | Route | Description | | |
| | ------------------------- | ------------------------------------------------------ | | |
| | `app/(home)` | The route group for your landing page and other pages. | | |
| | `app/docs` | The documentation layout and pages. | | |
| | `app/api/search/route.ts` | The Route Handler for search. | | |
| ### Fumadocs MDX | |
| A `source.config.ts` config file has been included, you can customise different options like frontmatter schema. | |
| Read the [Introduction](https://fumadocs.dev/docs/mdx) for further details. | |
| ## Building for Production | |
| ```bash | |
| # From the root directory | |
| yarn workspace docs build | |
| yarn workspace docs start | |
| ``` | |
| ## Learn More | |
| To learn more about Next.js and Fumadocs, take a look at the following | |
| resources: | |
| - [Next.js Documentation](https://nextjs.org/docs) - learn about Next.js | |
| features and API. | |
| - [Learn Next.js](https://nextjs.org/learn) - an interactive Next.js tutorial. | |
| - [Fumadocs](https://fumadocs.vercel.app) - learn about Fumadocs | |
| # Create your own transcription app | |
| This tutorial will guide you through building a complete transcription application using Hugging Face Inference Endpoints. We'll create an app that can transcribe audio files and generate intelligent summaries with action items - perfect for meeting notes, interviews, or any audio content. | |
| This tutorial uses Python and Gradio, but you can adapt the approach to any language that can make HTTP requests. The models deployed on Inference Endpoints use standard APIs, so you can integrate them into web applications, mobile apps, or any other system. | |
| # Inference Toolkit | |
| In some cases, the model you're looking to deploy isn't supported by any of the high-performance inference engines. In this case, | |
| we provide a fallback option. The Inference Toolkit supports models that are implemented in the | |
| Transformers, Sentence-Transformers and Diffusers libraries, and wraps them in a light web server. | |
| The Inference Toolkit is perfect for testing models and building demos, but isn't as production-ready as TGI, vLLM, SGLang, or llama.cpp. | |
| # Create a custom Inference Handler | |
| Hugging Face Endpoints supports all of the Transformers and Sentence-Transformers tasks and can support custom tasks, including | |
| custom pre- & post-processing. The customization can be done through a | |
| [handler.py](https://huggingface.co/philschmid/distilbert-onnx-banking77/blob/main/handler.py) file in your model repository on | |
| the Hugging Face Hub. | |
| The [handler.py](https://huggingface.co/philschmid/distilbert-onnx-banking77/blob/main/handler.py) needs to implement | |
| the [EndpointHandler](https://huggingface.co/philschmid/distilbert-onnx-banking77/blob/main/handler.py) class with a | |
| `__init__` and a `__call__` method. | |
| If you want to use custom dependencies, e.g. [optimum](https://raw.githubusercontent.com/huggingface/optimum), the dependencies must | |
| be listed in a `requirements.txt` as described above in “add custom dependencies.” | |
| ## Tutorial | |
| Before creating a Custom Handler, you need a Hugging Face Model repository with your model weights and an Access Token with | |
| _write_ access to the repository. To find, create and manage Access Tokens, click [here](https://huggingface.co/settings/tokens). | |
| If you want to write a Custom Handler for an existing model from the community, you can use the [repo_duplicator](https://huggingface.co/spaces/osanseviero/repo_duplicator) | |
| to create a repository fork. | |
| The code can also be found in this [Notebook](https://colab.research.google.com/drive/1hANJeRa1PK1gZaUorobnQGu4bFj4_4Rf?usp=sharing). | |
| You can also search for already existing Custom Handlers here: [https://huggingface.co/models?other=endpoints-template](https://huggingface.co/models?other=endpoints-template) | |
| ### 1. Set up Development Environment | |
| The easiest way to develop our custom handler is to set up a local development environment, to implement, test, and iterate there, and then | |
| deploy it as an Inference Endpoint. The first step is to install all required development dependencies. _needed to create the custom | |
| handler, not needed for inference_ | |
| ``` | |
| # install git-lfs to interact with the repository | |
| sudo apt-get update | |
| sudo apt-get install git-lfs | |
| # install transformers (not needed since it is installed by default in the container) | |
| pip install transformers[sklearn,sentencepiece,audio,vision] | |
| ``` | |
| After we have installed our libraries we will clone our repository to our development environment. | |
| We will use [philschmid/distilbert-base-uncased-emotion](https://huggingface.co/philschmid/distilbert-base-uncased-emotion) during the | |
| tutorial. | |
| ``` | |
| git lfs install | |
| git clone https://huggingface.co/philschmid/distilbert-base-uncased-emotion | |
| ``` | |
| To be able to push our model repo later you need to login into our HF account. This can be done by using the `huggingface-cli`. | |
| _Note: Make sure to configure git config as well._ | |
| ``` | |
| # setup cli with token | |
| huggingface-cli login | |
| git config --global credential.helper store | |
| ``` | |
| ### 2. Create EndpointHandler | |
| After we have set up our environment, we can start creating your custom handler. The custom handler is a Python class | |
| (`EndpointHandler`) inside a `handler.py` file in our repository. The `EndpointHandler` needs to implement an `__init__` and a | |
| `__call__` method. | |
| - The `__init__` method will be called when starting the Endpoint and will receive 1 argument, a string with the path to your model | |
| weights. This allows you to load your model correctly. | |
| - The `__call__` method will be called on every request and receive a dictionary with your request body as a python dictionary. | |
| It will always contain the `inputs` key. | |
| The first step is to create our `handler.py` in the local clone of our repository. | |
| ``` | |
| !cd distilbert-base-uncased-emotion && touch handler.py | |
| ``` | |
| In there, you define your `EndpointHandler` class with the `__init__` and `__call__ `method. | |
| ```python | |
| from typing import Dict, List, Any | |
| class EndpointHandler(): | |
| def __init__(self, path=""): | |
| # Preload all the elements you are going to need at inference. | |
| # pseudo: | |
| # self.model= load_model(path) | |
| def __call__(self, data: Dict[str, Any]) -> List[Dict[str, Any]]: | |
| """ | |
| data args: | |
| inputs (:obj: `str` | `PIL.Image` | `np.array`) | |
| kwargs | |
| Return: | |
| A :obj:`list` | `dict`: will be serialized and returned | |
| """ | |
| # pseudo | |
| # self.model(input) | |
| ``` | |
| ### 3. Customize EndpointHandler | |
| Now, you can add all of the custom logic you want to use during initialization or inference to your Custom Endpoint. You can | |
| already find multiple [Custom Handlers on the Hub](https://huggingface.co/models?other=endpoints-template) if you need some | |
| inspiration. In our example, we will add a custom condition based on additional payload information. | |
| *The model we are using in the tutorial is fine-tuned to detect emotions. We will add an additional payload field for the date, and | |
| will use an external package to check if it is a holiday, to add a condition so that when the input date is a holiday, the model | |
| returns “happy” - since everyone is happy when there are holidays *🌴🎉😆 | |
| First, we need to create a new `requirements.txt` and add our [holiday detection package](https://pypi.org/project/holidays/) and make | |
| sure we have it installed in our development environment as well. | |
| ``` | |
| !echo "holidays" >> requirements.txt | |
| !pip install -r requirements.txt | |
| ``` | |
| Next, we have to adjust our `handler.py` and `EndpointHandler` to match our condition. | |
| ```python | |
| from typing import Dict, List, Any | |
| from transformers import pipeline | |
| import holidays | |
| class EndpointHandler(): | |
| def __init__(self, path=""): | |
| self.pipeline = pipeline("text-classification",model=path) | |
| self.holidays = holidays.US() | |
| def __call__(self, data: Dict[str, Any]) -> List[Dict[str, Any]]: | |
| """ | |
| data args: | |
| inputs (:obj: `str`) | |
| date (:obj: `str`) | |
| Return: | |
| A :obj:`list` | `dict`: will be serialized and returned | |
| """ | |
| # get inputs | |
| inputs = data.pop("inputs",data) | |
| date = data.pop("date", None) | |
| # check if date exists and if it is a holiday | |
| if date is not None and date in self.holidays: | |
| return [{"label": "happy", "score": 1}] | |
| # run normal prediction | |
| prediction = self.pipeline(inputs) | |
| return prediction | |
| ``` | |
| ### 4. Test EndpointHandler | |
| To test our EndpointHandler, we can simplify import, initialize and test it. Therefore we only need to prepare a sample payload. | |
| ```python | |
| from handler import EndpointHandler | |
| # init handler | |
| my_handler = EndpointHandler(path=".") | |
| # prepare sample payload | |
| non_holiday_payload = {"inputs": "I am quite excited how this will turn out", "date": "2022-08-08"} | |
| holiday_payload = {"inputs": "Today is a tough day", "date": "2022-07-04"} | |
| # test the handler | |
| non_holiday_pred=my_handler(non_holiday_payload) | |
| holiday_pred=my_handler(holiday_payload) | |
| # show results | |
| print("non_holiday_pred", non_holiday_pred) | |
| print("holiday_pred", holiday_pred) | |
| # non_holiday_pred [{'label': 'joy', 'score': 0.9985942244529724}] | |
| # holiday_pred [{'label': 'happy', 'score': 1}] | |
| ``` | |
| It works!!!! 🎉 | |
| _Note: If you are using a notebook you might have to restart your kernel when you make changes to the handler.py since it is not | |
| automatically re-imported._ | |
| ### 5. Push the Custom Handler to your repository | |
| After you have successfully tested your handler locally, you can push it to your repository by simply using basic git commands. | |
| ``` | |
| # add all our new files | |
| !git add * | |
| # commit our files | |
| !git commit -m "add custom handler" | |
| # push the files to the hub | |
| !git push | |
| ``` | |
| Now, you should see your `handler.py` and `requirements.txt` in your repository in the | |
| [“Files and version”](https://huggingface.co/philschmid/distilbert-base-uncased-emotion/tree/main) tab. | |
| ### 6. Deploy your Custom Handler as an Inference Endpoint | |
| The last step is to deploy your Custom Handler as an Inference Endpoint. You can deploy your Custom Handler like you would a regular | |
| Inference Endpoint. Add your repository, select your cloud and region, your instance and security setting, and deploy. | |
| When creating your Endpoint, the Inference Endpoint Service will check for an available and valid `handler.py`, and will use it for | |
| serving requests no matter which “Task” you select. | |
| _Note: In your [Inference Endpoints dashboard](https://ui.endpoints.huggingface.co/), the Task for this Endpoint should now be set | |
| to Custom_ | |
| ## Examples | |
| There are a few examples on the [Hugging Face Hub](https://huggingface.co/models?other=endpoints-template) from where you can take | |
| inspiration or directly use them. The repositories are tagged with `endpoints-template` and can be found under this | |
| [link](https://huggingface.co/models?other=endpoints-template). | |
| You'll find examples are for: | |
| * [Optimum and ONNX Runtime](https://huggingface.co/philschmid/distilbert-onnx-banking77) | |
| * [Image Embeddings with BLIP](https://huggingface.co/florentgbelidji/blip_image_embeddings) | |
| * [TrOCR for OCR Detection](https://huggingface.co/philschmid/trocr-base-printed) | |
| * [Optimized Sentence Transformers with Optimum](https://huggingface.co/philschmid/all-MiniLM-L6-v2-optimum-embeddings) | |
| * [Pyannote Speaker diarization](https://huggingface.co/philschmid/pyannote-speaker-diarization-endpoint) | |
| * [LayoutLM](https://huggingface.co/philschmid/layoutlm-funsd) | |
| * [Flair NER](https://huggingface.co/philschmid/flair-ner-english-ontonotes-large) | |
| * [GPT-J 6B Single GPU](https://huggingface.co/philschmid/gpt-j-6B-fp16-sharded) | |
| * [Donut Document understanding](https://huggingface.co/philschmid/donut-base-finetuned-cord-v2) | |
| * [SetFit classifier](https://huggingface.co/philschmid/setfit-ag-news-endpoint) | |
| ## Create your transcription endpoint | |
| First, we need to create an Inference Endpoint for audio transcription. We'll use OpenAI's Whisper model for high-quality speech recognition. | |
| Start by navigating to the Inference Endpoints UI, and once you have logged in you should see a button for creating a new Inference Endpoint. Click the "New" button. | |
| 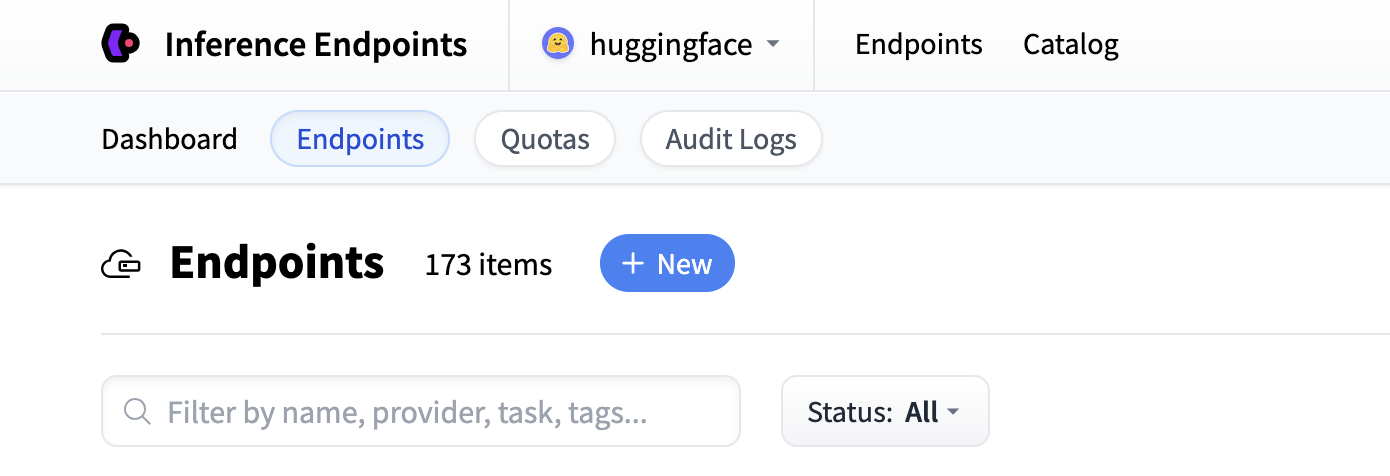 | |
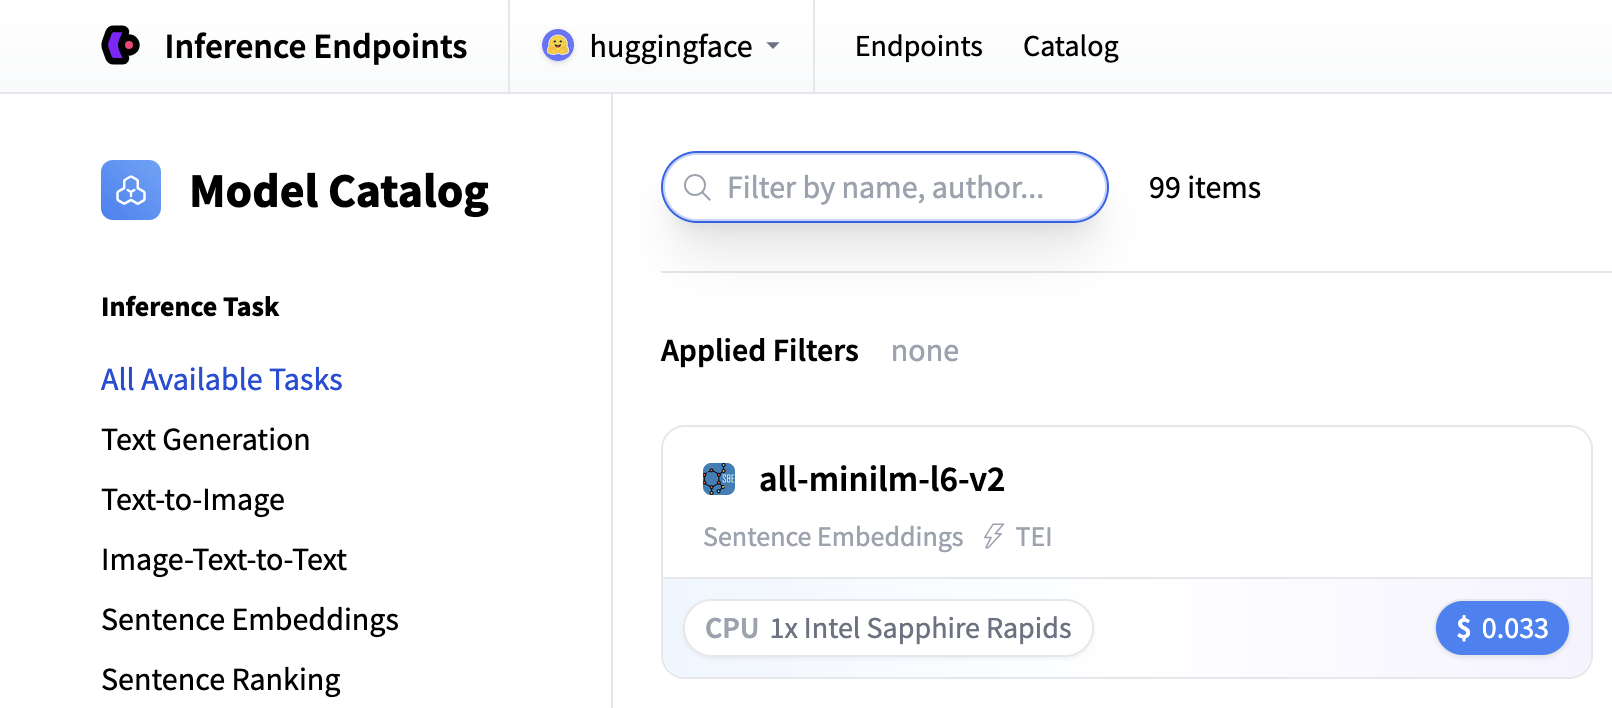
| From there you'll be directed to the catalog. The Model Catalog consists of popular models which have tuned configurations to work as one-click deploys. You can filter by name, task, price of the hardware and much more. | |
|  | |
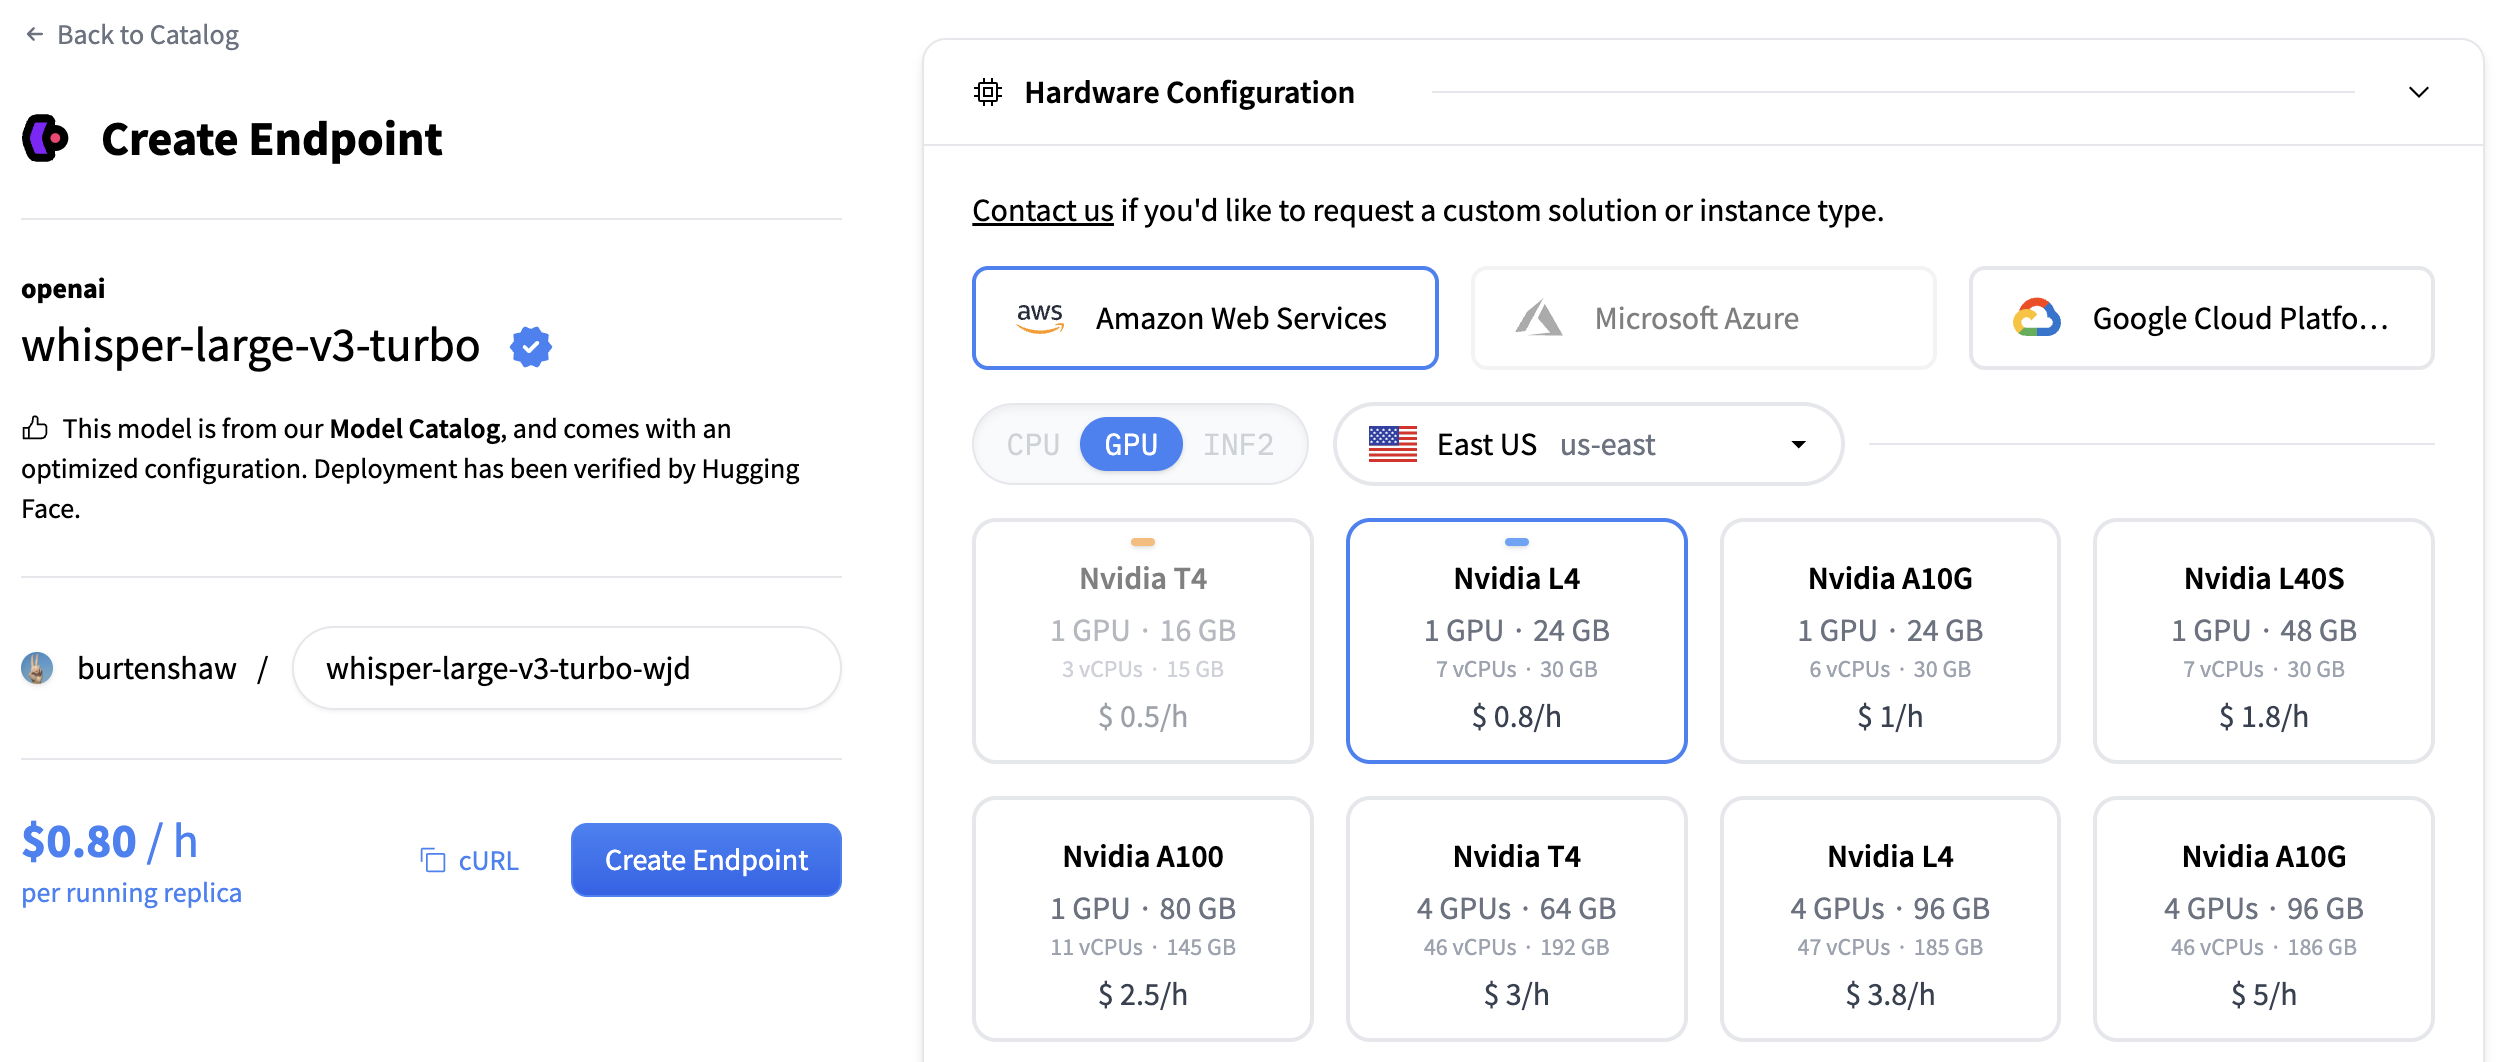
| Search for "whisper" to find transcription models, or you can create a custom endpoint with [openai/whisper-large-v3](https://huggingface.co/openai/whisper-large-v3). This model provides excellent transcription quality for multiple languages and handles various audio formats. | |
| For transcription models, we recommend: | |
| - **GPU**: NVIDIA L4 or A10G for good performance with audio processing | |
| - **Instance Size**: x1 (sufficient for most transcription workloads) | |
| - **Auto-scaling**: Enable scale-to-zero to save costs when not in use | |
| Click "Create Endpoint" to deploy your transcription service. | |
|  | |
| Your endpoint will take about 5 minutes to initialize. Once it's ready, you'll see it in the "Running" state. | |
| ## Create your text generation endpoint | |
| Now let's do the same again but now for a text generation model. For generating summaries and action items, we'll create a second endpoint using the [Qwen/Qwen3-1.7B](https://huggingface.co/Qwen/Qwen3-1.7B) model. | |
| Follow the same process: | |
| 1. Click "New" button in the Inference Endpoints UI | |
| 2. Search for `qwen3 1.7b` in the catalog | |
| 3. The NVIDIA L4 with x1 instance size is recommended for this model | |
| 4. Keep the default settings (scale-to-zero enabled, 1-hour timeout) | |
| 5. Click "Create Endpoint" | |
| This model is optimized for text generation tasks and will provide excellent summarization capabilities. Both endpoints will take about 3-5 minutes to initialize. | |
| ## Test your endpoints | |
| Once your endpoints are running, you can test them in the playground. The transcription endpoint will accept audio files and return text transcripts. | |
| 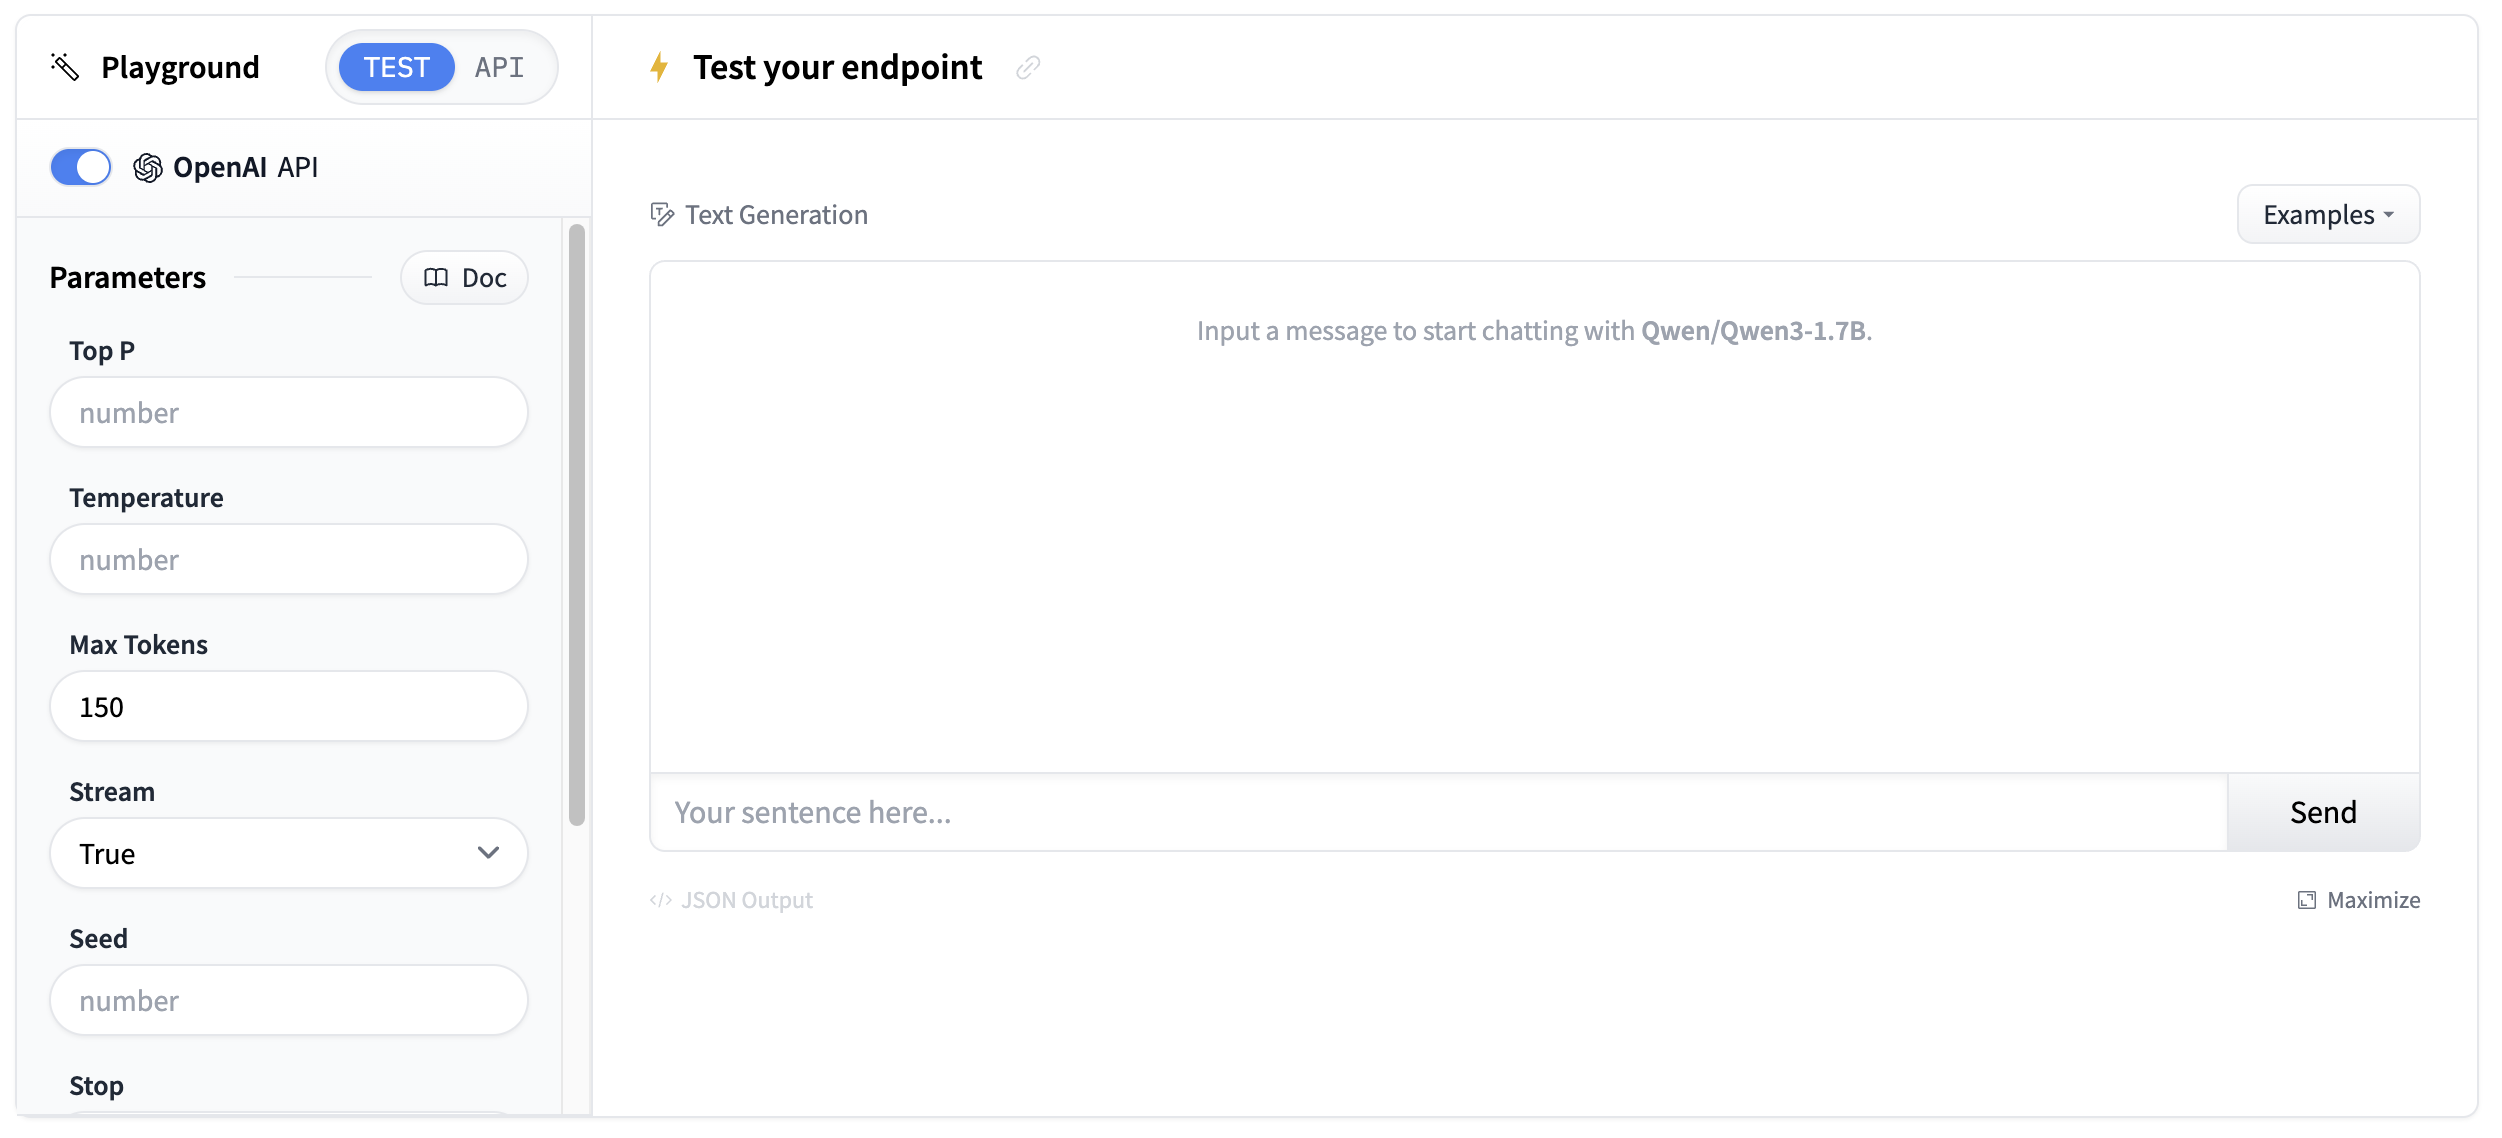 | |
| Test with a short audio sample to verify the transcription quality. | |
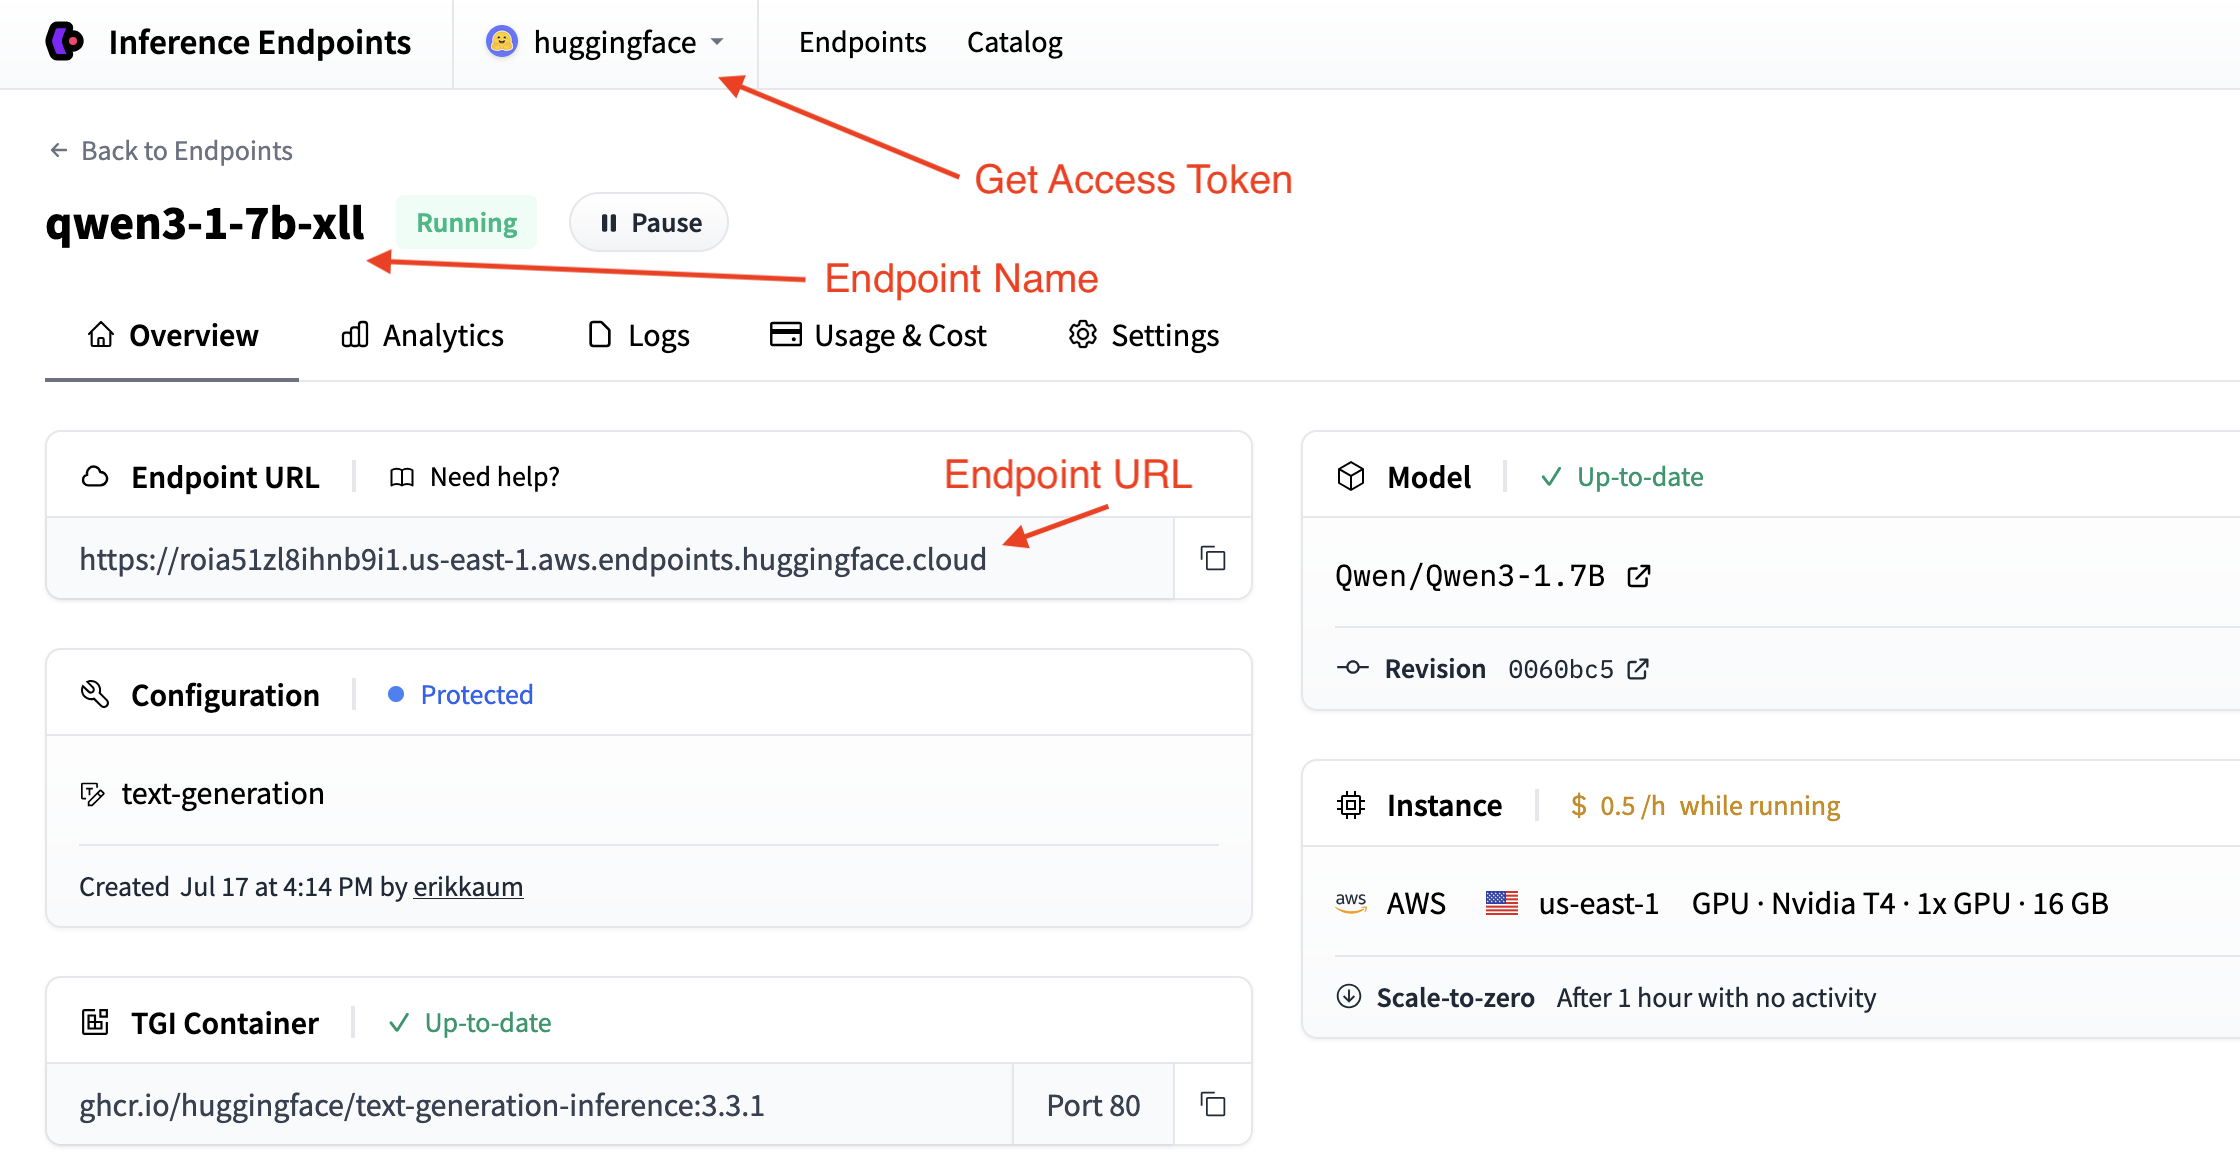
| ## Get your endpoint details | |
| You'll need the endpoint details from your [endpoints page](https://endpoints.huggingface.co/): | |
| - **Base URL**: `https://.endpoints.huggingface.cloud/v1/` | |
| - **Model name**: The name of your endpoint | |
| - **Token**: Your HF token from [settings](https://huggingface.co/settings/tokens) | |
|  | |
| You can validate your details by testing your endpoint out in the command line with curl. | |
| ```sh | |
| curl "" \ | |
| -X POST \ | |
| --data-binary '@' \ | |
| -H "Accept: application/json" \ | |
| -H "Content-Type: audio/flac" \ | |
| ``` | |
| ## Building the transcription app | |
| Now let's build a transcription application step by step. We'll break it down into logical blocks to create a complete solution that can transcribe audio and generate intelligent summaries. | |
| ### Step 1: Set up dependencies and imports | |
| We'll use the `requests` library to connect to both endpoints and `gradio` to create the interface. Let's install the required packages: | |
| ```bash | |
| pip install gradio requests | |
| ``` | |
| Then, set up your imports in a new Python file: | |
| ```python | |
| import os | |
| import gradio as gr | |
| import requests | |
| ``` | |
| ### Step 2: Configure your endpoint connections | |
| Set up the configuration to connect to both your transcription and summarization endpoints based on the details you collected in the previous steps. | |
| ```python | |
| # Configuration for both endpoints | |
| TRANSCRIPTION_ENDPOINT = "https://your-whisper-endpoint.endpoints.huggingface.cloud/api/v1/audio/transcriptions" | |
| SUMMARIZATION_ENDPOINT = "https://your-qwen-endpoint.endpoints.huggingface.cloud/v1/chat/completions" | |
| HF_TOKEN = os.getenv("HF_TOKEN") # Your Hugging Face Hub token | |
| # Headers for authentication | |
| headers = { | |
| "Authorization": f"Bearer {HF_TOKEN}" | |
| } | |
| ``` | |
| Your endpoints are now configured to handle both audio transcription and text summarization. | |
| You might also want to use `os.getenv` for your endpoint details. | |
| ### Step 3: Create the transcription function | |
| Next, we'll create a function to handle audio file uploads and transcription: | |
| ```python | |
| def transcribe_audio(audio_file_path): | |
| """Transcribe audio using direct requests to the endpoint""" | |
| # Read audio file and prepare for upload | |
| with open(audio_file_path, "rb") as audio_file: | |
| # Read the audio file as binary data and represent it as a file object | |
| files = {"file": audio_file.read()} | |
| # Make the request to the transcription endpoint | |
| response = requests.post(TRANSCRIPTION_ENDPOINT, headers=headers, files=files) | |
| # Check if the request was successful | |
| if response.status_code == 200: | |
| result = response.json() | |
| return result.get("text", "No transcription available") | |
| else: | |
| return f"Error: {response.status_code} - {response.text}" | |
| ``` | |
| The transcription endpoint expects a file upload in the `files` parameter. Make sure to read the audio file as binary data and pass it correctly to the API. | |
| ### Step 4: Create the summarization function | |
| Now we'll create a function to generate summaries from the transcribed text. We'll do some simple prompt engineering to get the best results. | |
| ```python | |
| def generate_summary(transcript): | |
| """Generate summary using requests to the chat completions endpoint""" | |
| # define a nice prompt to get the best results for our use case | |
| prompt = f""" | |
| Analyze this meeting transcript and provide: | |
| 1. A concise summary of key points | |
| 2. Action items with responsible parties | |
| 3. Important decisions made | |
| Transcript: {transcript} | |
| Format with clear sections: | |
| ## Summary | |
| ## Action Items | |
| ## Decisions Made | |
| """ | |
| # Prepare the payload using the Messages API format | |
| payload = { | |
| "model": "your-qwen-endpoint-name", # Use the name of your endpoint | |
| "messages": [{"role": "user", "content": prompt}], | |
| "max_tokens": 1000, # we can also set a max_tokens parameter to limit the length of the response | |
| "temperature": 0.7, # we might want to set lower temperature for more deterministic results | |
| "stream": False # we don't need streaming for this use case | |
| } | |
| # Headers for chat completions | |
| chat_headers = { | |
| "Accept": "application/json", | |
| "Content-Type": "application/json", | |
| "Authorization": f"Bearer {HF_TOKEN}" | |
| } | |
| # Make the request | |
| response = requests.post(SUMMARIZATION_ENDPOINT, headers=chat_headers, json=payload) | |
| response.raise_for_status() | |
| # Parse the response | |
| result = response.json() | |
| return result["choices"][0]["message"]["content"] | |
| ``` | |
| ### Step 5: Wrap it all together | |
| Now let's build our Gradio interface. We'll use the `gr.Interface` class to create a simple interface that allows us to upload an audio file and see the transcript and summary. | |
| First, we'll create a main processing function that handles the complete workflow. | |
| ```python | |
| def process_meeting_audio(audio_file): | |
| """Main processing function that handles the complete workflow""" | |
| if audio_file is None: | |
| return "Please upload an audio file.", "" | |
| try: | |
| # Step 1: Transcribe the audio | |
| transcript = transcribe_audio(audio_file) | |
| # Step 2: Generate summary from transcript | |
| summary = generate_summary(transcript) | |
| return transcript, summary | |
| except Exception as e: | |
| return f"Error processing audio: {str(e)}", "" | |
| ``` | |
| Then, we can run that function in a Gradio interface. We'll add some descriptions and a title to make it more user-friendly. | |
| ```python | |
| # Create Gradio interface | |
| app = gr.Interface( | |
| fn=process_meeting_audio, | |
| inputs=gr.Audio(label="Upload Meeting Audio", type="filepath"), | |
| outputs=[ | |
| gr.Textbox(label="Full Transcript", lines=10), | |
| gr.Textbox(label="Meeting Summary", lines=8), | |
| ], | |
| title="🎤 AI Meeting Notes", | |
| description="Upload audio to get instant transcripts and summaries.", | |
| ) | |
| ``` | |
| That's it! You can now run the app locally with `python app.py` and test it out. | |
| Click to view the complete script | |
| ```python | |
| import gradio as gr | |
| import os | |
| import requests | |
| # Configuration for both endpoints | |
| TRANSCRIPTION_ENDPOINT = "https://your-whisper-endpoint.endpoints.huggingface.cloud/api/v1/audio/transcriptions" | |
| SUMMARIZATION_ENDPOINT = "https://your-qwen-endpoint.endpoints.huggingface.cloud/v1/chat/completions" | |
| HF_TOKEN = os.getenv("HF_TOKEN") # Your Hugging Face Hub token | |
| # Headers for authentication | |
| headers = { | |
| "Authorization": f"Bearer {HF_TOKEN}" | |
| } | |
| def transcribe_audio(audio_file_path): | |
| """Transcribe audio using direct requests to the endpoint""" | |
| # Read audio file and prepare for upload | |
| with open(audio_file_path, "rb") as audio_file: | |
| files = {"file": audio_file.read()} | |
| # Make the request to the transcription endpoint | |
| response = requests.post(TRANSCRIPTION_ENDPOINT, headers=headers, files=files) | |
| if response.status_code == 200: | |
| result = response.json() | |
| return result.get("text", "No transcription available") | |
| else: | |
| return f"Error: {response.status_code} - {response.text}" | |
| def generate_summary(transcript): | |
| """Generate summary using requests to the chat completions endpoint""" | |
| prompt = f""" | |
| Analyze this meeting transcript and provide: | |
| 1. A concise summary of key points | |
| 2. Action items with responsible parties | |
| 3. Important decisions made | |
| Transcript: {transcript} | |
| Format with clear sections: | |
| ## Summary | |
| ## Action Items | |
| ## Decisions Made | |
| """ | |
| # Prepare the payload using the Messages API format | |
| payload = { | |
| "model": "your-qwen-endpoint-name", # Use the name of your endpoint | |
| "messages": [{"role": "user", "content": prompt}], | |
| "max_tokens": 1000, | |
| "temperature": 0.7, | |
| "stream": False | |
| } | |
| # Headers for chat completions | |
| chat_headers = { | |
| "Accept": "application/json", | |
| "Content-Type": "application/json", | |
| "Authorization": f"Bearer {HF_TOKEN}" | |
| } | |
| # Make the request | |
| response = requests.post(SUMMARIZATION_ENDPOINT, headers=chat_headers, json=payload) | |
| response.raise_for_status() | |
| # Parse the response | |
| result = response.json() | |
| return result["choices"][0]["message"]["content"] | |
| def process_meeting_audio(audio_file): | |
| """Main processing function that handles the complete workflow""" | |
| if audio_file is None: | |
| return "Please upload an audio file.", "" | |
| try: | |
| # Step 1: Transcribe the audio | |
| transcript = transcribe_audio(audio_file) | |
| # Step 2: Generate summary from transcript | |
| summary = generate_summary(transcript) | |
| return transcript, summary | |
| except Exception as e: | |
| return f"Error processing audio: {str(e)}", "" | |
| # Create Gradio interface | |
| app = gr.Interface( | |
| fn=process_meeting_audio, | |
| inputs=gr.Audio(label="Upload Meeting Audio", type="filepath"), | |
| outputs=[ | |
| gr.Textbox(label="Full Transcript", lines=10), | |
| gr.Textbox(label="Meeting Summary", lines=8), | |
| ], | |
| title="🎤 AI Meeting Notes", | |
| description="Upload audio to get instant transcripts and summaries.", | |
| ) | |
| if __name__ == "__main__": | |
| app.launch() | |
| ``` | |
|  | |
| ## Deploy your transcription app | |
| Now, let's deploy it to Hugging Face Spaces so everyone can use it! | |
| 1. **Create a new Space**: Go to [huggingface.co/new-space](https://huggingface.co/new-space) | |
| 2. **Choose Gradio SDK** and make it public | |
| 3. **Upload your files**: Upload `app.py` and any requirements | |
| 4. **Add your token**: In Space settings, add `HF_TOKEN` as a secret | |
| 5. **Configure hardware**: Consider GPU for faster processing | |
| 6. **Launch**: Your app will be live at `https://huggingface.co/spaces/your-username/your-space-name` | |
| Your transcription app is now ready to handle meeting notes, interviews, podcasts, and any other audio content that needs to be transcribed and summarized! | |
| ## Next steps | |
| Great work! You've now built a complete transcription application with intelligent summarization. | |
| Here are some ways to extend your transcription app: | |
| - **Multi-language support**: Add language detection and support for multiple languages | |
| - **Speaker identification**: Use a model from the hub with speaker diarization capabilities. | |
| - **Custom prompts**: Allow users to customize the summary format and style | |
| - **Implement Text-to-Speech**: Use a model from the hub to convert your summary to another audio file! | |
| # Configuration | |
| This section describes the configuration options available when creating a new inference endpoint. Each section of | |
| the interface allows fine-grained control over how the model is deployed, accessed, and scaled. | |
| ## Endpoint name, model and organization | |
| In the top left you can: | |
| - change the name of the inference endpoint | |
| - verify to which organization you're deploying this model | |
| - verify which model you are deploying | |
| - and which Hugging Face Hub repo you are deploying this model from | |
| 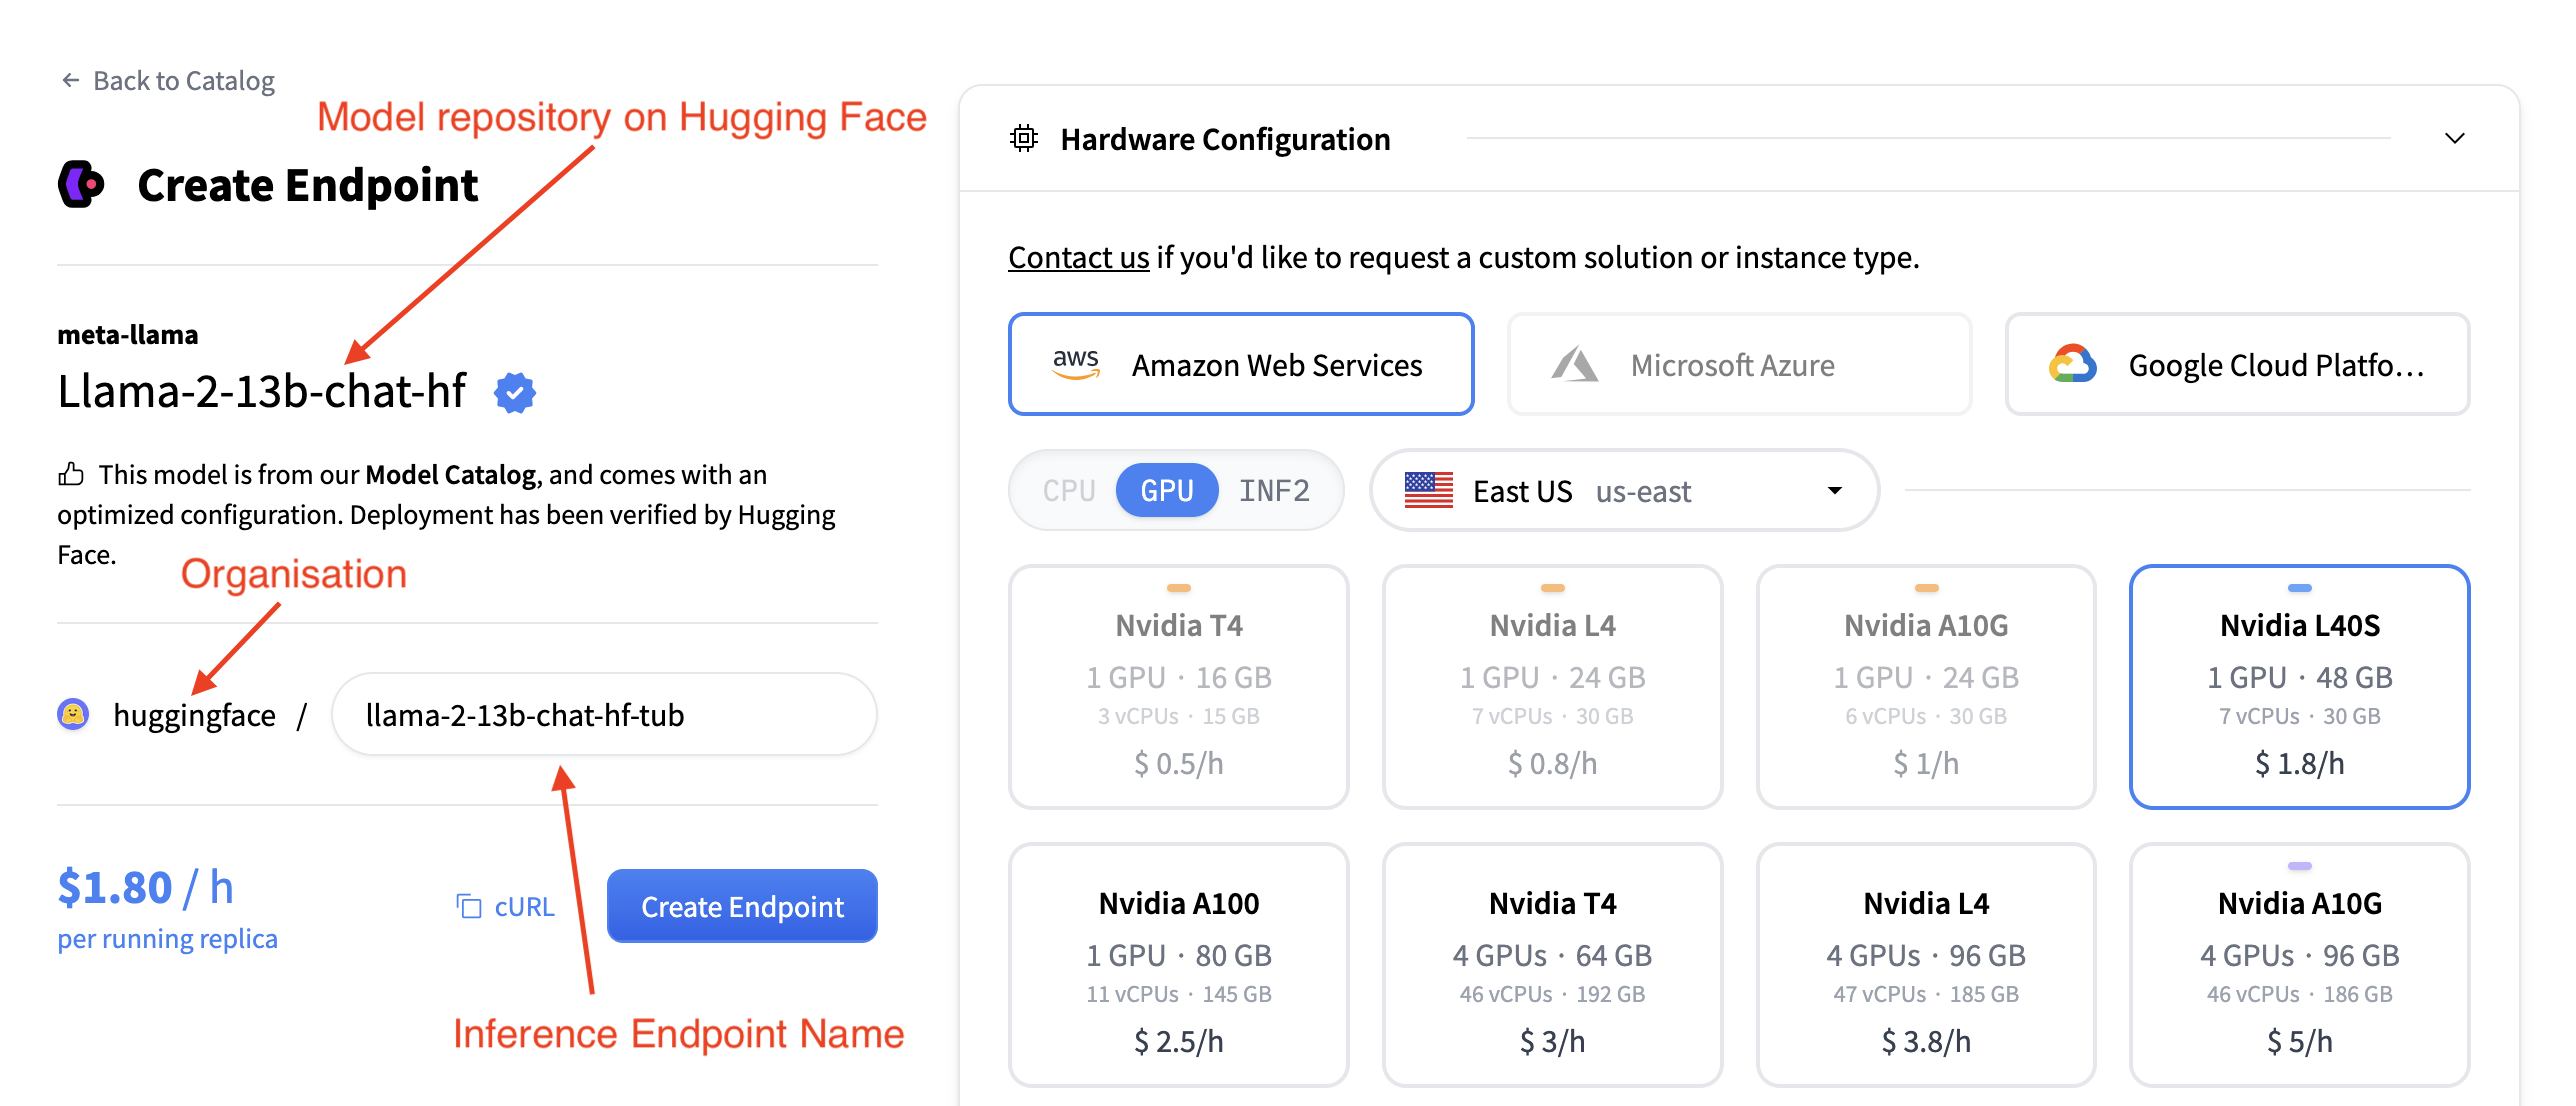 | |
| ## Hardware Configuration | |
| The Hardware Configuration section allows you to choose the compute backend used to host the model. | |
| You can select from three major cloud providers: | |
| - Amazon Web Services (AWS) | |
| - Microsoft Azure | |
| - Google Cloud Platform | |
| 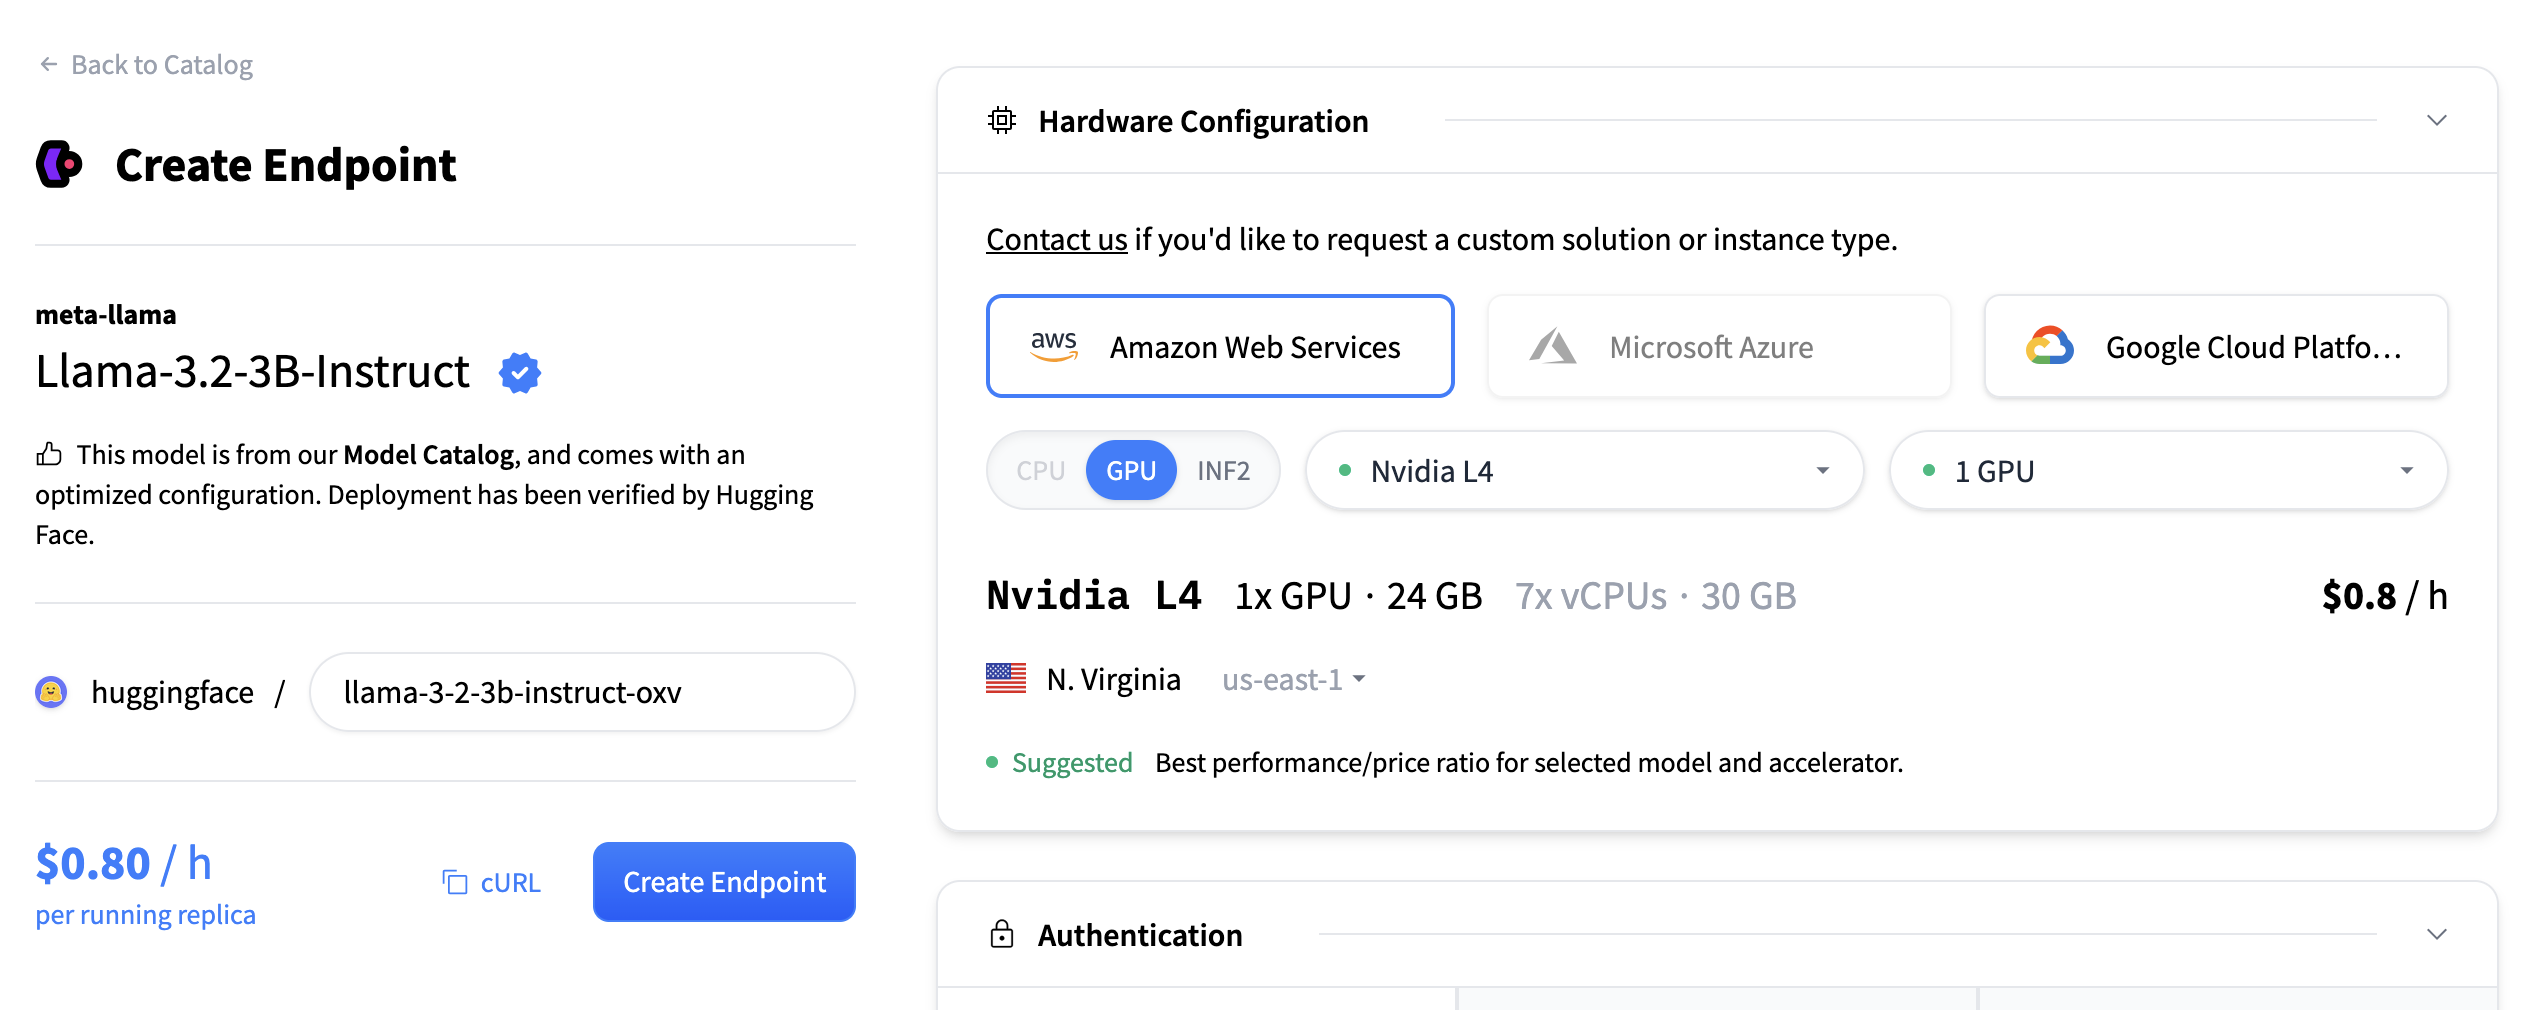 | |
| You must also choose an accelerator type: | |
| - CPU | |
| - GPU | |
| - INF2 (AWS Inferentia) | |
| Additionally, you can select the deployment region (e.g., East US) using the dropdown menu. Once the | |
| provider, accelerator, and region are chosen, a list of available instance types is displayed. Each instance tile includes: | |
| - GPU Type and Count | |
| - Memory (e.g., 48 GB) | |
| - vCPUs and RAM | |
| - Hourly Pricing (e.g., $1.80 / h) | |
| You can select a tile to choose that instance type for your deployment. Instances that are incompatible or unavailable in the | |
| selected region are grayed out and unclickable. | |
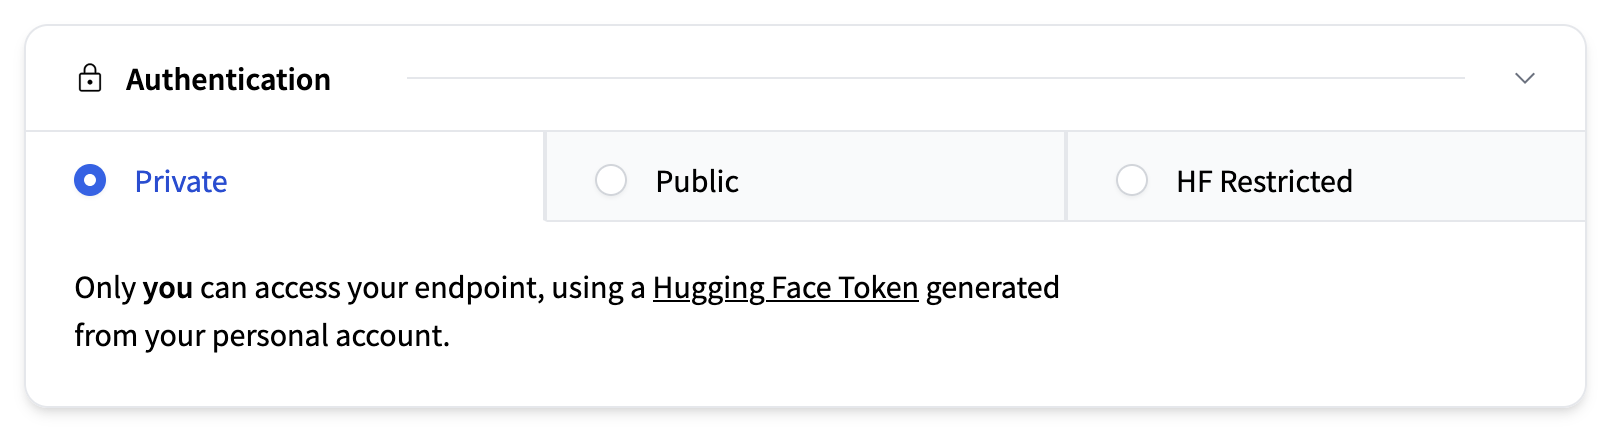
| ## Authentication | |
| This section determines who can access your deployed endpoint. Available options are: | |
| - **Private (default)**: Accessible only to you, or members of your Hugging Face organization, using a personal HF access token. | |
| - **Public**: Anyone can access your endpoint, without authentication. | |
| - **Authenticated**: Anyone with a Hugging Face account can access it, using their personal HF access tokens. | |
| Additionally, if you deploy your Inference Endpoint in AWS, you can use **AWS PrivateLink** for an intra-region secured connection to your AWS VPN. | |
|  | |
| ## Autoscaling | |
| The Autoscaling section configures how many replicas of your model run and whether the system scales down to zero during periods of inactivity. For more | |
| information we recommend reading the [in-depth guide on autoscaling](./autoscaling). | |
| 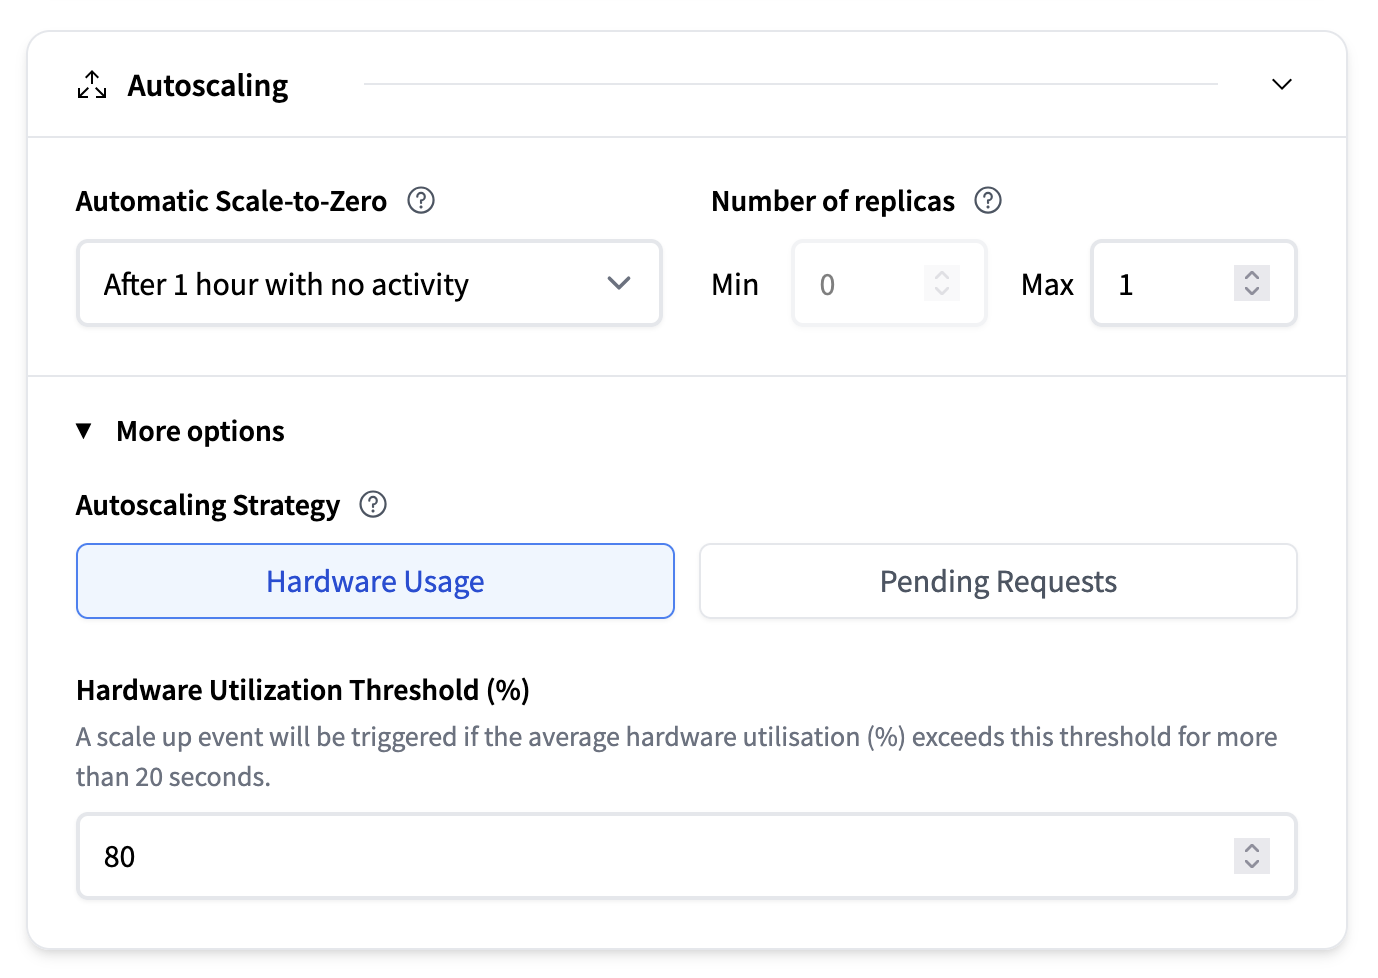 | |
| - **Automatic Scale-to-Zero**: A dropdown lets you choose how long the system should wait after the last request before | |
| scaling down to zero. Default is after 1 hour with no activity. | |
| - **Number of Replicas**: | |
| - Min: Minimum number of replicas to keep running. Note that enabling automatic scale-to-zero requires setting this to 0. | |
| - Max: Maximum number of replicas allowed (e.g., 1) | |
| - **Autoscaling strategy**: | |
| - Based on hardware usage: For example, a scale up will be triggered if the average hardware utilisation (%) exceeds this threshold for more than 20 seconds. | |
| - Pending requests: A scale up event will be triggered if the average number of pending requests exceeds this threshold for more than 20 seconds. | |
| ## Inference Engine Configuration | |
| This section allows you to specify how the container hosting your model behaves. This setting depends on the selected inference engine. | |
| For configuration details, please read the Inference Engine section. | |
|  | |
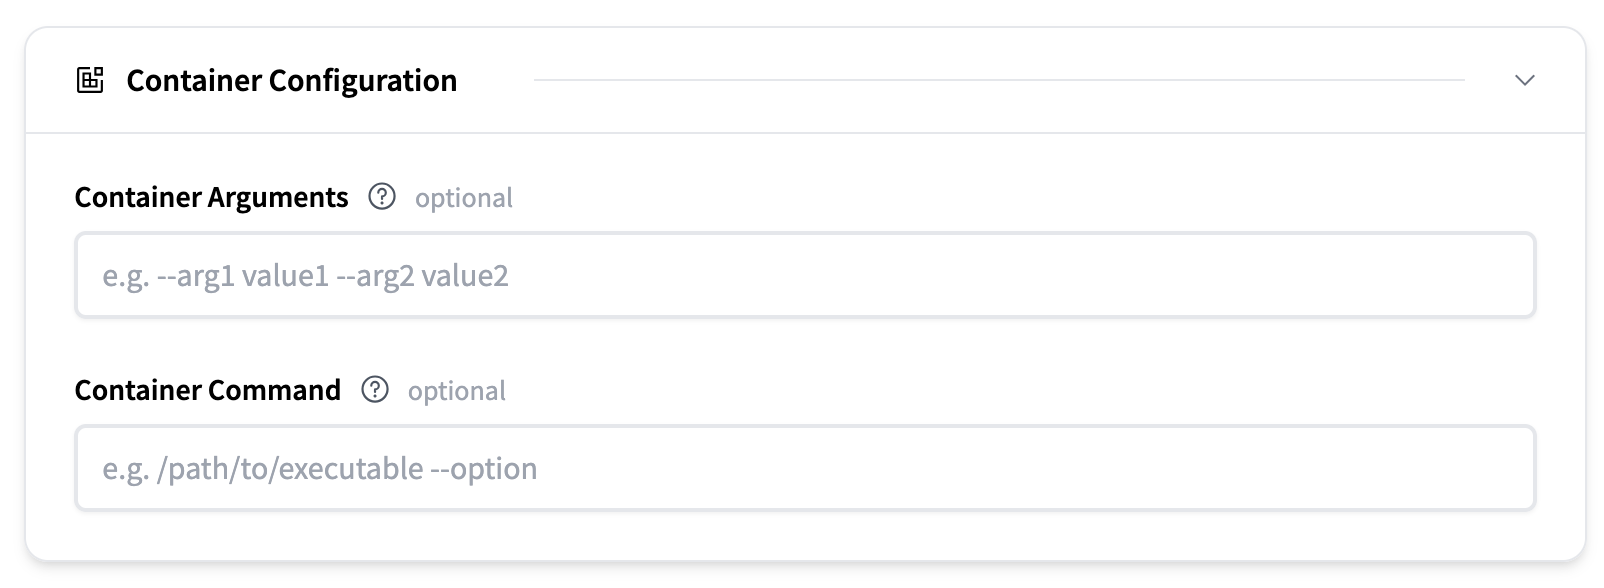
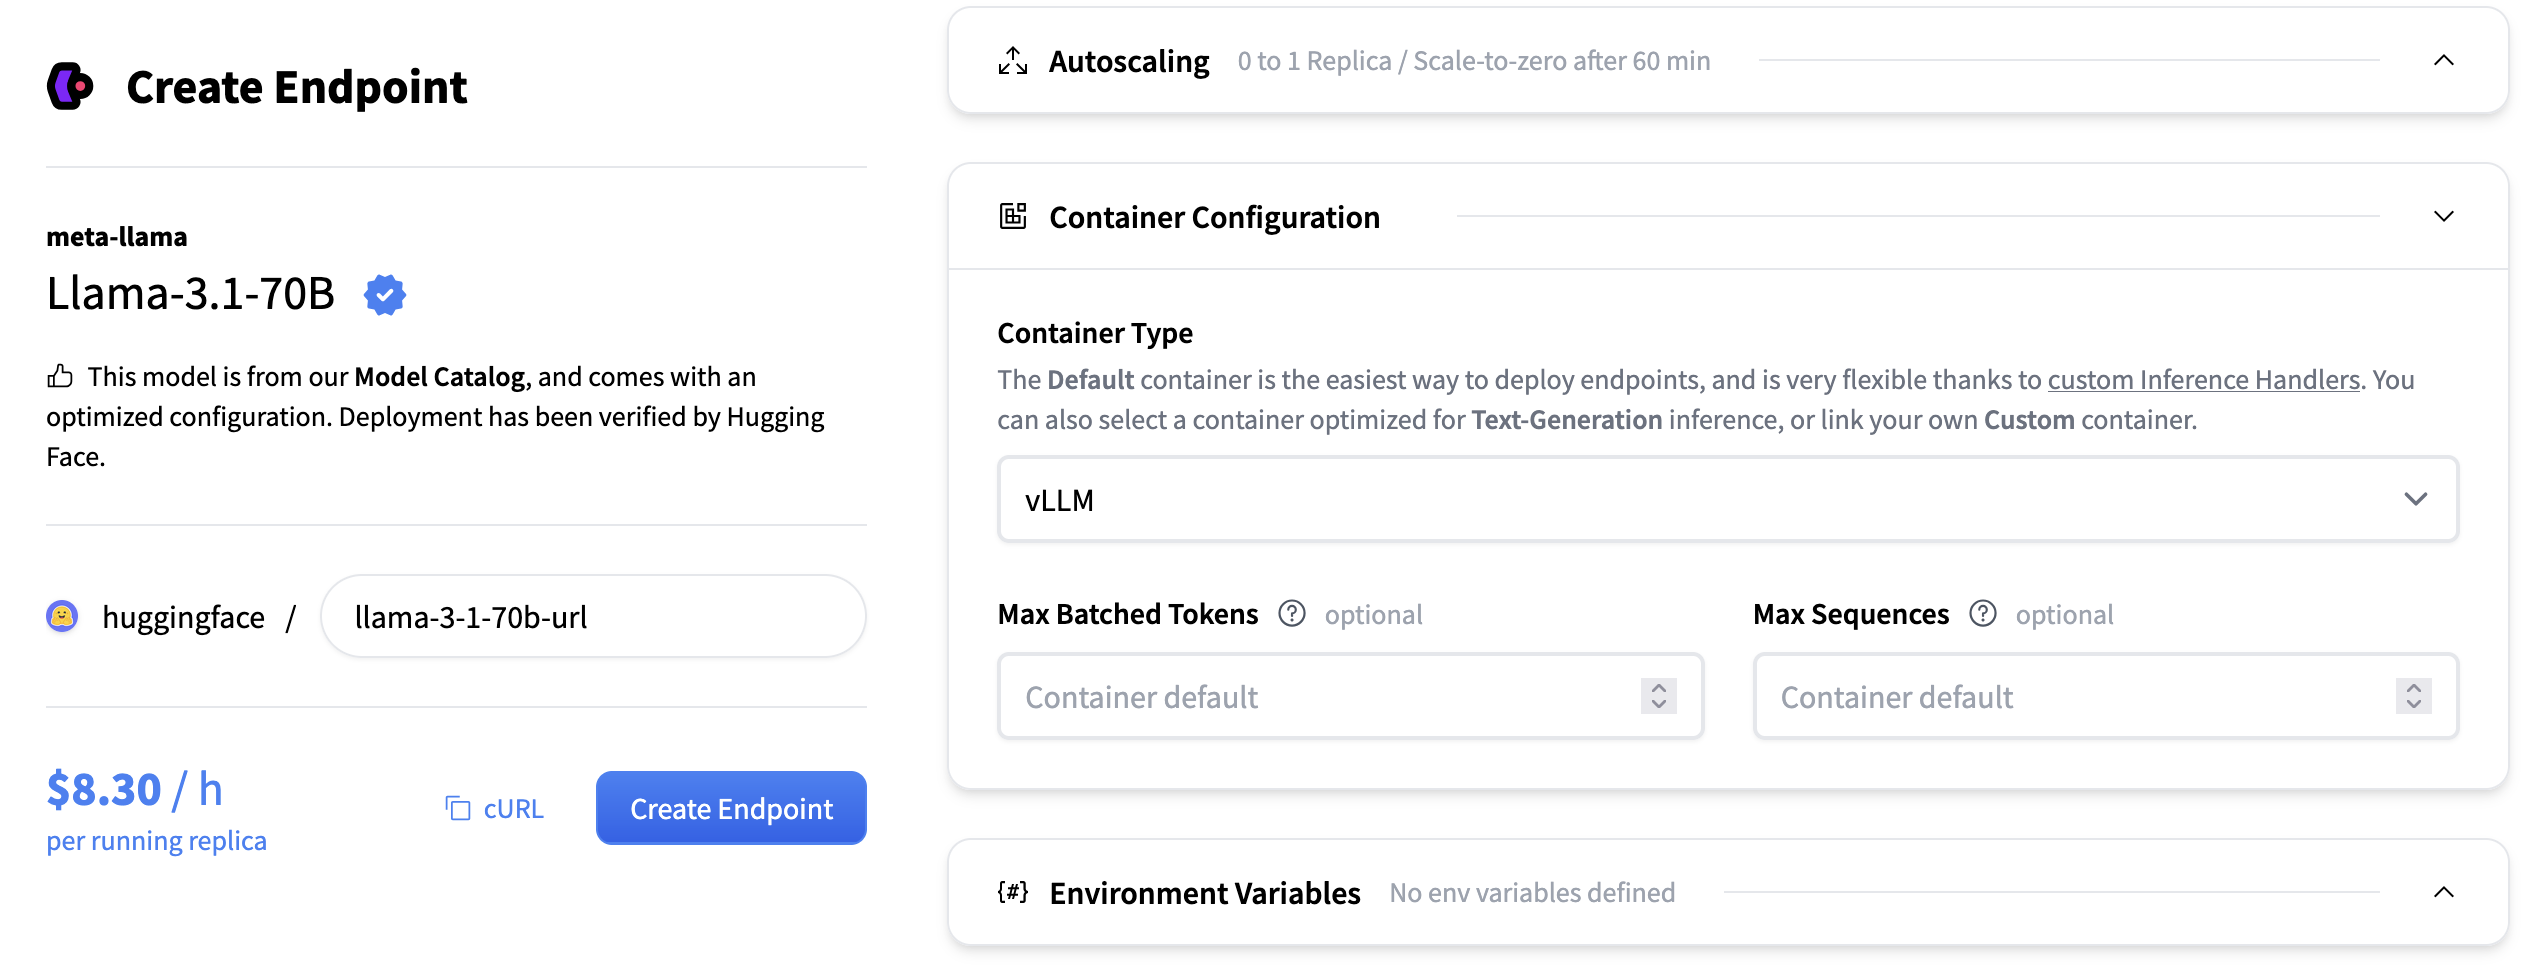
| ## Container Configuration | |
| Here you can edit the container arguments and container command. | |
|  | |
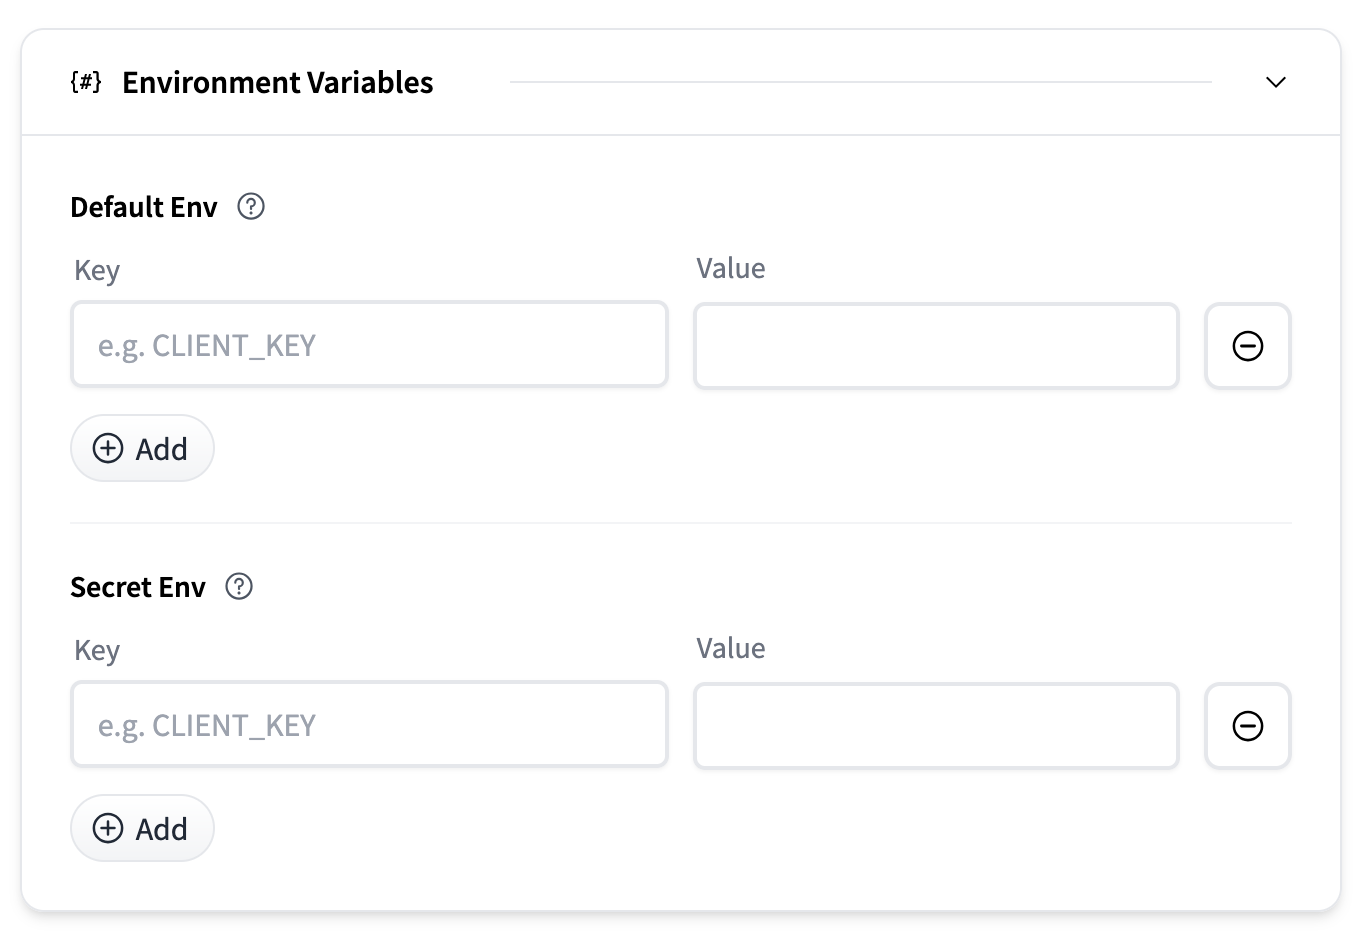
| ## Environment Variables | |
| Environment variables can be provided to customize container behavior or pass secrets. | |
| - **Default Env**: Key-value pairs passed as plain environment variables. | |
| - **Secret Env**: Key-value pairs stored securely and injected at runtime. | |
| Each section allows you to add multiple entries using the Add button. | |
|  | |
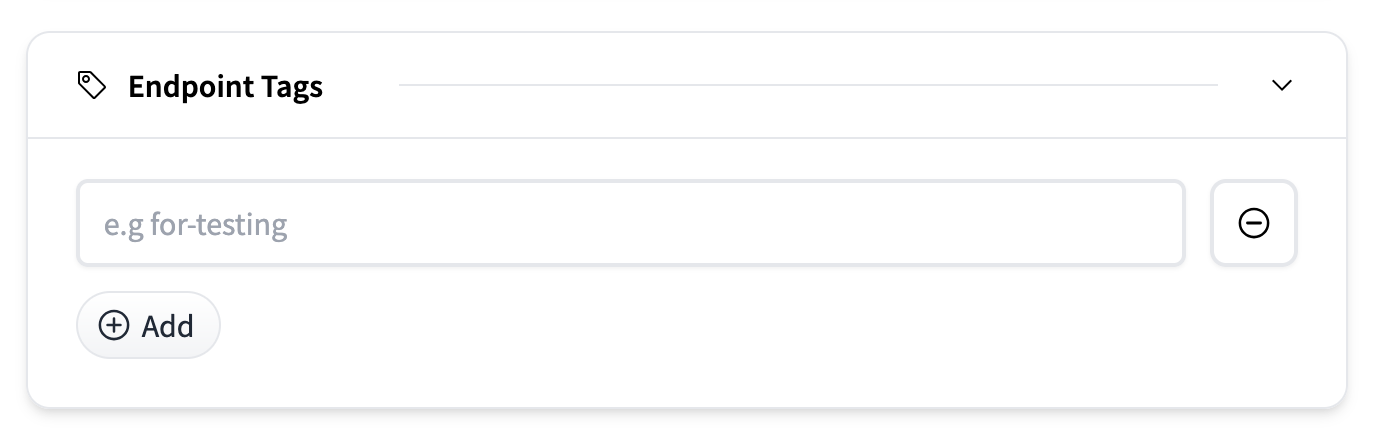
| ## Endpoint Tags | |
| You can label endpoints with tags (e.g., for-testing) to help organize and manage deployments across environments or teams. In the dashboard | |
| you will be able to filter and sort endpoints based on these tags. | |
| Tags are plain text labels added via the Add button. | |
|  | |
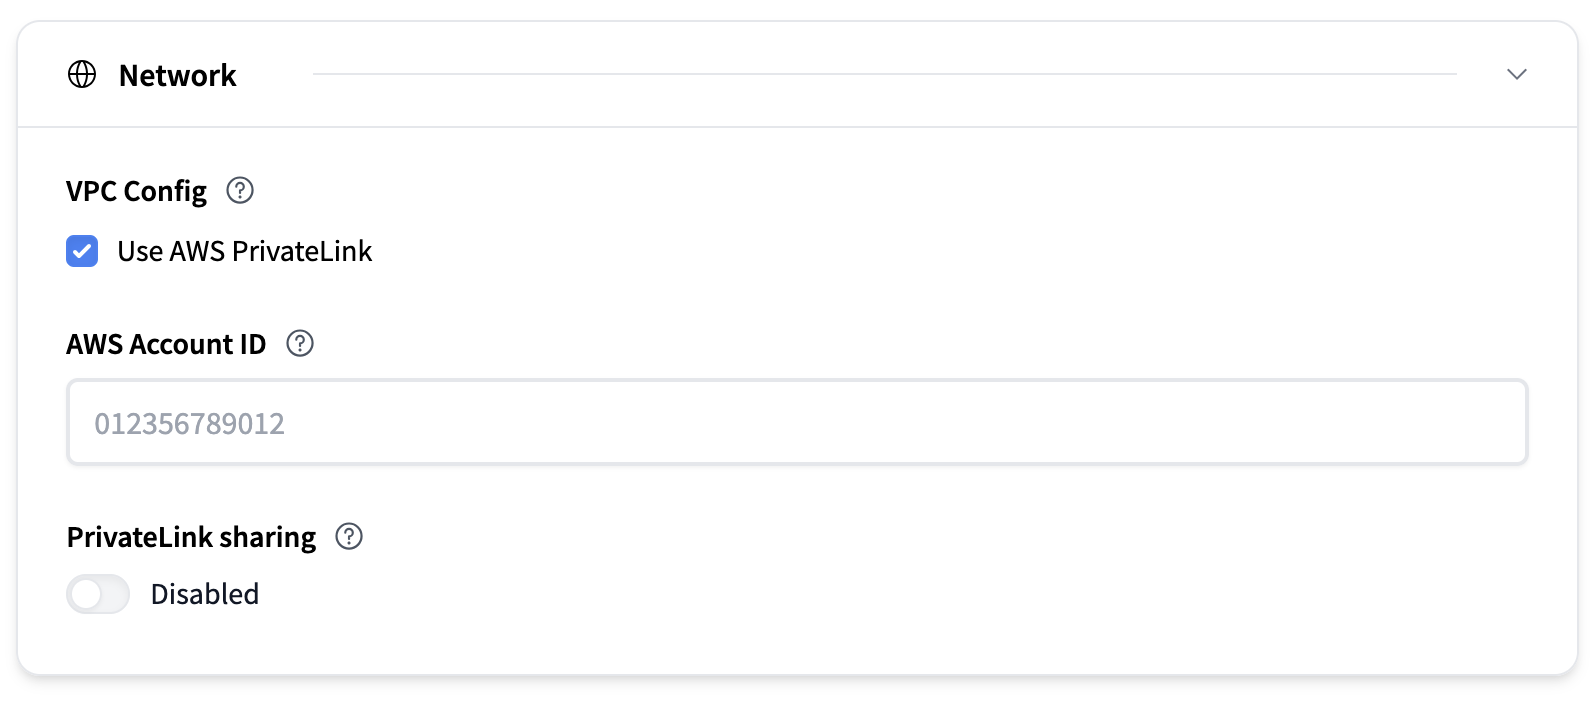
| ## Network | |
| This section determines from where your deployed endpoint can be accessed. | |
| By default, your endpoint is accessible from the Internet, and secured with TLS/SSL. Endpoints deployed on an AWS instance can use AWS PrivateLink to restrict access to a specific VPC. | |
| To configure it you need to: | |
| 1. check the box to activate AWS PrivateLink for your endpoint. | |
| 2. Add your AWS Account ID: You need to provide the AWS ID of the account that owns the VPC you want to restrict access to. | |
| Optionally you can enable PrivateLink Sharing. This will enable sharing of the same PrivateLink between different endpoints. | |
|  | |
| ## Advanced Settings | |
| Advanced Settings offer more fine-grained control over deployment. | |
|  | |
| - **Commit Revision**: Optionally specify a commit hash to which revision of the model repository on the Hugging Face Hub | |
| you want to download the model artifacts from | |
| - **Task**: Defines the type of model task. This is usually inferred from the model repository. | |
| - **Container Arguments**: Pass CLI-style arguments to the container entrypoint. | |
| - **Container Command**: Override the container entrypoint entirely. | |
| - **Download Pattern**: Defines which model files are downloaded. | |
| # vLLM | |
| vLLM is a high-performance, memory-efficient inference engine for open-source LLMs. It delivers efficient scheduling, KV-cache handling, | |
| batching, and decoding—all wrapped in a production-ready server. For most use cases, TGI, vLLM, and SGLang will be equivalently good options. | |
| **Core features**: | |
| - **PagedAttention for memory efficiency** | |
| - **Continuous batching** | |
| - **Optimized CUDA/HIP execution** | |
| - **Speculative decoding & chunked prefill** | |
| - **Multi-backend and hardware support**: Runs across NVIDIA, AMD, and AWS Neuron to name a few | |
| ## Configuration | |
|  | |
| - **Max Number of Sequences**: The maximum number of sequences (requests) that can be processed together in a single batch. Controls | |
| the batch size by sequence count, affecting throughput and memory usage. For example, if max_num_seqs=8, up to 8 different prompts can | |
| be handled at once, regardless of their individual lengths, as long as the total token count also fits within the Max Number of Batched Tokens. | |
| - **Max Number of Batched Tokens**: The maximum total number of tokens (summed across all sequences) that can be processed in a single | |
| batch. Limits batch size by token count, balancing throughput and GPU memory allocation. | |
| - **Tensor Parallel Size**: The number of GPUs across which model weights are split within each layer. Increasing this allows larger | |
| models to run and frees up GPU memory for KV cache, but may introduce synchronization overhead. | |
| - **KV Cache DType**: the data type used for storing the key-value cache during generation. Options include "auto", "fp8", "fp8_e5m2", | |
| and "fp8_e4m3". Using lower precision types can reduce memory usage but may slightly impact generation quality. | |
| For more advanced configuration you can pass any of the [Engine Arguments that vLLM supports](https://docs.vllm.ai/en/stable/api/vllm/engine/arg_utils.html#vllm.engine.arg_utils.EngineArgs) | |
| as container arguments. For example changing the `enable_lora` to `true` would look like this: | |
|  | |
| ## Supported models | |
| vLLM has wide support for large language models and embedding models. We recommend reading the | |
| [supported models](https://docs.vllm.ai/en/stable/models/supported_models.html?h=supported+models) section in the vLLM documentation for a full list. | |
| vLLM also supports model implementations that are available in Transformers. Currently not all models work but support is planned for most | |
| decoder language models are supported, and vision language models. | |
| ## Parallelism and Scaling | |
| vLLM supports several parallelism strategies for distributed inference. The two most common ones are **Tensor Parallelism (TP)** and **Data Parallelism (DP)**. Understanding when and how to use each is essential for optimal performance. | |
| ### Default Behavior on Inference Endpoints | |
| When you create an endpoint, after you've selected an instance type (e.g., 4 × A10G, 8 × H100). The defaults are: | |
| - **`tensor_parallel_size`** = number of GPUs on the instance (shards the model across all GPUs) | |
| - **`data_parallel_size`** = 1 (single copy of the model) | |
| This default configuration prioritizes fitting larger models by using all available GPU memory. However, you might want to tweak these settings if your model fits on fewer GPUs than your instance has and you want **higher throughput** by running multiple copies of the model. | |
| ### Tensor Parallelism (TP) | |
| Tensor parallelism splits the model's weights across multiple GPUs within each layer. Each GPU holds a slice of the model and computes its portion of the output, then synchronizes with other GPUs. | |
| **When to use:** Your model is too large to fit on a single GPU. You must set `tensor_parallel_size` to at least the number of GPUs required to hold the model in memory. | |
| **Example:** | |
| - **Llama 3 8B (FP16)** requires ~16GB → fits on 1 GPU → `tensor_parallel_size=1` | |
| - **Llama 3 70B (FP16)** requires ~140GB → needs 2 × 80GB GPUs → `tensor_parallel_size=2` | |
| - **Llama 3.1 405B (FP16)** requires ~810GB → needs 8 × 80GB GPUs → `tensor_parallel_size=8` | |
| ### Data Parallelism (DP) | |
| Data parallelism runs multiple independent copies of the model on different GPUs. Each copy handles different requests independently, increasing throughput. | |
| **When to use:** You want higher throughput and your model fits on fewer GPUs than your instance provides. | |
| **Configuration:** Set `data_parallel_size` to the number of copies you want. | |
| ### Combining TP and DP | |
| On multi-GPU instances, you can combine both strategies. The key formula is `tensor_parallel_size × data_parallel_size = total GPUs on instance`. | |
| #### Optimizing for Throughput | |
| If your model fits on a single GPU but you want high throughput, lower TP and increase DP to run multiple copies of the model. | |
| **Example:** Serving Llama 3 8B (~16GB) on a 4 × A100 80GB instance: | |
| | Configuration | TP | DP | Copies | Behavior | | |
| |--------------|----|----|--------|----------| | |
| | Default | 4 | 1 | 1 | Model sharded across all 4 GPUs | | |
| | Balanced | 2 | 2 | 2 | 2 copies, each sharded across 2 GPUs | | |
| | Max throughput | 1 | 4 | 4 | 4 independent copies | | |
| There's always a trade-off: | |
| - **Higher DP** (more copies) → higher throughput, but each copy has less memory for KV cache (shorter context) | |
| - **Higher TP** (fewer copies) → more memory per copy for KV cache (longer context), but lower throughput | |
| For example, `tensor_parallel_size=2` and `data_parallel_size=2` gives you 2 copies that can each handle longer contexts than the max throughput configuration, while still doubling your request capacity compared to the default. | |
| ### Choosing the Right Configuration | |
| 1. **Calculate minimum TP:** How many GPUs are needed to fit your model in memory? | |
| 2. **Set TP to that minimum** | |
| 3. **Set DP** = (total instance GPUs) ÷ TP | |
| **Example:** You want to deploy Llama 3 70B on 8 × H100 80GB. | |
| - Model needs ~140GB → minimum 2 × 80GB GPUs → `tensor_parallel_size=2` | |
| - Instance has 8 GPUs → `data_parallel_size=8÷2=4` | |
| - Result: 4 copies, each on 2 GPUs | |
| ### Common Mistakes | |
| | Configuration | Problem | Solution | | |
| |---------------|---------|----------| | |
| | TP=1, DP=1 for 7B on 4 × A10G | 3 GPUs sitting idle | Increase `data_parallel_size=4` | | |
| | TP=1 for 70B on single 80GB GPU | Out of memory | Use an instance with at least 2 × 80GB GPU and make sure `tensor_parallel_size=2` | | |
| | TP=2, DP=4 on 4 × A10G | Fails since 2 × 4 = 8 GPUs required, but only 4 available | Reduce to TP=2, DP=2 or TP=1, DP=4 | | |
| | TP=3, DP=1 on 4 × A10G | 1 GPU sits completely idle | Use TP=4 or TP=2 with DP=2 | | |
| ## References | |
| We also recommend reading the [vLLM documentation](https://docs.vllm.ai/en/stable/) for more in-depth information. | |
| ## Support | |
| To find answers to your questions, please refer to the [Documentation](https://docs.workflowai.com), ask a question in the [Q&A section of our GitHub Discussions](https://github.com/WorkflowAI/WorkflowAI/discussions/categories/q-a) or join our [Discord](https://discord.gg/auuf8DREZh). | |
| ## License | |
| WorkflowAI is licensed under the [Apache 2.0 License](./LICENSE). | |