
Spaces:
Paused

Paused
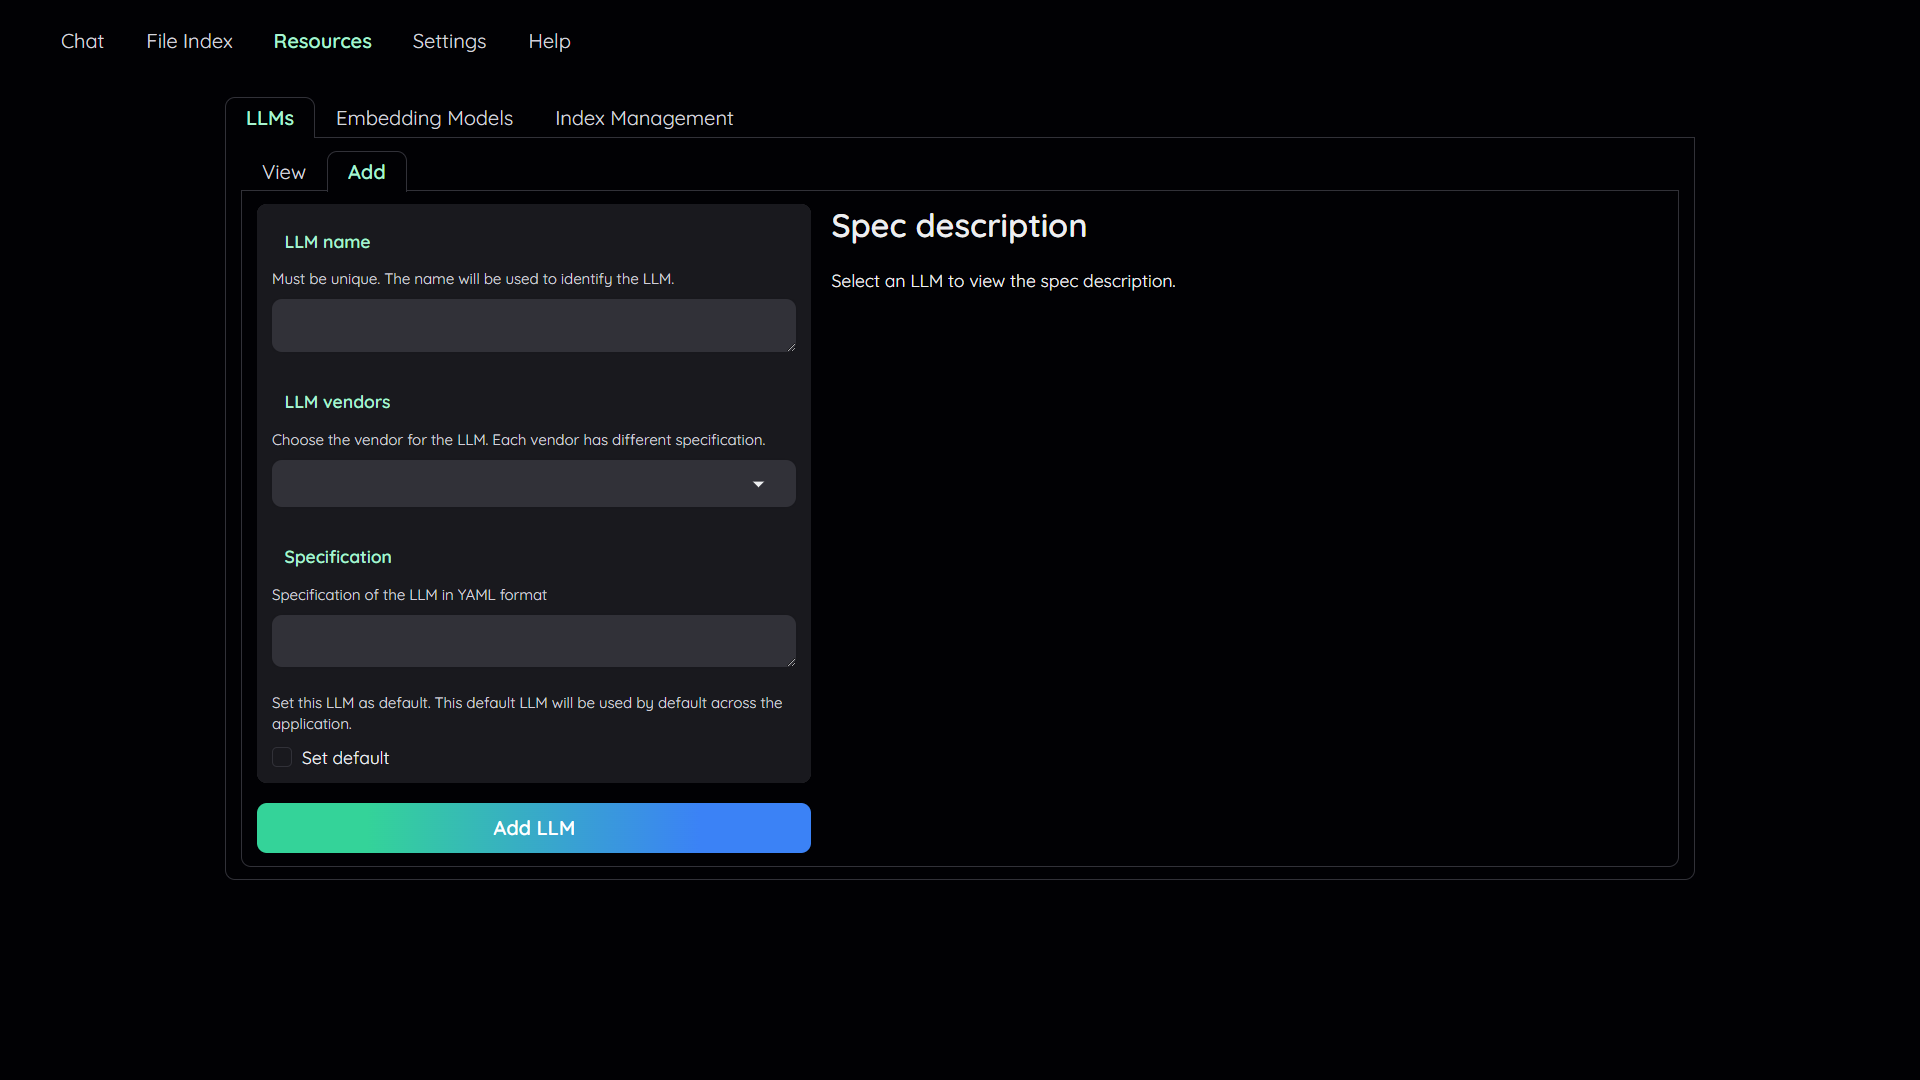
| ## 1. Add your AI models | |
|  | |
| - The tool uses Large Language Model (LLMs) to perform various tasks in a QA pipeline. | |
| So, you need to provide the application with access to the LLMs you want | |
| to use. | |
| - You only need to provide at least one. However, tt is recommended that you include all the LLMs | |
| that you have access to, you will be able to switch between them while using the | |
| application. | |
| To add a model: | |
| 1. Navigate to the `Resources` tab. | |
| 2. Select the `LLMs` sub-tab. | |
| 3. Select the `Add` sub-tab. | |
| 4. Config the model to add: | |
| - Give it a name. | |
| - Pick a vendor/provider (e.g. `ChatOpenAI`). | |
| - Provide the specifications. | |
| - (Optional) Set the model as default. | |
| 5. Click `Add` to add the model. | |
| 6. Select `Embedding Models` sub-tab and repeat the step 3 to 5 to add an embedding model. | |
| <details markdown> | |
| <summary>(Optional) Configure model via the .env file</summary> | |
| Alternatively, you can configure the models via the `.env` file with the information needed to connect to the LLMs. This file is located in | |
| the folder of the application. If you don't see it, you can create one. | |
| Currently, the following providers are supported: | |
| ### OpenAI | |
| In the `.env` file, set the `OPENAI_API_KEY` variable with your OpenAI API key in order | |
| to enable access to OpenAI's models. There are other variables that can be modified, | |
| please feel free to edit them to fit your case. Otherwise, the default parameter should | |
| work for most people. | |
| ```shell | |
| OPENAI_API_BASE=https://api.openai.com/v1 | |
| OPENAI_API_KEY=<your OpenAI API key here> | |
| OPENAI_CHAT_MODEL=gpt-3.5-turbo | |
| OPENAI_EMBEDDINGS_MODEL=text-embedding-ada-002 | |
| ``` | |
| ### Azure OpenAI | |
| For OpenAI models via Azure platform, you need to provide your Azure endpoint and API | |
| key. Your might also need to provide your developments' name for the chat model and the | |
| embedding model depending on how you set up Azure development. | |
| ```shell | |
| AZURE_OPENAI_ENDPOINT= | |
| AZURE_OPENAI_API_KEY= | |
| OPENAI_API_VERSION=2024-02-15-preview # could be different for you | |
| AZURE_OPENAI_CHAT_DEPLOYMENT=gpt-35-turbo # change to your deployment name | |
| AZURE_OPENAI_EMBEDDINGS_DEPLOYMENT=text-embedding-ada-002 # change to your deployment name | |
| ``` | |
| ### Local models | |
| Pros: | |
| - Privacy. Your documents will be stored and process locally. | |
| - Choices. There are a wide range of LLMs in terms of size, domain, language to choose | |
| from. | |
| - Cost. It's free. | |
| Cons: | |
| - Quality. Local models are much smaller and thus have lower generative quality than | |
| paid APIs. | |
| - Speed. Local models are deployed using your machine so the processing speed is | |
| limited by your hardware. | |
| #### Find and download a LLM | |
| You can search and download a LLM to be ran locally from the [Hugging Face | |
| Hub](https://huggingface.co/models). Currently, these model formats are supported: | |
| - GGUF | |
| You should choose a model whose size is less than your device's memory and should leave | |
| about 2 GB. For example, if you have 16 GB of RAM in total, of which 12 GB is available, | |
| then you should choose a model that take up at most 10 GB of RAM. Bigger models tend to | |
| give better generation but also take more processing time. | |
| Here are some recommendations and their size in memory: | |
| - [Qwen1.5-1.8B-Chat-GGUF](https://huggingface.co/Qwen/Qwen1.5-1.8B-Chat-GGUF/resolve/main/qwen1_5-1_8b-chat-q8_0.gguf?download=true): | |
| around 2 GB | |
| #### Enable local models | |
| To add a local model to the model pool, set the `LOCAL_MODEL` variable in the `.env` | |
| file to the path of the model file. | |
| ```shell | |
| LOCAL_MODEL=<full path to your model file> | |
| ``` | |
| Here is how to get the full path of your model file: | |
| - On Windows 11: right click the file and select `Copy as Path`. | |
| </details> | |
| ## 2. Upload your documents | |
|  | |
| In order to do QA on your documents, you need to upload them to the application first. | |
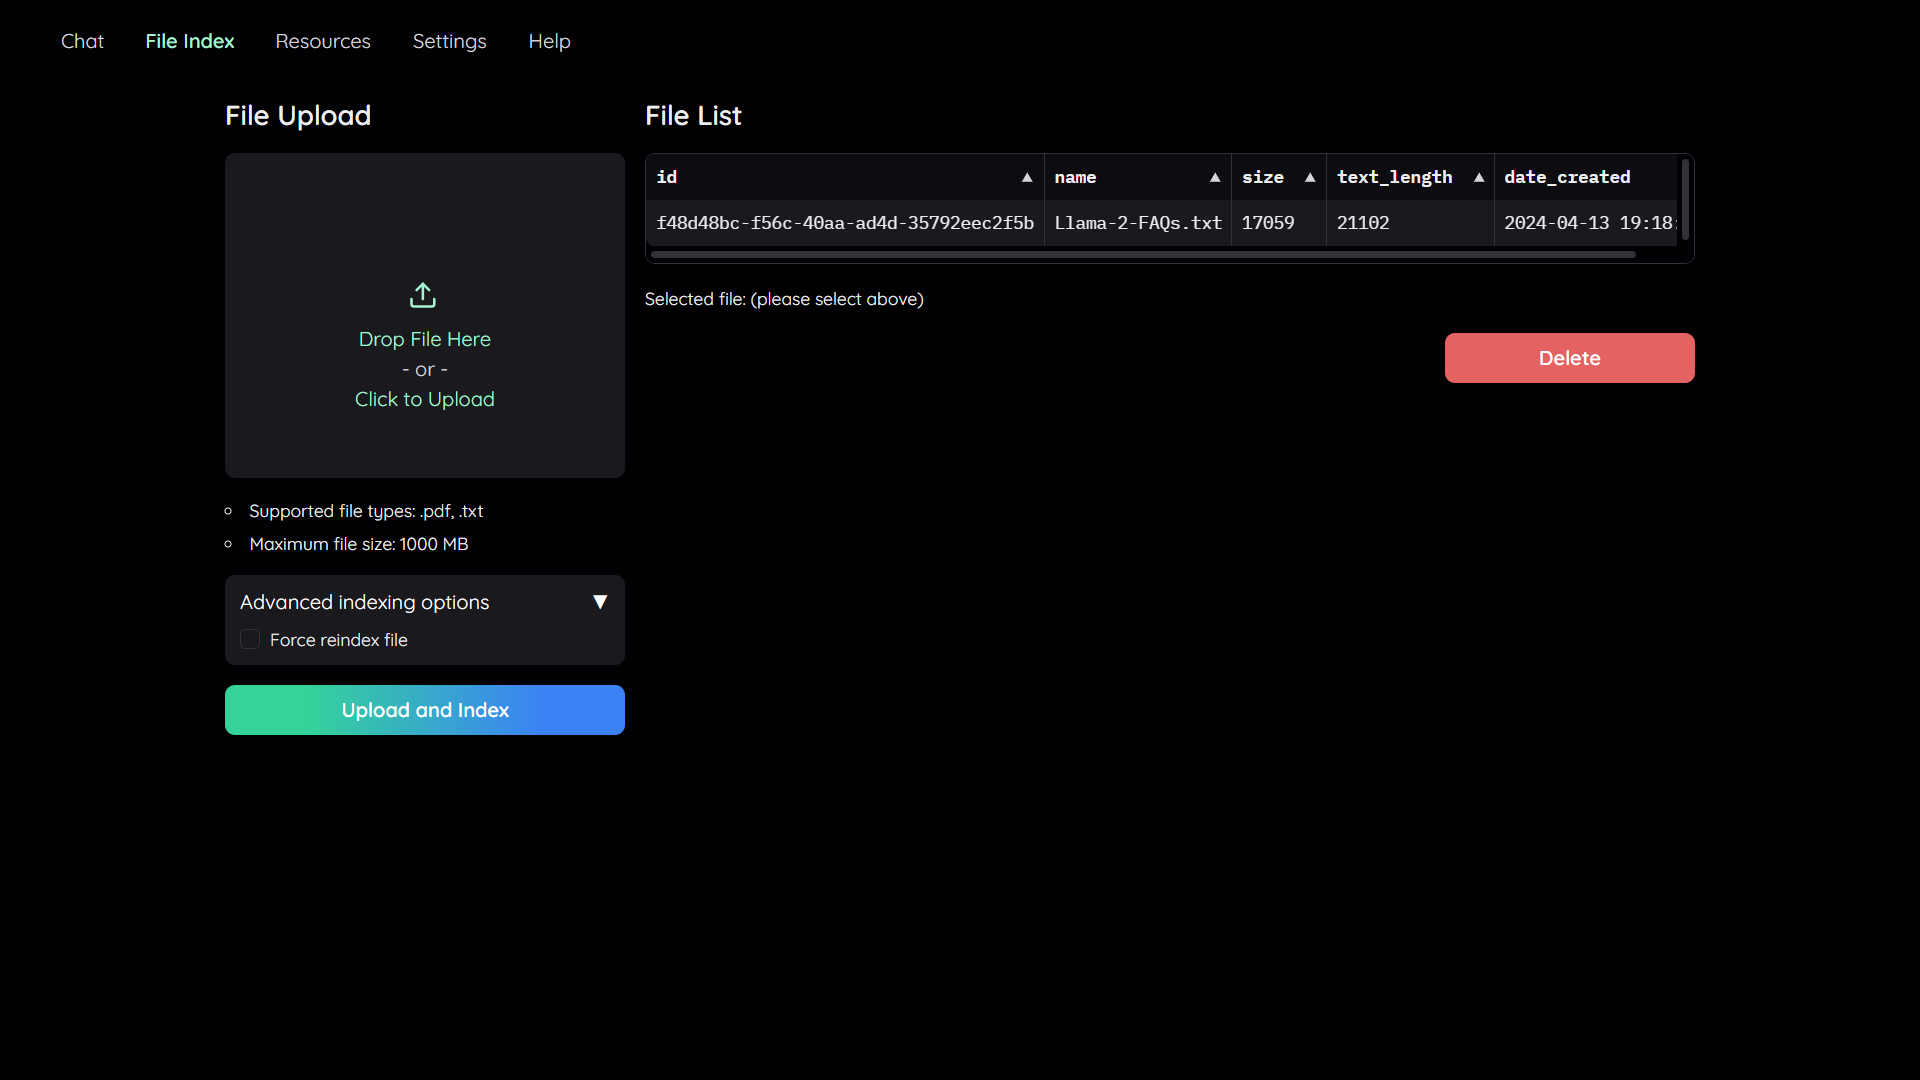
| Navigate to the `File Index` tab and you will see 2 sections: | |
| 1. File upload: | |
| - Drag and drop your file to the UI or select it from your file system. | |
| Then click `Upload and Index`. | |
| - The application will take some time to process the file and show a message once it is done. | |
| 2. File list: | |
| - This section shows the list of files that have been uploaded to the application and allows users to delete them. | |
| ## 3. Chat with your documents | |
|  | |
| Now navigate back to the `Chat` tab. The chat tab is divided into 3 regions: | |
| 1. Conversation Settings Panel | |
| - Here you can select, create, rename, and delete conversations. | |
| - By default, a new conversation is created automatically if no conversation is selected. | |
| - Below that you have the file index, where you can choose whether to disable, select all files, or select which files to retrieve references from. | |
| - If you choose "Disabled", no files will be considered as context during chat. | |
| - If you choose "Search All", all files will be considered during chat. | |
| - If you choose "Select", a dropdown will appear for you to select the | |
| files to be considered during chat. If no files are selected, then no | |
| files will be considered during chat. | |
| 2. Chat Panel | |
| - This is where you can chat with the chatbot. | |
| 3. Information Panel | |
| 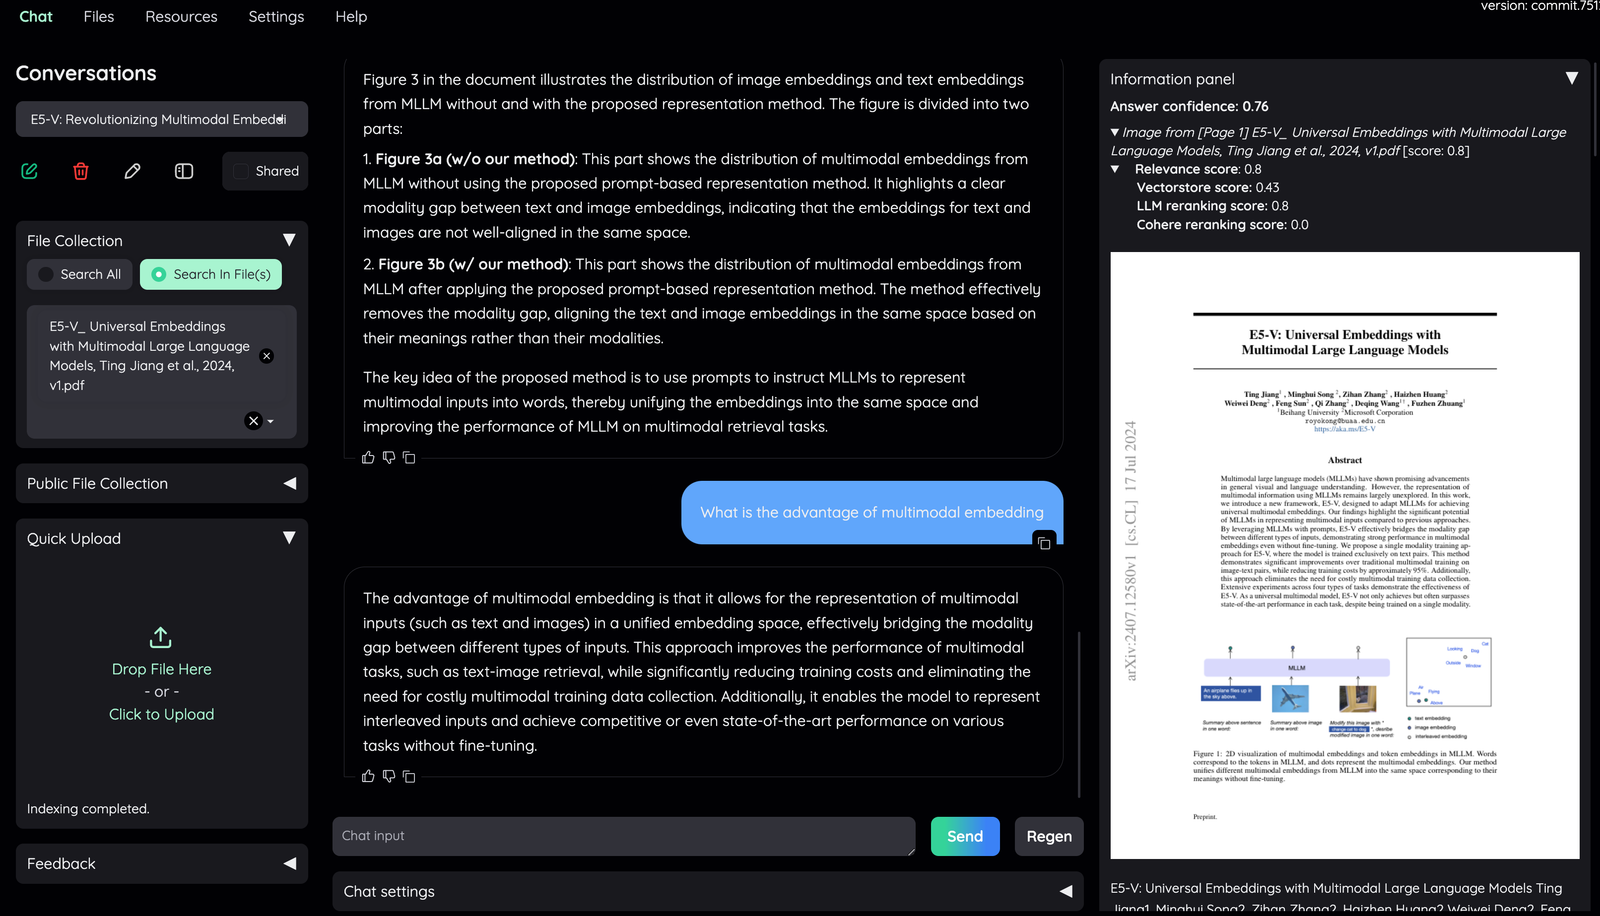 | |
| - Supporting information such as the retrieved evidence and reference will be | |
| displayed here. | |
| - Direct citation for the answer produced by the LLM is highlighted. | |
| - The confidence score of the answer and relevant scores of evidences are displayed to quickly assess the quality of the answer and retrieved content. | |
| - Meaning of the score displayed: | |
| - **Answer confidence**: answer confidence level from the LLM model. | |
| - **Relevance score**: overall relevant score between evidence and user question. | |
| - **Vectorstore score**: relevant score from vector embedding similarity calculation (show `full-text search` if retrieved from full-text search DB). | |
| - **LLM relevant score**: relevant score from LLM model (which judge relevancy between question and evidence using specific prompt). | |
| - **Reranking score**: relevant score from Cohere [reranking model](https://cohere.com/rerank). | |
| Generally, the score quality is `LLM relevant score` > `Reranking score` > `Vectorscore`. | |
| By default, overall relevance score is taken directly from LLM relevant score. Evidences are sorted based on their overall relevance score and whether they have citation or not. | |